Easy Velvet Teddy Bear Crochet Pattern: Step-by-Step Guide for a Super Soft Plushie
Easy Velvet Teddy Bear Crochet Pattern: A Cozy Step-by-Step Tutorial
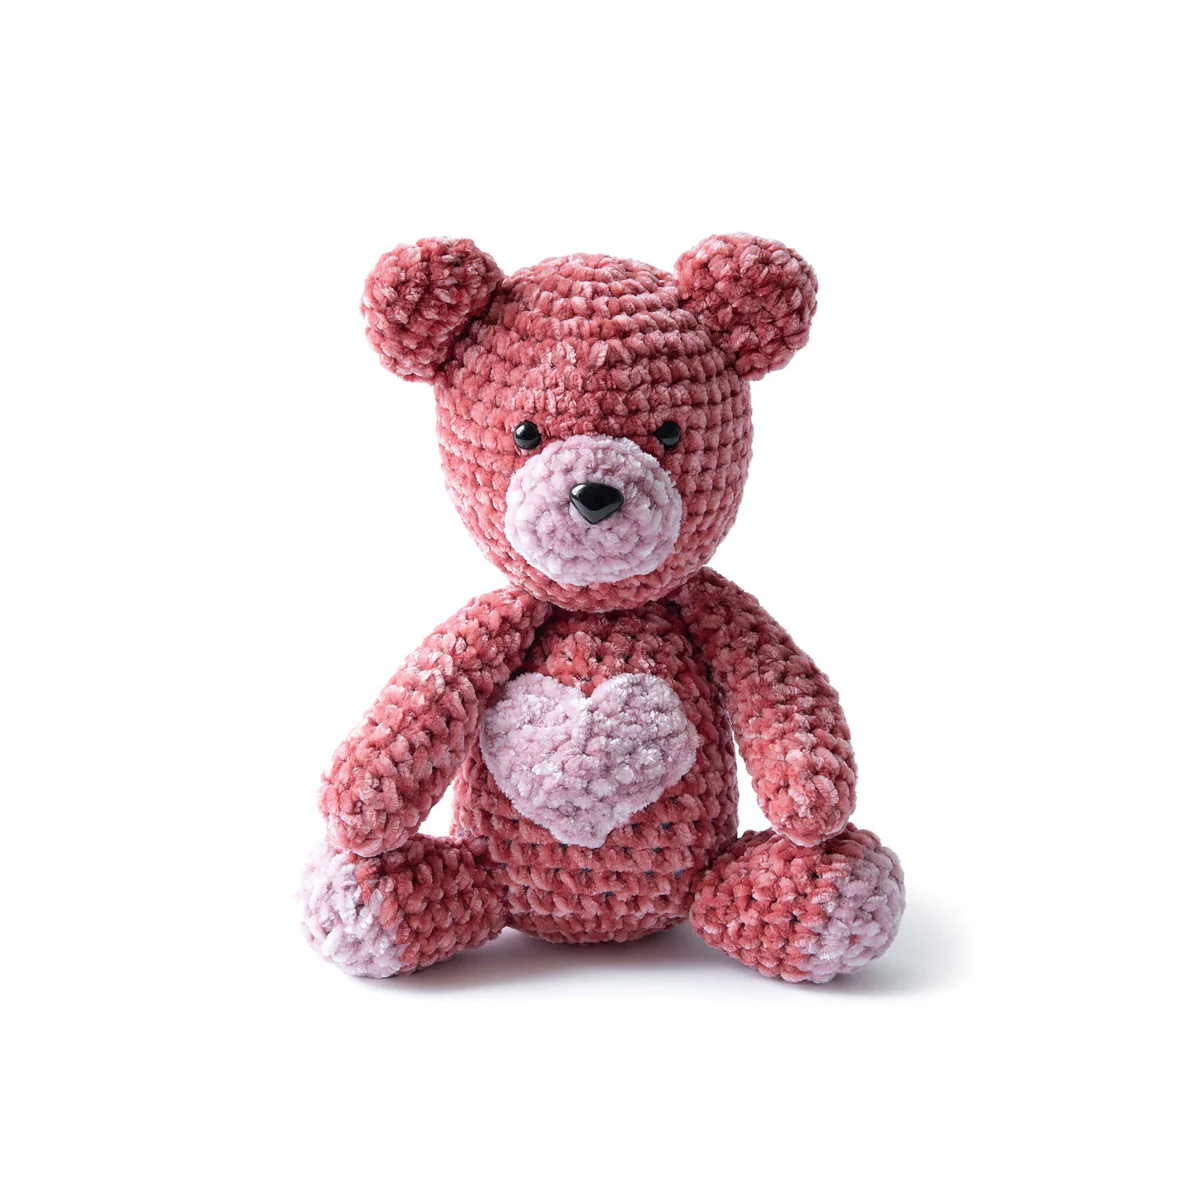
There is nothing quite as comforting as a plush, oversized teddy bear. Whether you are looking for the perfect Valentine’s Day gift, a nursery addition, or a cozy companion for yourself, this velvet crochet bear is the ideal project. Using luxurious chenille-style yarn, this bear is incredibly soft to the touch and has a professional, store-bought look that is surprisingly easy to achieve.
This pattern is designed for beginners and intermediate crocheters alike. The magic of this project lies in the yarn; velvet yarn works up quickly and hides small mistakes, making it a stress-free experience. In this tutorial, we will walk you through every step, from the magic loop to the final assembly, ensuring you create a cuddly friend that lasts for years.
Materials & Abbreviations
To get started, gather the following materials. Using a velvet or chenille yarn is essential for that signature “plushie” feel.
Supplies Needed
- Yarn: Velvet-style yarn (Medium weight/Size 4). You will need approximately one ball of Main Color (MC) in a rose or terracotta shade and one ball of Contrast Color (A) in a soft pink.
- Crochet Hook: US size H/8 (5 mm) hook, or a size that allows you to maintain a tight tension so the stuffing doesn’t peek through.
- Safety Eyes: 9mm plastic safety eyes.
- Safety Nose: One black plastic safety nose.
- Stuffing: High-quality polyester fiberfill.
- Tools: Tapestry needle, stitch markers, and scissors.
Abbreviations (US Terms)
- Approx: Approximately
- Ch: Chain
- Sc: Single crochet
- Hdc: Half double crochet
- Dc: Double crochet
- Sc2tog: Single crochet two together (decrease)
- Sl st: Slip stitch
- Rnd: Round
- Rep: Repeat
- MC: Main Color
- A: Contrast Color
- RS/WS: Right Side / Wrong Side
Gauge: 12 sc and 12 rows = 4 inches. If your stitches are too loose, try a smaller hook.
Step-by-Step Instructions
The Body
Using the Main Color (MC), start with a magic loop. This ensures there is no hole at the bottom of your bear.
- Round 1: Ch 1. Work 10 sc into the magic loop. Join with a sl st to the first sc.
- Round 2: Ch 1. Work 2 sc in each stitch around. Join with a sl st. (20 sc)
- Round 3: Ch 1. Work 1 sc in each stitch around. Join with a sl st.
- Round 4: Ch 1. 2 sc in the first sc. *1 sc in the next sc, 2 sc in the next sc. Repeat from * until the last stitch. 1 sc in the last stitch. Join with a sl st. (30 sc)
- Rounds 5–11: Ch 1. Work 1 sc in each stitch around. Join with a sl st.
- Round 12: Ch 1. *Sc2tog, 1 sc in each of the next 4 sc. Repeat from * around. Join with a sl st. (25 sc)
- Round 13: Ch 1. Work 1 sc in each stitch around. Join with a sl st.
- Round 14: Ch 1. *Sc2tog, 1 sc in each of the next 3 sc. Repeat from * around. Join with a sl st. (20 sc)
- Round 15: Ch 1. Work 1 sc in each stitch around. Join with a sl st.
- Round 16: Ch 1. *Sc2tog, 1 sc in each of the next 2 sc. Repeat from * around. Join with a sl st. (15 sc)
- Rounds 17–19: Ch 1. Work 1 sc in each stitch around. Join with a sl st.
Fasten off, leaving a long tail for sewing. Stuff the body firmly, but leave the top open for the head attachment.
The Head
Using MC, start with a magic loop.
- Round 1: Ch 1. 8 sc in magic loop. Join with a sl st.
- Round 2: Ch 1. 2 sc in each sc around. Join with a sl st. (16 sc)
- Round 3: Ch 1. 2 sc in first sc. *1 sc in next, 2 sc in next. Repeat from * to last st. 1 sc in last sc. Join with a sl st. (24 sc)
- Round 4: Ch 1. 2 sc in first sc. *1 sc in each of next 2 sc, 2 sc in next sc. Repeat from * to last st. 1 sc in last sc. Join with a sl st. (32 sc)
- Round 5: Ch 1. 2 sc in first sc. *1 sc in each of next 3 sc, 2 sc in next sc. Repeat from * to last st. 1 sc in last sc. Join with a sl st. (40 sc)
- Rounds 6–13: Ch 1. 1 sc in each st around. Join with a sl st.
- Round 14: Ch 1. *Sc2tog, 1 sc in each of next 3 sc. Repeat from * around. Join with a sl st. (32 sc)
- Round 15: Repeat Round 6.
- Round 16: Ch 1. *Sc2tog, 1 sc in each of next 2 sc. Repeat from * around. Join with a sl st. (24 sc)
- Round 17: Repeat Round 6.
- Round 18: Ch 1. *Sc2tog, 1 sc in next sc. Repeat from * around. Join with a sl st. (16 sc)
- Round 19: Repeat Round 6.
Note: Before continuing, sew on the snout and attach the safety eyes. Stuff the head lightly as you work.
- Round 20: Ch 1. *Sc2tog, 1 sc in each of next 2 sc. Repeat from * around. Join with a sl st. (12 sc)
- Round 21: Ch 1. *Sc2tog around. Join with a sl st.
Fasten off, leaving a long end. Weave the end through the remaining stitches and pull tight to close.
The Snout
Using Contrast Color (A), chain 5.
- Round 1: 1 sc in 2nd ch from hook. 1 sc in each of next 2 ch. 2 sc in next ch. Working into the opposite side of the chain, 1 sc in each of the next 3 ch. 2 sc in the last ch. Join with a sl st. (10 sc)
- Round 2: Ch 1. 2 sc in each sc around. Join with a sl st. (20 sc)
- Round 3: Ch 1. 1 sc in each sc around. Join with a sl st.
Fasten off, leaving a tail. Attach the safety nose before sewing the snout to the head.
The Arms (Make 2)
Using MC, start with a magic loop. For the arms, work in continuous rounds (do not join with a slip stitch).
- Round 1: Ch 1. 10 sc in magic loop.
- Rounds 2–7: 1 sc in each sc around.
- Round 8: (Sc2tog, 1 sc in each of the next 3 sc) twice.
- Rounds 9–14: Repeat Rounds 2–7.
Fasten off and stuff.
The Ears (Make 2)
Using MC, start with a magic loop.
- Round 1: Ch 1. 5 sc in magic loop. Join with a sl st.
- Round 2: Ch 1. 2 sc in each sc around. Join with a sl st. (10 sc)
- Round 3: Ch 1. 2 sc in next sc. *1 sc in next, 2 sc in next. Repeat from * to last sc. 1 sc in last sc. Join with a sl st. (15 sc)
- Round 4: Ch 1. 1 sc in each sc around. Join with a sl st.
- Round 5: Ch 1. *Sc2tog, 1 sc in next sc. Repeat from * around. Join with a sl st. (10 sc)
Fasten off, leaving a tail for sewing.
The Feet (Make 2)
Using Contrast Color (A), start with a magic loop.
- Round 1: Ch 1. 6 sc in magic loop. Join with a sl st.
- Round 2: Ch 2. 2 dc in each of first 2 sts. 2 hdc in next st. 2 sc in each of next 2 sts. 2 hdc in last st. Join with a sl st. (12 sts)
- Round 3: Ch 1. 2 sc in first st. *1 sc in next, 2 sc in next. Repeat from * to last st. 1 sc in last sc. Join with a sl st. (18 sc)
- Rounds 4–5: Ch 1. 1 sc in each sc around. Join with a sl st.
- Round 6: Ch 1. (Sc2tog) 4 times. 1 sc in each of next 10 sts. Join with a sl st. (14 sc)
- Round 7: Ch 1. (Sc2tog) twice. 1 sc in each of next 10 sts. Join with a sl st. (12 sc)
- Rounds 8–9: Repeat Rounds 4–5.
Fasten off. Change to MC and sew to the body.
The Tail
Using MC, start with a magic loop.
- Round 1: Ch 1. 6 sc in magic loop. Join with a sl st.
- Round 2: Ch 1. 2 sc in each sc around. Join with a sl st. (12 sc)
- Round 3: Ch 1. 1 sc in each sc around. Join with a sl st.
- Round 4: Ch 1. *Sc2tog, 1 sc in next sc. Repeat from * around. Join with a sl st. (8 sc)
Fasten off, stuff lightly, and sew to the back of the body.
The Heart Detail
Using Contrast Color (A), chain 7.
- Row 1: 1 sc in 2nd ch from hook. 1 sc in each ch to end. 6 sc. Turn.
- Rows 2–3: Ch 1. 1 sc in each sc across. Turn.
- Rows 4–6: Ch 1. 1 sc in each of the first 3 sts. Turn.
- Row 7: Ch 1. 1 sc in each of the first 3 sts. Do not turn.
- Final Round: Work 1 round of sc evenly around the entire perimeter of the heart, placing (sc, ch 1, sc) into the bottom corner where the slip knot is located. Join with a sl st to the first sc of Row 7.
Fasten off and sew to the bear’s chest.
Finishing
Now it is time to assemble your teddy bear! Using your tapestry needle and the long tails left from your pieces, sew the head to the body. Ensure the head is centered and secure. Attach the ears to the top of the head and the arms to the sides of the body. Finally, sew the feet to the bottom of the body so the bear can sit upright.
Trim any remaining yarn tails and weave them into the stuffing for a clean, seamless finish.
Tips for Success
Working with velvet yarn can be a bit different than working with standard acrylic or cotton. Here are a few tips to make your process smoother:
- Find the Center: Because the “fuzz” of velvet yarn hides the stitch definition, it can be hard to find where to insert your hook. Use your fingers to feel for the gap between stitches rather than relying solely on your eyes.
- Use Stitch Markers: Since you are working in rounds, it is very easy to lose your place. Always place a stitch marker in the first stitch of every round.
- Tension Control: Don’t pull your stitches too tight, or you’ll struggle to insert the hook on the next round. However, keep them tight enough so that the white fiberfill stuffing doesn’t show through the gaps.
- Counting is Key: Since the stitches are less visible, count your stitches at the end of every round to ensure you haven’t accidentally added or dropped one.