Adorable Crochet Sheep Pattern: Free Step-by-Step Amigurumi Tutorial
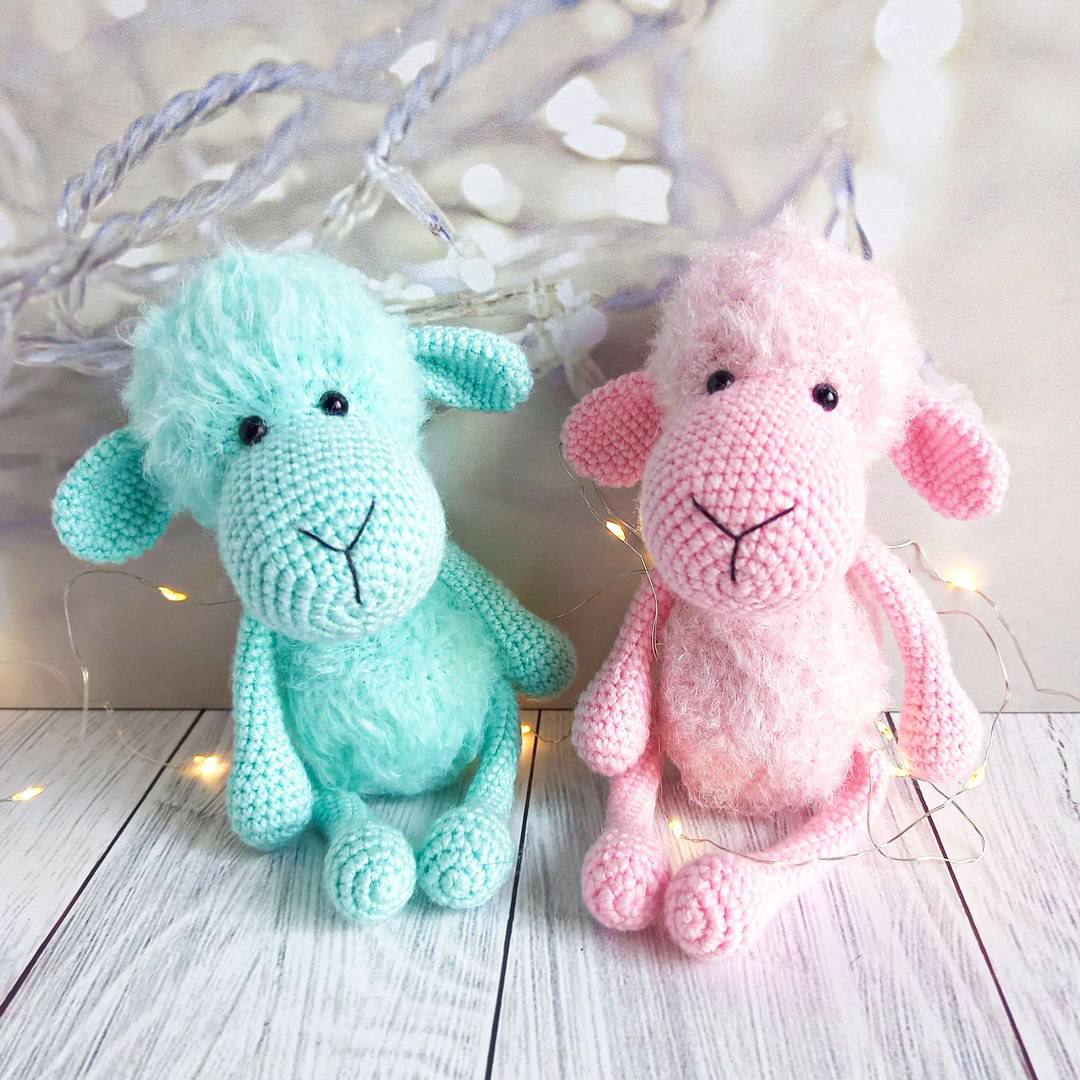
There is nothing quite as cozy as a little handmade sheep! This amigurumi project is perfect for anyone looking to create a soft, huggable companion. What makes this sheep special is the contrast in textures—we use a smooth yarn for the face and paws and a fluffy, textured yarn for the body and head to mimic real wool. Whether you are making this as a gift for a newborn or adding to your own plushie collection, this detailed guide will walk you through every stitch.
This pattern is designed for intermediate beginners. If you know the basics of crochet and how to work in a spiral, you are ready to go! The finished sheep stands approximately 7 to 8 inches tall, depending on your tension and the specific yarn you choose.
Materials & Abbreviations
To get that professional “store-bought” look, choosing the right yarn is key. You will need two different types of yarn in the same or coordinating colors.
Yarn and Tools
- Smooth Yarn: A cotton blend or acrylic (like YarnArt Jeans or Alize Cotton Gold) for the muzzle, legs, and arms.
- Textured Yarn: A fluffy, bouclé, or chenille-style yarn (like Alize Softy) for the head and body.
- Crochet Hooks: A 1.75mm hook for the smooth yarn and a 2.0mm to 2.5mm hook for the textured yarn.
- Safety Eyes: 6mm safety eyes (or black beads/embroidery thread if making this for a very small child).
- Stuffing: High-quality polyester fiberfill.
- Embroidery Thread: Black thread for stitching the nose and mouth.
- Other Essentials: A yarn needle, stitch markers, and scissors.
US Crochet Terms
This pattern uses standard US terminology. All rounds are worked in a continuous spiral unless otherwise noted. Please use a stitch marker to keep track of the start of each round.
- MR: Magic Ring
- sc: Single crochet
- inc: Increase (two single crochets in one stitch)
- dec: Decrease (invisible decrease recommended)
- ch: Chain
- hdc: Half double crochet
- (…)*X: Repeat the instructions inside the parentheses X times
- Stitch count: The number at the end of the round indicates the total stitches for that round.
Step-by-Step Instructions
The Arms and Legs (Make 4)
These are worked using the smooth yarn. You will make two slightly longer pieces for the legs and two shorter pieces for the arms.
- Round 1: 6 sc in MR (6)
- Round 2: 6 inc (12)
- Round 3: (1 sc, inc)*6 (18)
- Rounds 4-6: 18 sc (18)
- Round 7: (1 sc, dec)*6 (12)
- Round 8: 12 sc (12)
- Round 9: (2 sc, dec)*3 (9)
For the Arms: Work Rounds 10-23 as 9 sc per round. Stop at Round 23.
For the Legs: Work Rounds 10-27 as 9 sc per round. Stop at Round 27.
Finishing the limbs: Fold the piece in half and crochet 4 sc across the opening to close the end. Stuff only the bottom paw area lightly; leave the upper part unstuffed so the limbs can bend naturally.
The Ears (Make 2)
Worked with smooth yarn.
- Round 1: 6 sc in MR (6)
- Round 2: 6 inc (12)
- Round 3: (1 sc, inc)*6 (18)
- Rounds 4-10: 18 sc (18)
- Round 11: (1 sc, dec)*6 (12)
Fold the ear in half and sc 6 across to close. To give the ear a more realistic shape, fold it in half once more and use a needle to tack it into place.
The Head
The head is worked in one piece, starting with the smooth muzzle and transitioning into the fluffy wool.
The Muzzle (Smooth Yarn)
Stuff the muzzle as you go.
- Round 1: 6 sc in MR (6)
- Round 2: 6 inc (12)
- Round 3: (1 sc, inc)*6 (18)
- Round 4: (2 sc, inc)*6 (24)
- Round 5: (3 sc, inc)*6 (30)
- Round 6: (4 sc, inc)*6 (36)
- Round 7: (5 sc, inc)*6 (42)
- Rounds 8-14: 42 sc (42)
- Round 15: (5 sc, dec)*6 (36)
- Round 16: 36 sc (36)
- Round 17: (4 sc, dec)*6 (30)
The Fluffy Part (Textured Yarn)
Switch to your larger hook and fluffy yarn here.
Safety Eye Placement: Place the eyes between Round 17 and Round 18. Leave 4 to 6 sc between the eyes. Note that the increases in the next round will form the forehead.
- Round 18: 12 sc, 6 inc, 12 sc (36)
- Round 19: (5 sc, inc)*6 (42)
- Rounds 20-29: 42 sc (42)
- Round 30: (5 sc, dec)*6 (36)
- Round 31: (4 sc, dec)*6 (30)
- Round 32: (3 sc, dec)*6 (24)
- Round 33: (2 sc, dec)*6 (18)
- Round 34: (1 sc, dec)*6 (12)
- Round 35: 6 dec.
Fasten off and weave in the ends.
The Body
Worked entirely with the textured fluffy yarn. Stuff as you progress.
- Round 1: 6 sc in MR (6)
- Round 2: 6 inc (12)
- Round 3: (1 sc, inc)*6 (18)
- Round 4: (2 sc, inc)*6 (24)
- Round 5: (3 sc, inc)*6 (30)
- Round 6: (4 sc, inc)*6 (36)
- Round 7: (5 sc, inc)*6 (42)
- Rounds 8-15: 42 sc (42)
Attaching the Legs
In Round 8 (or Round 9), you will join the legs to the body. For each leg, crochet 4 sc together with the top of the leg. Space the legs so there are 17 sc between them.
- Round 16: (5 sc, dec)*6 (36)
- Round 17: 36 sc (36)
- Round 18: (4 sc, dec)*6 (30)
- Round 19: 30 sc (30)
- Round 20: (3 sc, dec)*6 (24)
- Round 21: 24 sc (24)
- Round 22: (2 sc, dec)*6 (18)
- Rounds 23-24: 18 sc (18)
Attaching the Arms
In Round 24, join the arms parallel to the legs. Crochet 4 sc together with each arm, leaving 5 sc between the arm and the leg. Finish by working Rounds 25-27 as 18 sc. Fasten off at the center back and leave a long tail for sewing the head.
Finishing
Now comes the magic—assembling your sheep!
- The Head: Sew the head to the body. To give the sheep a cute, curious look, sew the head slightly tilted forward.
- The Ears: Sew the ears to the sides of the head. Ensure they are not placed higher than the eye level.
- The Face: Use your black embroidery thread to stitch a small “Y” shape on the muzzle for the nose and mouth.
- The Tail: Attach your yarn to the center back of the body. Chain 7 or 8, then work hdc back down the chain. Fasten off and hide the yarn inside the body.
Tips for a Professional Look
Want to take your crochet sheep to the next level? Here are a few pro tips:
- Extra Fluff: If your textured yarn isn’t fluffy enough, you can gently brush the head and body with a clean pet slicker brush or a fine-tooth comb. This creates a “cloud-like” effect.
- Invisible Decreases: To avoid gaps in your work, always use the invisible decrease method (crochet into the front loops only of the next two stitches).
- Customization: Feel free to dress up your sheep! A small crochet ribbon, a tiny scarf, or a flower crown can add a personalized touch.
- Yarn Choices: If you can’t find bouclé yarn, a chunky velvet yarn also works beautifully for the body, though it may change the final size slightly.