Adorable Crochet Sheep Bag Pattern: A Beginner-Friendly Tutorial
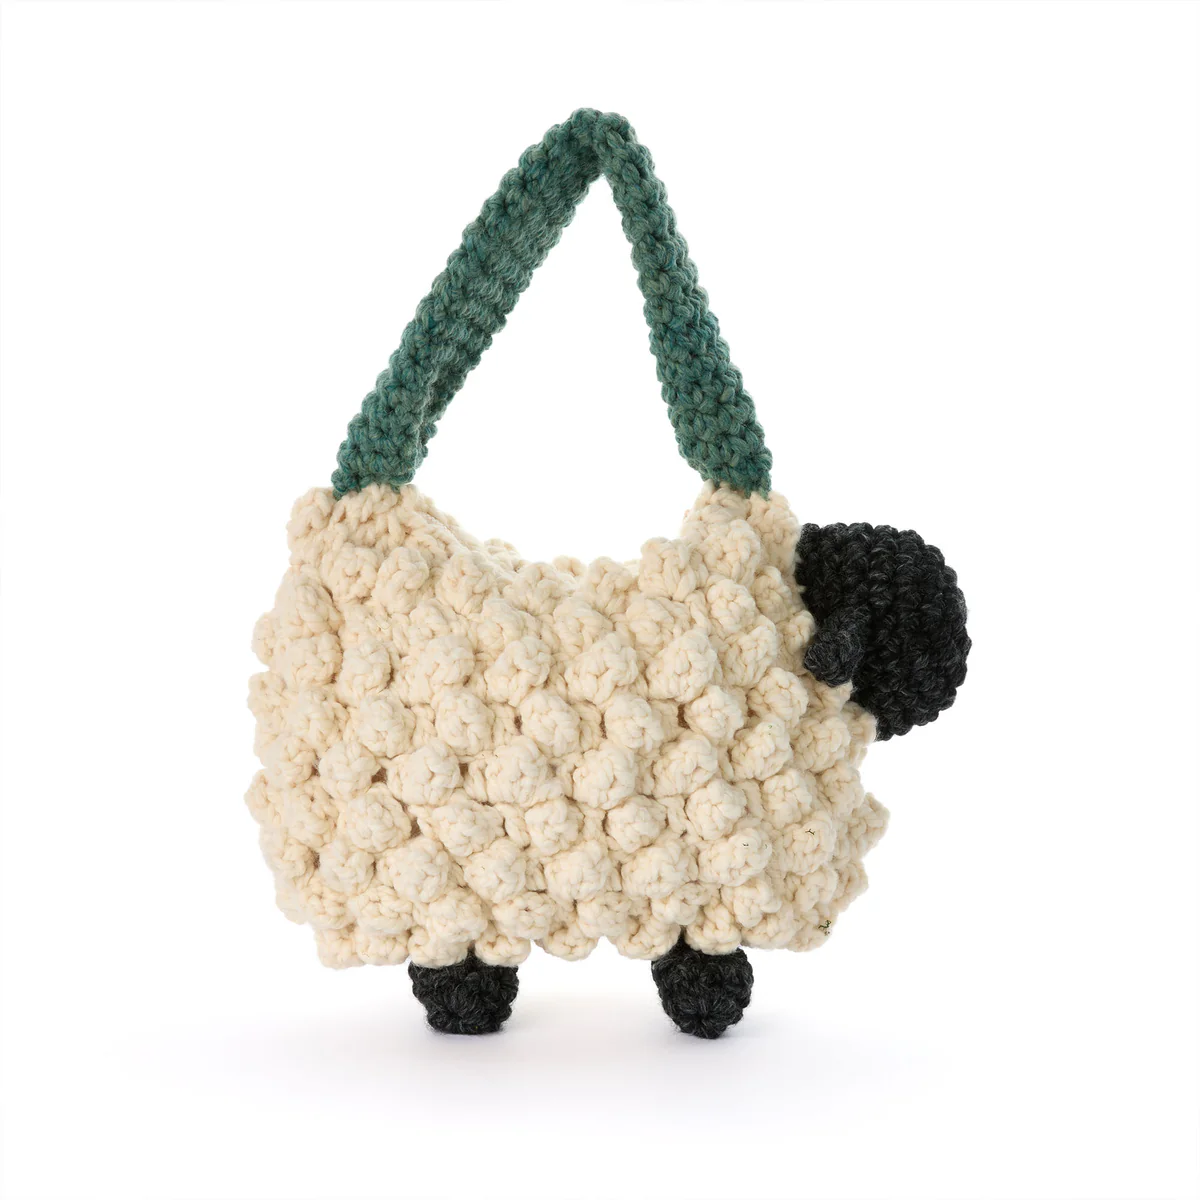
Looking for a project that combines cuteness with practicality? This crochet sheep bag is the perfect addition to your handmade collection. With its fluffy, textured body and sweet little face, this bag is sure to turn heads wherever you go. Whether you are looking for a unique gift or a fun afternoon project, this pattern is designed to be accessible for beginners while introducing a few fun techniques like the popcorn stitch.
The result is a charming, tactile accessory that measures approximately 9 inches wide and 8 inches tall. Because we are using super bulky yarn, this project works up quickly, giving you that instant gratification every crafter loves. Let’s dive into the details and start creating your own woolly companion!
Materials & Abbreviations
To get started, gather your materials. To achieve the look in the photos, we recommend a super bulky weight yarn, but you can experiment with different colors to make your sheep unique.
Supplies Needed
- Super Bulky Yarn (Weight 6):
- Color A (Main Body): Approx. 200 yards
- Color B (Head, Legs, and Ears): Approx. 30 yards
- Color C (Strap): Approx. 50 yards
- Crochet Hook: Size M/N/13 (9 mm) or the size needed to obtain gauge.
- Notions: Yarn needle, 9-inch sport closed-end zipper (Natural color suggested), Polyfil stuffing, all-purpose sewing thread, and a sewing needle.
Gauge and Measurements
Gauge: 7 single crochet (sc) and 8 rows = 4 inches.
Finished Size: Approx. 9″ wide x 8″ tall (excluding the head, tail, and legs).
Abbreviations (US Terms)
- Approx: Approximately
- Beg: Beginning
- Ch: Chain
- Dc: Double crochet
- Dc2tog: Double crochet two together (Yarn over and draw up a loop in next stitch; yarn over and draw through 2 loops on hook twice. Yarn over and draw through all 3 loops on hook).
- Dec: Decrease
- Popcorn: Work 4 dc into the same stitch or space. Drop the loop from your hook. Insert the hook from front to back into the first dc of the 4-dc group. Pull the dropped loop through the stitch. Chain 1 to secure the popcorn.
- Rep: Repeat
- Rnd: Round
- RS: Right side
- Sc: Single crochet
- Sl st: Slip stitch
- St(s): Stitch(es)
- Sp(s): Space(s)
- Yoh: Yarn over hook
Step-by-Step Instructions
General Notes: When working in rounds, join with a slip stitch to the first stitch or the top of the starting chain. A starting chain of 3 counts as a double crochet (dc) at the beginning of a round or row.
The Body
The body is worked in a textured pattern to mimic sheep’s wool. We will use Color A for this section.
Round 1 (RS): Chain 11. Work 2 dc in the 4th chain from the hook. Work 1 dc in each of the next 6 chains. Work 6 dc in the last chain. Now, working along the opposite side of the foundation chain, work 1 dc in each of the next 6 chains and 3 dc in the last chain. Join with a slip stitch to the first stitch. Turn. (24 dc)
Round 2 (WS): Chain 3. Work a Popcorn stitch in the first dc. (1 dc, Popcorn) in each of the next 3 dc. (1 dc in next dc, Popcorn in next dc) 3 times. (1 dc, Popcorn) in each of the next 6 dc. (1 dc in next dc, Popcorn in next dc) 3 times. (1 dc, Popcorn) in each of the last 2 dc. Join. Turn. (36 sts)
Round 3 (RS): Chain 2 (this does not count as a stitch). Work a Popcorn stitch in the same space as the slip stitch. *Work 1 dc in the next stitch, then a Popcorn in the next stitch. Repeat from * to the last stitch. Work 1 dc in the last stitch. Join. Turn.
Row 4 (WS): Chain 3. *Work a Popcorn in the next stitch, followed by 1 dc in the next stitch. Repeat from * to the last stitch. Work a Popcorn in the last stitch. Do not join. Turn.
Repeating the Pattern: Repeat Row 4 until the body measures approximately 8 inches from the beginning.
Closing the Body:
Next Round: Chain 3. *Work a Popcorn in the next stitch, followed by 1 dc in the next stitch. Repeat from * to the last stitch. Work a Popcorn in the last stitch. Join. Turn.
Final Round: Chain 2. Work 1 dc in the next stitch (this counts as the first dc2tog). Work (dc2tog) twice. Work 1 dc in each of the next 6 stitches. Work (dc2tog) 6 times. Work 1 dc in each of the next 6 stitches. Work (dc2tog) 3 times. Join. (24 sts)
Fasten off. Lay the body flat to prepare for the zipper.
The Head
Switch to Color B for the head, which is worked in a spiral to create a sphere.
Round 1: Chain 2. Work 6 sc in the 2nd chain from the hook. Join. (6 sc)
Round 2: Chain 1. Work 2 sc in each sc around. Join. (12 sc)
Round 3: Chain 1. *Work 1 sc in the next sc, then 2 sc in the next sc. Repeat from * around. Join. (18 sc)
Rounds 4 through 8: Chain 1. Work 1 sc in each sc around. Join. Fasten off at the end of the last round.
The Ears and Legs
Still using Color B, we will create the small details.
Legs (Make 2): Chain 2. Work 6 sc in the 2nd chain from hook. Join. From rounds 2 to 5, chain 1 and work 1 sc in each sc around. Join and fasten off.
Right Ear: Chain 4. Work 1 sc in the 2nd chain from hook, 1 sc in the next chain, and 3 sc in the last chain. Working into the opposite side of the foundation chain, work 1 sl st in each of the next 2 chains. Fasten off.
Left Ear: Chain 4. Work a sl st in the 2nd chain from hook, a sl st in the next chain, and 3 sc in the last chain. Working into the opposite side of the foundation chain, work 1 sc in each of the next 2 chains. Fasten off.
The Strap
Switch to Color C for the strap.
Chain 12. Join with a slip stitch to the first chain to form a ring, ensuring the chain does not twist.
Round 1: Chain 1. Work 1 sc in each chain around. Join. (12 sc)
Round 2: Chain 1. Work 1 sc in each sc around. Join.
Repeat Round 2 until the strap measures 15 inches. Fasten off.
Finishing
Now it is time to bring your sheep to life!
Adding the Zipper: Lay the body flat. Using your sewing needle and all-purpose thread, sew the 9-inch zipper into the top opening of the body, staying within the edges of the last round. Ensure the zipper is secure and smooth.
Assembling the Face: Sew the ears to each side of the head. Lightly stuff the head with Polyfil and sew it to the body by “sandwiching” the head into the opening left at the front end of the body.
Final Touches: Lightly stuff the legs with Polyfil and sew them to the bottom of the body. Finally, sew the strap to the top two corners of the body, exactly where the zipper begins and ends. Fold the ends of the strap in half before securing them for extra strength.
Tips for Success
- Taming the Popcorn: If your popcorn stitches feel too tight, try loosening your tension slightly. This ensures the “bobble” effect is pronounced and fluffy.
- Zipper Placement: Before sewing the zipper, pin it in place to make sure it is perfectly centered. This prevents the bag from looking skewed.
- Yarn Choice: While super bulky wool is traditional, you can use a super bulky acrylic or a wool blend if you want the bag to be more durable and easier to wash.
- Stuffing: Don’t overstuff the head or legs. You want them to be firm enough to hold their shape, but not so hard that they distort the crochet stitches.