Free Crochet Triceratops Pattern: Cute Amigurumi Dinosaur Tutorial
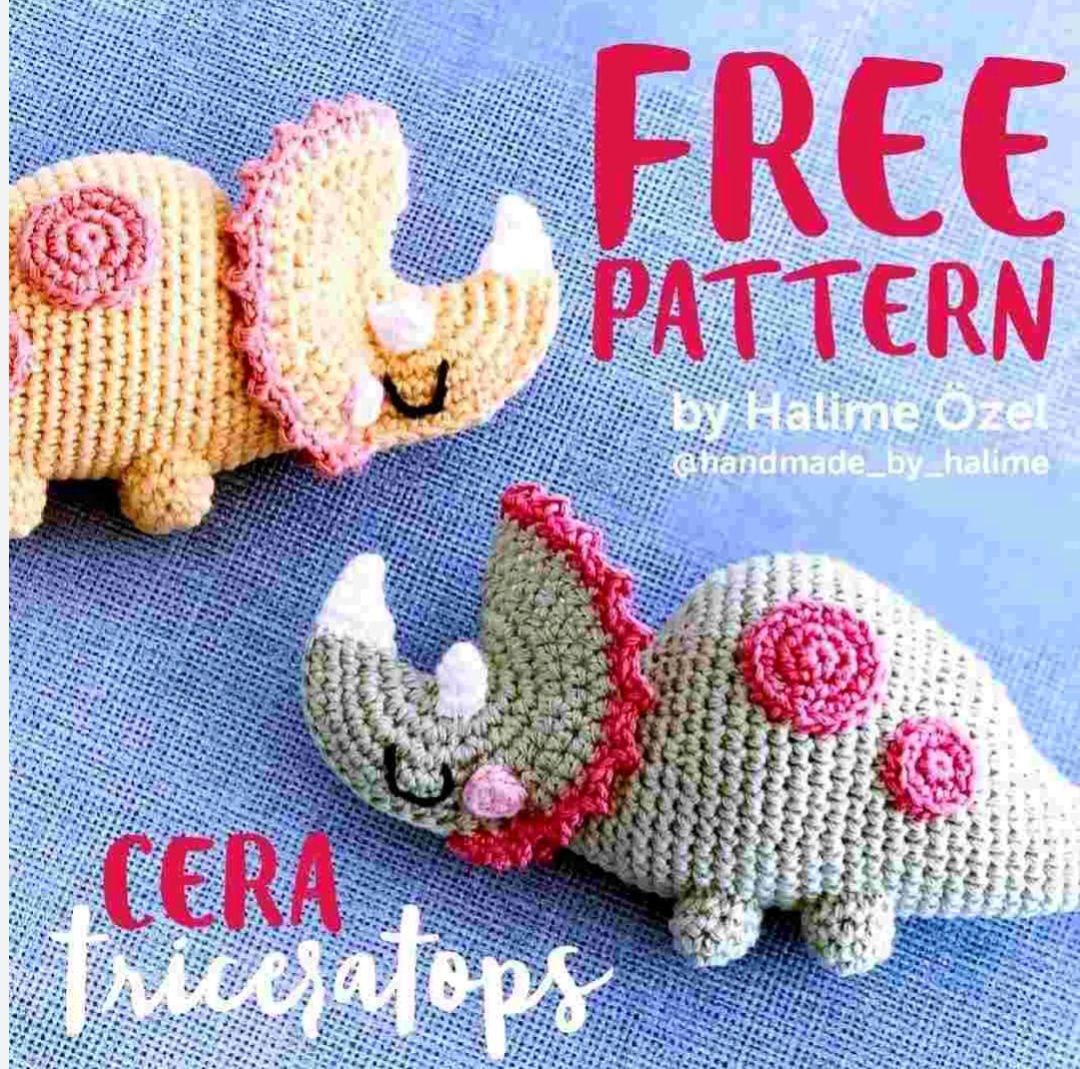
Bring a charming prehistoric buddy to life with this free crochet triceratops pattern! Whether you are crafting a cozy nursery decoration, a handmade toy for a dinosaur enthusiast, or a fun addition to your amigurumi collection, this sweet triceratops is a fantastic project. Featuring cute rosy cheeks, decorative side spots, a picot-edged head frill, and sturdy little feet, this plush dino measures approximately 6.5 inches long from snout to tail when made with suggested yarn weights.
This tutorial is written using standard US crochet terminology and includes comprehensive, step-by-step instructions. Grab your hook, pick your favorite yarn colors, and let’s start crocheting!
Materials & Abbreviations
Supplies Needed
- Yarn: Sport / Fine Weight (#2) 100% Cotton Yarn
- Main Color (Sage Green or Beige): ~90 yards
- Accent Color (Pink or Magenta): ~25 yards
- Contrast Color (White): ~10 yards
- Black embroidery floss or yarn scrap for face details
- Crochet Hook: Size B-1 / 2.5 mm crochet hook
- Stuffing: Polyester fiberfill toy stuffing
- Notions: Yarn needle, stitch markers, scissors
Size & Gauge
Using a 2.5 mm hook and Sport weight cotton yarn, your finished triceratops will measure approximately 6.5 inches (16.5 cm) long and 4 inches (10 cm) tall. Gauge is not critical for this project, but stitches should be worked tightly to prevent polyfill from showing through.
Abbreviations (US Terms)
- ch: chain
- sc: single crochet
- hdc: half double crochet
- sl st: slip stitch
- inc: single crochet increase (2 sc in the same stitch)
- hdc-inc: half double crochet increase (2 hdc in the same stitch)
- dec: single crochet decrease (sc 2 stitches together)
- st(s): stitch(es)
- rnd(s): round(s)
- […] x X: repeat instructions inside brackets X times
- (..): total stitch count at the end of the round
Step-by-Step Instructions
Head & Frill
The head starts in the round and creates the cute curved snout before expanding into the wide shield frill.
Using Main Color yarn:
- Rnd 1: 6 sc into a magic ring (6)
- Rnd 2: [inc] x 6 (12)
- Rnd 3: [inc] x 12 (24)
- Rnd 4: [1 sc, inc] x 12 (36)
- Rnd 5: [1 sc, inc] x 18 (54)
- Rnd 6: 12 sc, [4 hdc, hdc-inc] x 6, 12 sc (60)
- Rnd 7: 12 sc, 36 hdc, 12 sc (60)
- Rnd 8: Fold the work slightly to align the front snout stitches. Crochet the first 12 sc and last 12 sc together by working 12 sc through both layers. Then continue working along the remaining half double crochets: [5 hdc, hdc-inc] x 6 (54). Sl st into the next sc. Fasten off and weave in the end. Weave in the starting yarn tail from the magic ring.
Now, attach Accent Color yarn to create the ruffled frill edging:
- Rnd 9: Join Accent Color yarn in the front loop of the first hdc from Round 8. Work [2 sc, ch 2, sl st in the 2nd ch from hook] into stitches across the hdc section to create 21 decorative spikes/frills. Only work across the hdc stitches from Round 8; skip the folded sc section. Sl st into the base sc, fasten off, and weave in ends.
Stuff the nose tip lightly with fiberfill stuffing. Using black yarn or embroidery floss, stitch two sleeping eye arcs onto the sides of the snout.
Dinosaur Body
The body is worked from the tail tip forward to create a curved, natural silhouette.
Using Main Color yarn:
- Rnd 1: 4 sc into a magic ring (4)
- Rnd 2: [1 sc, inc] x 2 (6)
- Rnd 3: 6 sc (6)
- Rnd 4: 2 sc, [inc] x 2, 2 sc (8)
- Rnd 5: 2 sc, [1 sc, inc] x 2, 2 sc (10)
- Rnd 6: dec, 3 sc, [inc] x 2, 3 sc (11)
- Rnd 7: dec, 4 sc, [inc] x 2, 3 sc (12)
- Rnd 8: dec, 4 sc, [inc] x 2, 2 sc, dec (12)
Tip: Add a small amount of stuffing to the tail tip now using the back end of your crochet hook.
- Rnd 9: 5 sc, inc, 2 sc, inc, 3 sc (14)
- Rnd 10: 7 sc, [inc] x 2, 5 sc (16)
- Rnd 11: 8 sc, [inc] x 2, 6 sc (18)
- Rnd 12: 8 sc, inc, 2 sc, inc, 6 sc (20)
- Rnd 13: 10 sc, [inc] x 4, 6 sc (24)
- Rnd 14: 10 sc, [inc, 1 sc] x 4, 6 sc (28)
- Rnd 15: 10 sc, [2 sc, inc] x 4, 6 sc (32)
- Rnds 16–18: 32 sc (32 for 3 rounds)
- Rnd 19: 10 sc, [inc, 3 sc] x 4, 6 sc (36)
- Rnd 20: 36 sc (36)
- Rnd 21: 10 sc, [4 sc, inc] x 4, 6 sc (40)
- Rnd 22: 40 sc (40)
- Rnd 23: 10 sc, [inc, 5 sc] x 4, 6 sc (44)
- Rnds 24–30: 44 sc (44 for 7 rounds)
- Rnd 31: 10 sc, [5 sc, dec] x 4, 6 sc (40)
- Rnd 32: 20 sc, [dec] x 6, 8 sc (34)
Stuff the body firmly, maintaining a round belly shape. Continue stuffing as you go.
- Rnd 33: 20 sc, [dec] x 4, 6 sc (30)
- Rnd 34: [3 sc, dec] x 6 (24)
- Rnds 35–38: 24 sc (24 for 4 rounds)
- Rnd 39: [2 sc, dec] x 6 (18)
- Rnd 40: [1 sc, dec] x 6 (12)
- Rnd 41: 12 sc (12)
- Rnd 42: [dec] x 6 (6)
Cut yarn, leaving a long yarn tail for assembly. Use a tapestry needle to pull the tail back up to Round 40, which forms the neck attachment point.
Cheeks (Make 2)
Using Pink yarn:
- Rnd 1: 6 sc into a magic ring (6). Skip the next sc, sl st into the following stitch. Fasten off, leaving a long tail to attach to the head across Rounds 6 and 7.
Nose Horn (Big Horn)
Using White yarn:
- Rnd 1: 4 sc into a magic ring (4)
- Rnd 2: 4 sc (4)
- Rnd 3: 1 sc, [inc] x 2, 1 sc (6)
- Rnd 4: 1 sc, [inc] x 4, 1 sc (10)
Sl st into the next stitch. Fasten off, leaving a tail for sewing. Do not stuff.
Brow Horns (Small Horns – Make 2)
Using White yarn:
- Rnd 1: 4 sc into a magic ring (4)
- Rnd 2: inc, 3 sc (5)
- Rnd 3: 5 sc (5)
Sl st into the next stitch. Fasten off, leaving a tail for sewing. Do not stuff.
Legs (Make 4)
Using Main Color yarn:
- Rnd 1: 6 sc into a magic ring (6)
- Rnd 2: [1 sc, inc] x 3 (9)
- Rnds 3–4: 9 sc (9 for 2 rounds)
Sl st in next st. Fasten off, leaving a tail for sewing. Stuff legs lightly with polyfill.
Decorative Spots
Big Spots (Make 2)
Using Accent Color yarn:
- Rnd 1: 6 sc into a magic ring (6)
- Rnd 2: [inc] x 6 (12)
- Rnd 3: [1 sc, inc] x 6 (18)
Skip next sc, sl st in next st. Fasten off with a long sewing tail.
Small Spots (Make 2)
Using Accent Color yarn:
- Rnd 1: 6 sc into a magic ring (6)
- Rnd 2: [inc] x 6 (12)
Skip next sc, sl st in next st. Fasten off with a long sewing tail.
Finishing & Assembly
Follow these steps to bring your cute amigurumi triceratops together:
- Attach Head to Body: Position the neck end of the body (Round 40) against the back middle portion of the head fold. Flip the frill backward slightly to make sewing easier, then stitch the neck securely to the head using whip stitches.
- Attach Horns: Sew the Big Horn to the top of the nose tip. Sew the two Small Horns on the forehead area between Rounds 3 and 4 of the head.
- Attach Cheeks: Sew one pink cheek circle to each side of the face around Rounds 6–7, placed right beneath the embroidered eyes.
- Attach Spots: Sew the two Big Spots onto the sides of the body between Rounds 23 and 28. Sew the two Small Spots closer to the front between Rounds 17 and 21.
- Attach Legs: Sew the four stuffed legs to the underside of the body. Place the front legs between Rounds 19–22 and the back legs between Rounds 26–29. Ensure all four feet sit evenly so your dinosaur can stand unsupported!
Tips for Amigurumi Success
- Maintain Tight Tension: Use a hook size that is slightly smaller than recommended on the yarn label to keep your stitches compact and hide stuffing.
- Use Stitch Markers: Amigurumi pieces are worked in continuous spirals without joining. Place a stitch marker in the first stitch of every round to keep track of your count easily.
- Stuffing Technique: Add small clumps of fiberfill gradually rather than one large piece. This prevents lumpiness and creates a smooth, rounded shape.
- Pin Before Sewing: Use glass-head sewing pins to fix legs, spots, and horns in place before stitching. Step back and check alignment from all angles to ensure symmetrical placement!