Adorable Crochet Reindeer Keychain Pattern: Free Amigurumi Tutorial
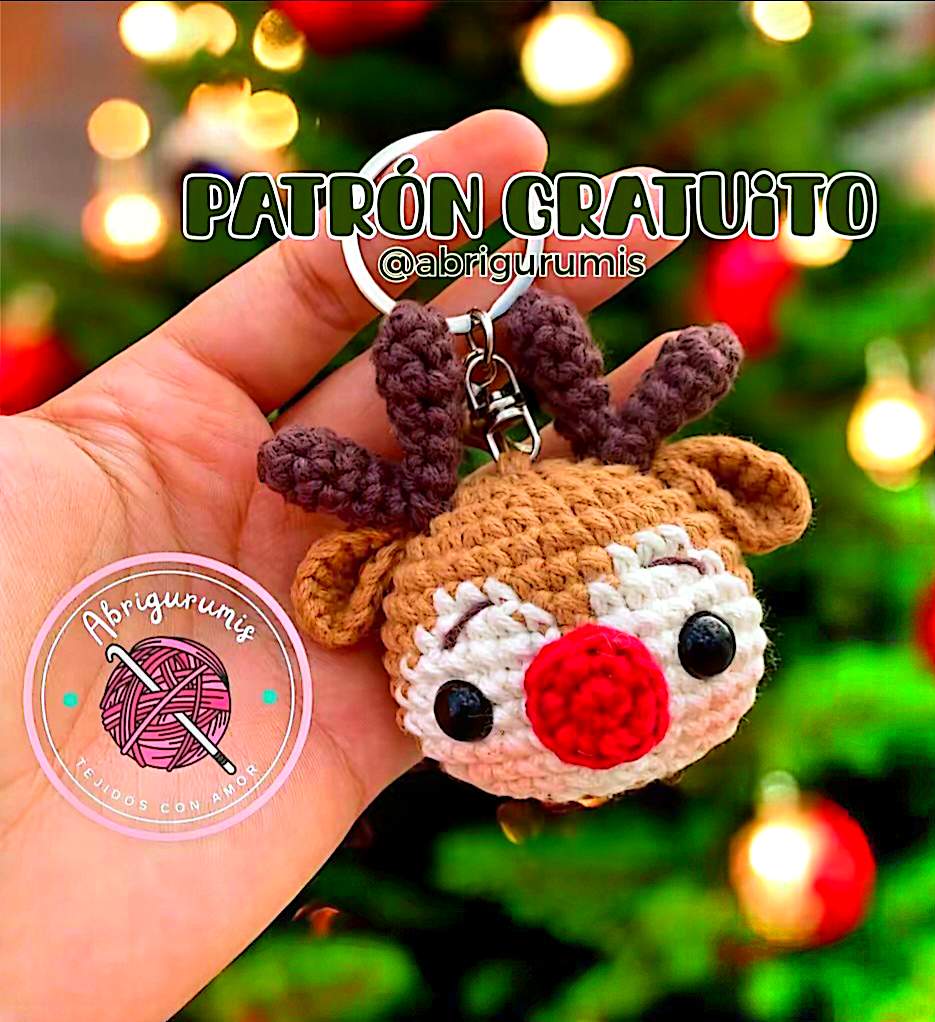
Get into the holiday spirit with this incredibly cute crochet reindeer head keychain! Whether you are looking for a thoughtful handmade gift for friends and family or a charming addition to your own set of keys, this amigurumi project is the perfect choice. This pattern is designed to be beginner-friendly, using basic stitches to create a professional-looking festive accessory.
This little reindeer features a cozy brown coat, a sweet cream-colored muzzle, and a bright red nose that would make Rudolph proud. Because it is small and quick to make, it’s an excellent project for “market prep” during the holiday season or a relaxing weekend craft. Let’s dive into the details and start stitching!
Materials & Abbreviations
To get started, gather your supplies. We recommend using a cotton yarn for this project because it provides excellent stitch definition and holds its shape well for small amigurumi items.
Supplies Needed
- Yarn: Medium-weight cotton yarn in Brown, Cream (off-white), and Red.
- Crochet Hooks: 2.5mm (for the head, ears, and antlers) and 2mm (for the nose).
- Safety Eyes: 9mm black safety eyes.
- Stuffing: Polyester fiberfill.
- Tools: Yarn needle, stitch markers, and scissors.
- Hardware: A metal keychain ring and clasp.
US Crochet Terms & Abbreviations
This pattern uses standard US crochet terminology. If you are new to amigurumi, remember to work in a continuous spiral unless otherwise noted.
- MR: Magic Ring
- Sc: Single Crochet
- Inc: Increase (two single crochet stitches in the same stitch)
- Dec: Decrease (invisible decrease is recommended for a cleaner look)
- Tinc: Triple Increase (three single crochet stitches in the same stitch)
- CC: Change Color
- FLO: Front Loop Only
- St: Stitch
Step-by-Step Instructions
The Head
The head is the main part of the project. We start with brown yarn and introduce the cream color to create the face/muzzle area. Use the 2.5mm hook.
Round 1: Create a MR and work 6 sc into it. (6 sts)
Round 2: Inc in every stitch around. (12 sts)
Round 3: (1 inc, 1 sc) repeat 6 times. (18 sts)
Round 4: (2 sc, 1 inc) repeat 6 times. (24 sts)
Round 5: 1 sc, (1 inc, 3 sc) repeat 5 times, 1 inc, 2 sc. (30 sts)
Round 6: (4 sc, 1 inc) repeat 6 times. (36 sts)
Adding the Muzzle (Color Changes)
Starting with Round 7, we will switch between brown and cream to create the reindeer’s face. Pay close attention to the stitch counts to ensure the muzzle is centered.
Round 7: Brown: 12 sc, [CC Cream: 3 sc], [CC Brown: 3 sc], [CC Cream: 3 sc], [CC Brown: 15 sc]. (36 sts)
Round 8: Brown: 11 sc, [CC Cream: 5 sc], [CC Brown: 1 sc], [CC Cream: 5 sc], [CC Brown: 14 sc]. (36 sts)
Round 9: Brown: 10 sc, [CC Cream: 6 sc], [CC Brown: 1 sc], [CC Cream: 6 sc], [CC Brown: 13 sc]. (36 sts)
Round 10-12: Brown: 9 sc, [CC Cream: 15 sc], [CC Brown: 12 sc]. (36 sts)
Note on Eyes: This is the time to place your safety eyes! Insert the 9mm eyes into the 4th row of the cream-colored section. Leave 7 sc of separation between the two eyes for a cute, wide-set look.
Closing the Head
Now we will begin decreasing to shape the head. Continue using the 2.5mm hook.
Round 13: Brown: 4 sc, dec, 3 sc, [CC Cream: 1 sc, dec, (4 sc, dec) repeat 2 times], [CC Brown: (4 sc, dec) repeat 2 times]. (30 sts)
Round 14: Brown: 3 sc, dec, 3 sc, [CC Cream: dec, (3 sc, dec) repeat 2 times], [CC Brown: (3 sc, dec) repeat 2 times]. (24 sts)
Round 15: Brown: (2 sc, dec) repeat 2 times, [CC Cream: (2 sc, dec) repeat 2 times], [CC Brown: (2 sc, dec) repeat 2 times]. (18 sts)
Round 16: Brown: (1 sc, dec) repeat 6 times. (12 sts)
Round 17: Brown: 6 dec. (6 sts)
Fasten off, leaving a long tail. Use your yarn needle to weave the tail through the front loops only (FLO) of the remaining stitches and pull tight to close the hole. Stuff the head firmly with fiberfill before closing completely.
The Nose
Switch to your 2mm hook and red yarn for a tiny, round nose.
Round 1: 6 sc in a MR. (6 sts)
Round 2: 6 inc. (12 sts)
Fasten off and leave a long tail for sewing.
The Ears (Make 2)
Using the 2.5mm hook and brown yarn:
Round 1: 6 sc in a MR. (6 sts)
Round 2: (1 sc, 1 tinc) repeat 3 times. (12 sts)
Round 3: 2 sc, (1 inc, 3 sc) repeat 2 times, 1 tinc, 1 sc. (18 sts)
Fasten off. Fold the ear slightly to create a cupped shape and sew it to the head at Round 3.
The Antlers (Make 2 sets)
Each antler consists of two different sized pieces to give a natural look. Use the 2.5mm hook and brown yarn.
Antler Part 1 (Smaller branch):
Round 1: 4 sc in a MR. (4 sts)
Round 2: (1 sc, inc) repeat 2 times. (6 sts)
Round 3-5: 6 sc around. (6 sts)
Fasten off. Do not leave a very long tail as this will be sewn onto the larger branch.
Antler Part 2 (Main branch):
Round 1: 4 sc in a MR. (4 sts)
Round 2: (1 sc, inc) repeat 2 times. (6 sts)
Round 3-7: 6 sc around. (6 sts)
Fasten off, leaving a long tail for sewing. Attach the smaller branch (Part 1) to the top of the main branch (Part 2) before attaching them to the head.
Finishing
Now it is time to assemble your reindeer! Use your yarn needle and matching brown yarn for all attachments.
- Nose: Sew the red nose centered on the cream muzzle area.
- Ears: Attach the ears to the sides of the head at Round 3.
- Antlers: Position the antlers on top of the head at Round 2, ensuring they are symmetrical.
- Keychain: Attach the metal keychain clasp to the top center of the head, between the antlers. Make sure it is sewn securely into the stuffing so it doesn’t pull out.
Tips for Success
Getting the Perfect Shape
Amigurumi depends on tension. If you notice stuffing peeking through your stitches, try using a slightly smaller hook. Conversely, if the piece feels too stiff and difficult to work with, move up a half-millimeter in hook size.
Working with Color Changes
When changing colors (CC), do the last pull-through of the old color with the new color. This ensures a seamless transition and prevents gaps in the fabric.
Choosing the Right Yarn
While this pattern calls for cotton, you can use acrylic yarn for a fuzzier, softer feel. Just keep in mind that acrylic tends to stretch more, which might slightly change the final dimensions of your keychain.
Customizing Your Reindeer
Feel free to get creative! You can add a tiny crochet scarf around the base of the head or use a different color of yarn for a “fantasy” reindeer. If you want to make it a Christmas ornament instead of a keychain, simply replace the clasp with a gold loop of embroidery thread.