Easy Crochet Carry-All Bag Pattern: A Beginner-Friendly Tutorial
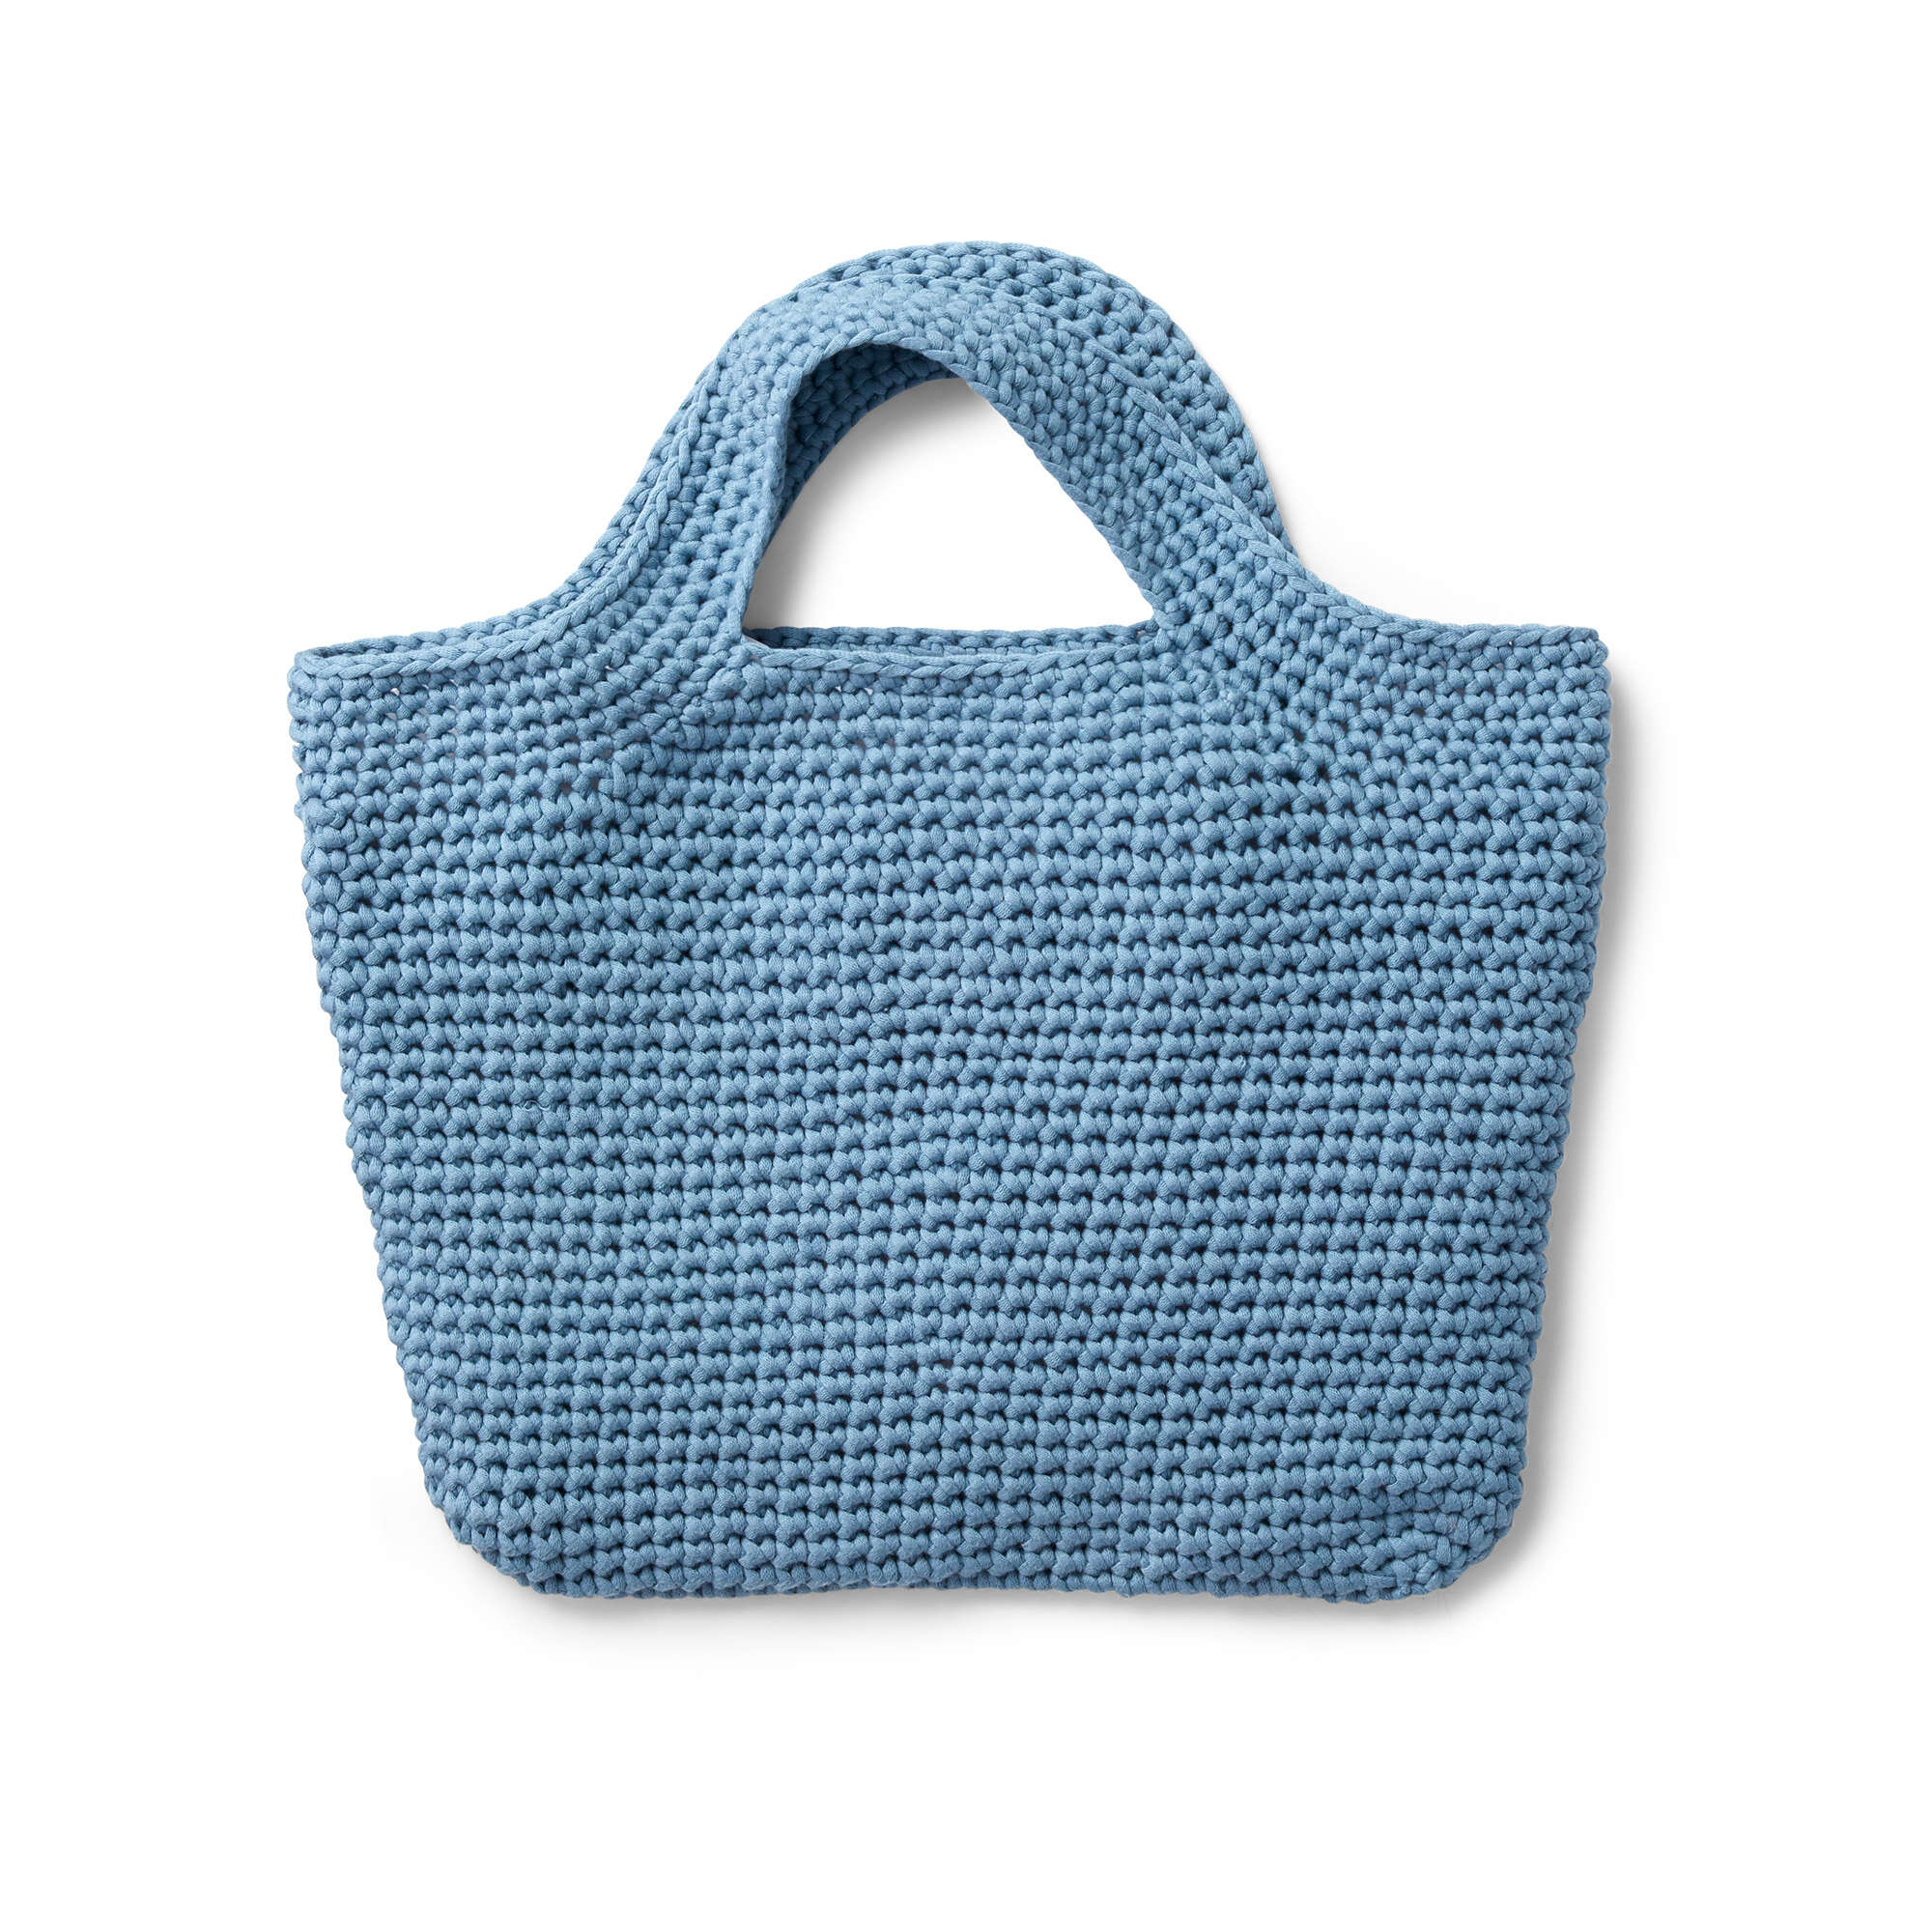
Looking for a stylish, sturdy, and quick project to add to your crochet repertoire? This Easy Crochet Carry-All Bag is the perfect blend of function and fashion. Whether you need a cozy bag for your farmers’ market finds, a cute tote for your crochet-on-the-go supplies, or a simple everyday accessory, this pattern has you covered.
Because we are using a bulky weight yarn, this bag works up incredibly fast, making it an ideal weekend project or a thoughtful handmade gift. The design features a sturdy oval base, a spacious body, and uniquely shaped sides that create a professional, tailored look. Best of all, the construction is beginner-friendly, focusing primarily on the single crochet stitch.
Materials & Abbreviations
Before you jump into the stitches, gather your supplies. Using a bulky yarn not only speeds up the process but also gives the bag the structure it needs to hold its shape without requiring an inner liner.
Materials Needed
- Yarn: Approximately 317 yards of Bulky weight yarn. (A single 8.8 oz ball is typically sufficient).
- Crochet Hook: Size U.S. K/10.5 (6.5 mm) or the size needed to obtain the correct gauge.
- Notions: Stitch markers, yarn needle for weaving in ends, and scissors.
Gauge
To ensure your bag is the correct size, check your gauge: 11 single crochet (sc) and 12 rows = 4 inches. If your work is too small, try a larger hook; if it is too loose, try a smaller hook.
Finished Size
Approximately 14 inches wide by 11 inches high (excluding the handles).
Abbreviations (US Terms)
- Beg: Beginning
- Ch: Chain
- Dc: Double crochet
- Hdc: Half double crochet
- Inc: Increase
- PM: Place marker
- Rep: Repeat
- Rnd(s): Round(s)
- RS: Right side
- Sc: Single crochet
- Sl st: Slip stitch
- Sp: Space
Step-by-Step Instructions
This bag is worked from the bottom up. We start with an oval base, grow the body in a spiral, and finish with specialized shaping for the handles.
Part 1: Creating the Oval Base
The base is created by crocheting around both sides of a foundation chain to create a flat oval.
Foundation: Chain 31.
Round 1: Work 1 sc in the 2nd chain from the hook. Work 1 sc in each chain until you reach the last chain. In the last chain, work 3 sc (this turns the corner). Now, working across the opposite side of the foundation chain, work 1 sc in each chain until you reach the last chain. In the last chain, work 2 sc. Join with a slip stitch to the first sc. (62 stitches total).
Round 2: Chain 1. Work 2 sc in the first sc. Work 1 sc in each of the next 28 sc. Work 2 sc in each of the next 3 sc. Work 1 sc in each of the next 28 sc. Work 2 sc in each of the last 2 sc. Join with a slip stitch to the first sc. (68 stitches total).
Round 3: Chain 1. Work 2 sc in the first sc. Work 1 sc in each of the next 31 sc. Work 2 sc in each of the next 3 sc. Work 1 sc in each of the next 31 sc. Work 2 sc in each of the last 2 sc. Join with a slip stitch to the first sc. (74 stitches total). Place a marker (PM) at the end of this round.
Part 2: The Bag Body
From this point forward, we will work in spirals. This means you will not join the rounds with a slip stitch; instead, you will keep crocheting into the first stitch of the previous round. Use your stitch marker to keep track of where each round begins.
Next Round (Increase Round): *Work 1 sc in each of the next 17 sc, 2 sc in the next sc, 1 sc in each of the next 18 sc, and 2 sc in the next sc. Repeat from * around. (78 stitches total).
Next 5 Rounds: Work 1 sc in each stitch around. (Maintain the spiral).
Next Round (Increase Round): *Work 1 sc in each of the next 18 sc, 2 sc in the next sc, 1 sc in each of the next 19 sc, and 2 sc in the next sc. Repeat from * around. (82 stitches total).
Next 5 Rounds: Work 1 sc in each stitch around.
Next Round (Increase Round): *Work 1 sc in each of the next 19 sc, 2 sc in the next sc, 1 sc in each of the next 20 sc, and 2 sc in the next sc. Repeat from * around. (86 stitches total).
Final Body Rounds: Work 1 sc in each stitch around. Repeat this last round until the total height of the bag, measured from the beginning, is 11 inches. Fasten off.
Part 3: Shaping the Sides
To give the bag a professional “dip” where the handles attach, we will create two shaped sides using short rows. Lay your work flat and place a marker on the first sc at the right side.
The First Shaped Side
With the right side (RS) facing, skip the first 10 sc (including the marked stitch).
- Row 1: Join yarn with a slip stitch to the next sc. Chain 1. Work 1 sc in the same space as the slip stitch and in each of the next 22 sc. Fasten off. (23 sc). Do not turn.
- Row 2: Skip the first sc. Join yarn with a slip stitch to the next sc. Chain 1. Work 1 sc in the same space as the slip stitch and in each of the next 20 sc. Fasten off. (21 sc). Do not turn.
- Row 3: Skip the first sc. Join yarn with a slip stitch to the next sc. Chain 1. Work 1 sc in the same space as the slip stitch and in each of the next 18 sc. Fasten off. (19 sc). Do not turn.
- Row 4: Skip the first sc. Join yarn with a slip stitch to the next sc. Chain 1. Work 1 sc in the same space as the slip stitch and in each of the next 16 sc. Fasten off. (17 sc). Do not turn.
- Row 5: Skip the first sc. Join yarn with a slip stitch to the next sc. Chain 1. Work 1 sc in the same space as the slip stitch and in each of the next 14 sc. Fasten off. (15 sc).
The Second Shaped Side
With the right side facing, skip the next 20 sc. Repeat the steps from the First Shaped Side (Rows 1 through 5) exactly as written.
Part 4: Adding the Handles
Now we will tie everything together by crocheting around the top edge of the bag and adding the handle straps.
Handle Round 1: Join yarn with a slip stitch to the first sc at the right marker at the top edge of the bag. Chain 1. Work 1 sc in the same space as the slip stitch and in each of the next 9 sc. Now, work 1 sc into the first sc of the 1st, 2nd, 3rd, 4th, and 5th rows of the First Shaped Side (working upwards). Chain 30 for the handle. Skip the next 13 sc on the top edge. Working downwards, work 1 sc into the last sc of the 5th, 4th, 3rd, 2nd, and 1st rows of the First Shaped Side. Work 1 sc in each of the next 20 sc. Working upwards, work 1 sc into the first sc of the 1st, 2nd, 3rd, 4th, and 5th rows of the Second Shaped Side. Chain 30 for the second handle. Skip the next 13 sc. Working downwards, work 1 sc into the last sc of the 5th, 4th, 3rd, 2nd, and 1st rows of the Second Shaped Side. Work 1 sc in each of the last 10 sc. Join with a slip stitch to the first sc.
Handle Round 2: Chain 1. Work 1 sc in each sc and 1 sc in each chain around. Join with a slip stitch to the first sc.
Handle Rounds 3 through 6: Chain 1. Work 1 sc in each stitch around. Join with a slip stitch to the first sc. Fasten off at the end of the 6th round.
Finishing
Once you have completed the handle rounds, use your yarn needle to weave in all remaining ends. Give your bag a little pat and shape it by hand to ensure the oval base is centered and the handles are symmetrical.
Tips for Success
- Mastering the Spiral: When working in spirals, it is very easy to lose track of your rounds. Always move your stitch marker up to the top of the first stitch of the new round immediately after completing the previous one.
- The “Do Not Turn” Technique: In the shaping section, “do not turn” means you are not rotating your project as you would in a typical row. You are simply attaching new yarn to a specific spot on the right side, working a short row, and fastening off. This creates the tiered, curved effect.
- Sturdy Straps: We added several rounds of single crochet to the handles. This is crucial because bulky yarn can stretch over time; these extra rounds provide the reinforcement needed to carry heavier items.
- Customization: Want a deeper bag? Simply add more rounds of single crochet to the body before starting the shaped sides. Just remember to maintain the spiral!