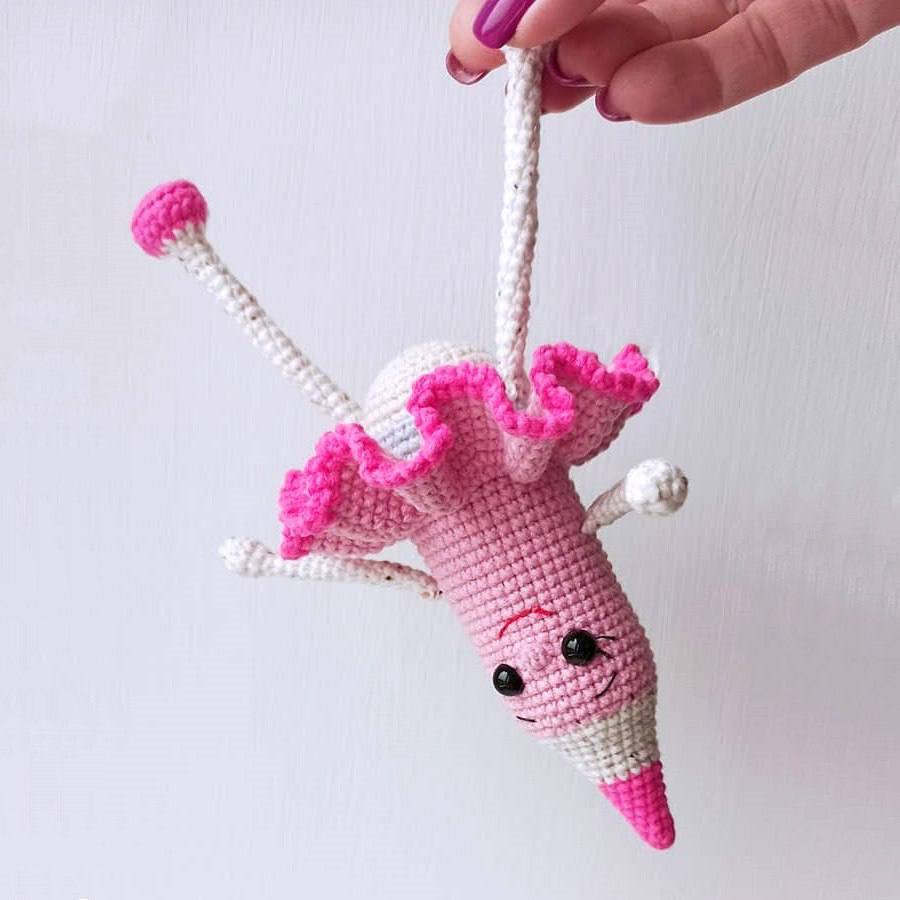
How to Crochet a Cute Pink Pencil Amigurumi: A Step-by-Step Tutorial
Are you looking for a whimsical and adorable project to brighten up your desk or your child’s playroom? This crochet pink pencil amigurumi is the perfect project! With its cute little tutu and sweet expression, this little pencil character is as charming as it is easy to make. Whether you are a beginner looking to practice your amigurumi skills or an experienced crocheter wanting a quick, fun project, this tutorial will guide you through every single stitch.
This pattern creates a character that stands approximately 8 inches tall, making it a great size for shelf decor or a personalized gift. Grab your favorite cotton yarn and let’s get started on this sweet little project!
Materials and Supplies
To achieve the best results and ensure your pencil has that crisp, professional look, I recommend using a smooth cotton or cotton-blend yarn. Here is everything you will need:
- Yarn: Medium weight (DK or Worsted) cotton yarn in the following colors:
- Dark Pink
- Light Pink
- Light Beige
- Off-White/Milk
- Gray
- Crochet Hooks:
- 2.0mm (approx. B-1)
- 2.25mm (approx. C-2)
- Safety Eyes: 7mm diameter
- Stuffing: Polyester fiberfill (polyfill)
- Sewing Supplies: Black and red sewing thread for facial details and a tapestry needle
Crochet Abbreviations
This pattern uses standard US crochet terminology. Please ensure you are familiar with these terms before beginning:
- MR: Magic Ring (also known as an Amigurumi Ring)
- ch: Chain
- sc: Single Crochet
- inc: Increase (2 sc in the same stitch)
- dec: Decrease (2 sc worked together)
- hdc: Half Double Crochet
- sl st: Slip Stitch
- BLO: Back Loop Only
- Bobble Stitch: 3 hdc in the same stitch, pull the loop through all three top loops
- (…) x #: Repeat the instructions within the parentheses the specified number of times
Note: This project is worked in a continuous spiral. Please use a stitch marker to keep track of your rounds!
Step-by-Step Instructions
The Body
We will begin the body using Dark Pink yarn with a 2.0mm hook. Remember to stuff the piece as you work!
Round 1: 6 sc in MR (6)
Round 2: 6 sc (6)
Round 3: (1 sc, inc) x 3 (9)
Round 4: 9 sc (9)
Round 5: (2 sc, inc) x 3 (12)
Round 6: 12 sc (12)
Round 7: (3 sc, inc) x 3 (15)
Round 8: 15 sc (15)
Switch to Off-White/Milk yarn:
Round 9: (4 sc, inc) x 3 (18)
Round 10: 18 sc (18)
Round 11: (5 sc, inc) x 3 (21)
Round 12: 21 sc (21)
Round 13: (6 sc, inc) x 3 (24)
Round 14: (3 sc, inc) x 6 (30)
Round 15: 30 sc (30)
Switch to Light Pink yarn:
Round 16: 2 sc, inc, (4 sc, inc) x 5, 2 sc (36)
Round 17–20: 36 sc for 4 rounds (36)
Round 21: 15 sc, ch 1, skip 1 stitch, 5 sc, ch 1, skip 1 stitch, 14 sc (36)
Round 22: 18 sc, bobble stitch, 17 sc (36)
IMPORTANT: Before continuing, insert your 7mm safety eyes between rounds 24 and 25 and secure them firmly inside the stuffing.
Round 23–35: 36 sc for 13 rounds (36)
Make 2 slip stitches to ensure your marker is positioned at the center of the back.
Round 36: 36 sc in BLO (36)
Round 37–38: 36 sc for 2 rounds (36)
Switch to Gray yarn:
Round 39–41: 36 sc for 3 rounds (36)
Switch to Light Beige yarn:
Round 42: 36 sc in BLO (36)
Round 43–44: 36 sc for 2 rounds (36)
Round 45: 2 sc, dec, (4 sc, dec) x 5, 2 sc (30)
Round 46: (3 sc, dec) x 6 (24)
Round 47: 1 sc, dec, (2 sc, dec) x 5, 1 sc (18)
Round 48: (1 sc, dec) x 6 (12)
Round 49: 6 dec (6)
Fasten off, leaving a long tail, and weave the end into the piece to close the hole.
The Arms (Handles)
Use Off-White/Milk yarn. Do not stuff the arms.
Round 1: 5 sc in MR (5)
Round 2: 5 inc (10)
Round 3–4: 10 sc (10)
Round 5: 5 dec (5)
Round 6–19: 5 sc for 14 rounds (5)
Fold the edges together and sc through both layers to flatten the arm. Fasten off, leaving a long tail for sewing.
The Legs
Use Dark Pink yarn. Stuff only the foot portion of the leg.
Round 1: 6 sc in MR (6)
Round 2: 6 inc (12)
Round 3: (1 sc, inc) x 6 (18)
Round 4: 18 sc in BLO (18)
Round 5: 18 sc (18)
Switch to Off-White/Milk yarn:
Round 6: (1 sc, dec) x 6 (12)
Round 7: 6 dec (6)
Round 8–28: 6 sc for 21 rounds (6)
Fold the edges together and sc through both layers (3 sc) to flatten the leg. Fasten off, leaving a long tail for sewing.
The Ruffled Tutu (Skirt)
For the skirt, switch to a 2.25mm hook and use Light Pink yarn. Attach the yarn to the front loops remaining from Round 36 of the body. When working, orient the “pencil tip” (the conical part) toward yourself.
Round 1: 36 inc (72)
Round 2: (1 sc, inc) x 36 (108)
Round 3–7: 108 sc for 5 rounds (108)
Switch to Dark Pink yarn for the decorative edge:
Edge: Work around the entire skirt, alternating (1 sc, 2 ch) repeatedly until the round is complete.
Finishing
Now comes the fun part—bringing your little character to life!
- Attach the Arms: Sew the arms onto the body between rounds 29 and 30.
- Attach the Legs: Sew the legs onto the body between rounds 40 and 41.
- Face Details: Using black and red sewing thread (use two strands for better visibility), embroider the eyebrows, eyelashes, and a sweet little mouth.
Tips for Success
Tension is Key: When working with amigurumi, try to keep your stitches tight. This prevents the stuffing from peeking through the gaps in your stitches, which is especially important for the body.
Color Changes: To make your color changes look seamless, pull the new color through the last two loops of the final stitch of the previous color. This creates a much cleaner transition.
The Tutu: When working the skirt, ensure your tension is consistent so the ruffles look even and voluminous. If you want a “frillier” look, you can increase the number of chain stitches in the edging.
Safety First: If you are making this for a small child, please consider embroidering the eyes instead of using plastic safety eyes to avoid any choking hazards.
Congratulations! Your adorable crochet pencil is ready to go! Feel free to share your creation and tag your fellow crafters.