Minions Halloween Amigurumi: DIY Crochet Pattern Tutorial
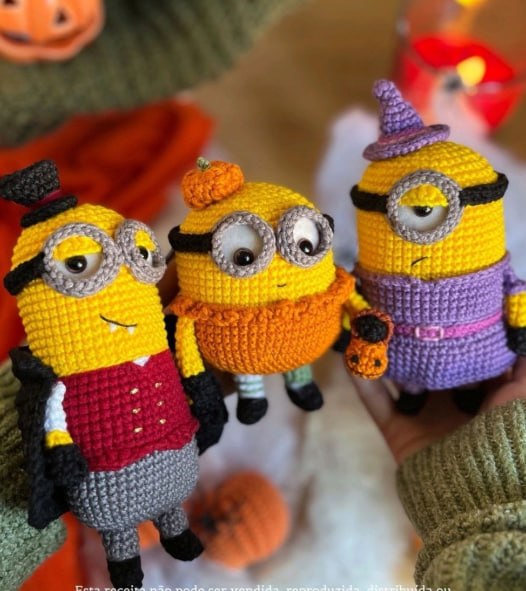
Get ready to celebrate the spookiest season of the year with a trio of adorable, festive Minions! This detailed crochet tutorial will guide you through making three different Halloween-themed Minions: Bob, Stuart, and Kevin. Whether you want to a little pumpkin-themed companion or a witch-themed friend, these amigurumi characters are perfect for seasonal decor or a handmade gift.
These little characters are intermediate to advanced level projects, making them a great way to level up your crochet skills. Let’s dive into the spooky fun!
Materials & Abbreviations
To complete these projects, you will need the following supplies. While you can use your favorites, the following were used to create the sample versions:
- Crochet Hook: 2mm or a size compatible with your chosen yarn.
- Yarn: Cotton yarn (TEX 492/Sport weight recommended). Colors needed: Black, White, Green, Orange, Yellow, Gray, Brown, Violet, Purple, Lavender, Red/Wine, and Gold.
- Eyes: 8mm brown safety eyes (adjust size based on your Minion’s scale).
- Stuffing: Polyester fiberfill.
- Tools: Tapestry needle, scissors, stitch markers, pins, long tweezers, and pipe cleaners (optional, for flexible arms).
- Extras: White and black felt, liquid silicone or craft glue, hot glue (optional for flattening soles), and fabric markers/paint.
Crochet Abbreviations (US Terms)
- AM: Magic Ring
- aum: Increase
- dim: Decrease
- pts: Stitches
- carr: Round
- corr: Chain
- pbx: Slip stitch
- pb: Single crochet
- mpa: Half double crochet
- pa: Double crochet
- pad: Treble crochet
- aummpa: Increase with half double crochet (2 hdc in the same stitch)
- aumT: Increase with treble crochet (3 tr in the same stitch)
- BLO: Back loops only
- FLO: Front loops only
- (…) x nº: Repeat instructions
- […] : Total stitch count for the round
Step-by-Step Instructions
Note: These characters are worked in a continuous spiral. When the pattern specifies flat or oval crochet, please follow those specific instructions.
1. The Legs (Make 2 for each Minion)
The legs are worked in an oval shape starting with Black.
- Chain 7. In the 2nd chain from hook, work 5 sc. In the last chain, work 1 treble increase (3 tr in one stitch). On the other side of the chain, work 4 sc and 1 increase [14].
- In BLO: 14 sc [14].
- 2 sc, 5 decreases, 2 sc [9].
Optional Tip: To make the soles flat, apply a small amount of hot glue to the bottom and press with a damp cotton swab.
For Bob (White/Green legs): Switch to White (or Green for the second leg) for rounds 4-5 in BLO. Add stuffing with tweezers. Round 7: 1 sc, 1 increase, (2 sc, 1 increase) x2, 1 sc [12]. Finish with a slip stitch.
For Stuart (Violet legs): Switch to Violet for rounds 4-5 in BLO. Follow the same assembly as Bob.
For Kevin (Gray legs): Switch to Gray for rounds 4-5 in BLO. Follow the same assembly as Bob.
2. The Body
The body is an oval shape. The pattern varies slightly depending on the character’s outfit.
Bob (Pumpkin Outfit)
- Start with Orange. Chain 7. In the 2nd chain from hook, work 5 sc, 1 treble increase in the last stitch. On the other side of the chain, work 4 sc and 1 increase [14].
- 3 increases, 2 sc, 3 increases, 1 sc, 1 increase, 1 sc, 3 increases [24].
- 1 increase, 7 sc, (1 increase, 1 sc) x3, 6 sc, (1 increase, 1 sc) x2 [30].
- 1 increase, 8 sc, (1 increase, 2 sc) x3, 6 sc, (1 increase, 2 sc) x2 [36].
- 1 increase, 9 sc, (1 increase, 3 sc) x3, 6 sc, (1 increase, 3 sc) x2 [42].
- 1 increase, 10 sc, (1 increase, 4 sc) x3, 6 sc, (1 increase, 4 sc) x2 [48].
- 1 increase, 11 sc, (1 increase, 5 sc) x3, 6 sc, (1 increase, 5 sc) x2 [54].
- Rounds 8-12: 54 sc [54].
Switch to Yellow for rounds 13-23. (Round 13 and 14 should be worked in BLO). Add stuffing as you go.
Pumpkin Detail: Before continuing the body, use Orange to create the pumpkin ruffle around the middle. Attach the yarn to the yellow loops from round 13 and work (1 slip stitch, 3 chains, 1 slip stitch) in each stitch around. Finish with a slip stitch and weave in ends.
Stuart (Witch Outfit)
The body for Stuart starts with Purple. Follow the oval base pattern (14, 24, 30, 36, 42, 48 stitches), then work rounds 7-10 in 48 sc. Switch to Lavender for rounds 11-12 (BLO). Switch back to Purple for rounds 13-18. Finally, switch to Yellow for rounds 19-30. For the witch dress, add a purple ruffle at the waist using the “skirt” instructions provided in the pattern.
Kevin (Vampire Outfit)
The body for Kevin starts with Gray. Follow the oval base pattern, then work rounds 7-11 in 42 sc. Switch to Wine/Red for rounds 12-23. Use the wine yarn to create the vest detail at the waist by working small loops around the front edges of the vest section. Finally, switch to Yellow for rounds 24-37. Add stuffing as you go.
3. The Arms (Make 2)
Arms do not require stuffing but can include a piece of pipe cleaner for poseability.
- Bob/Stuart: Start with Black. Round 1: 6 sc in magic ring. Round 2: 2 sc, 1 treble (the little finger), 3 sc [6]. Switch to Yellow. Rounds 3-9: 6 sc in BLO. Finish with a slip stitch. Add a Black cuff at the end.
- Kevin: Start with Black. Round 1: 6 sc in magic ring. Round 2: 2 sc, 1 treble, 3 sc [6]. Switch to Yellow. Rounds 3-7: 6 sc in BLO. Switch to White. Rounds 8-9: 6 sc in BLO. Finish with a slip stitch and a Black cuff.
4. Accessories & Headwear
- Eyes & Glasses: The eyes can be made with felt or crochet. For crochet, make a white circle, attach the safety eye, and then add the gray glasses rim. For glasses, work a chain of 20 (or 24 for Stuart) and work sc around to form a ring. Attach with black yarn straps.
- Bob’s Pumpkin: Use Orange to make a small ball (6 sc in magic ring, increase to 12, work 2 rounds of 12 sc, decrease to 9). Add a small Green stem.
- Stuart’s Witch Hat: Work in Purple to create the cone shape, using Lavender and Violet for the brim and details.
- Kevin’s Top Hat: Work in Black for the base and crown, with a Wine colored band.
Finishing
Once all pieces are complete, it is time for assembly!
- Legs: Sew the legs between rounds 1 and 2 of the body, roughly 3 stitches apart.
- Arms: Sew the arms to the sides of the body, between rounds 12 and 13 (or 18 and 19 for Kevin).
- Eyes: Carefully position and glue the eyes and glasses on the face. For Bob and Kevin, eyes should be placed between rounds 18-24 and 30-36 respectively.
- Final Touches: Embroider a small smile on the face using black thread. Attach hats and accessories (like Bob’s pumpkin or Kevin’s cape) using glue or sewing.
Tips
- For Lefties: Remember that everything is mirrored! If the pattern says “left side,” work the “right side” to achieve the same result.
- Tension: If you are working with a tight tension, you may need to adjust your hook size slightly to ensure the pieces fit together smoothly.
- Safety: If you are using safety eyes, ensure they are securely fastened, especially if the finished item is intended for a display rather than a toy for small children.
- Details: Using a long pair of tweezers is a lifesaver when stuffing small parts like arms or adding tiny facial features!