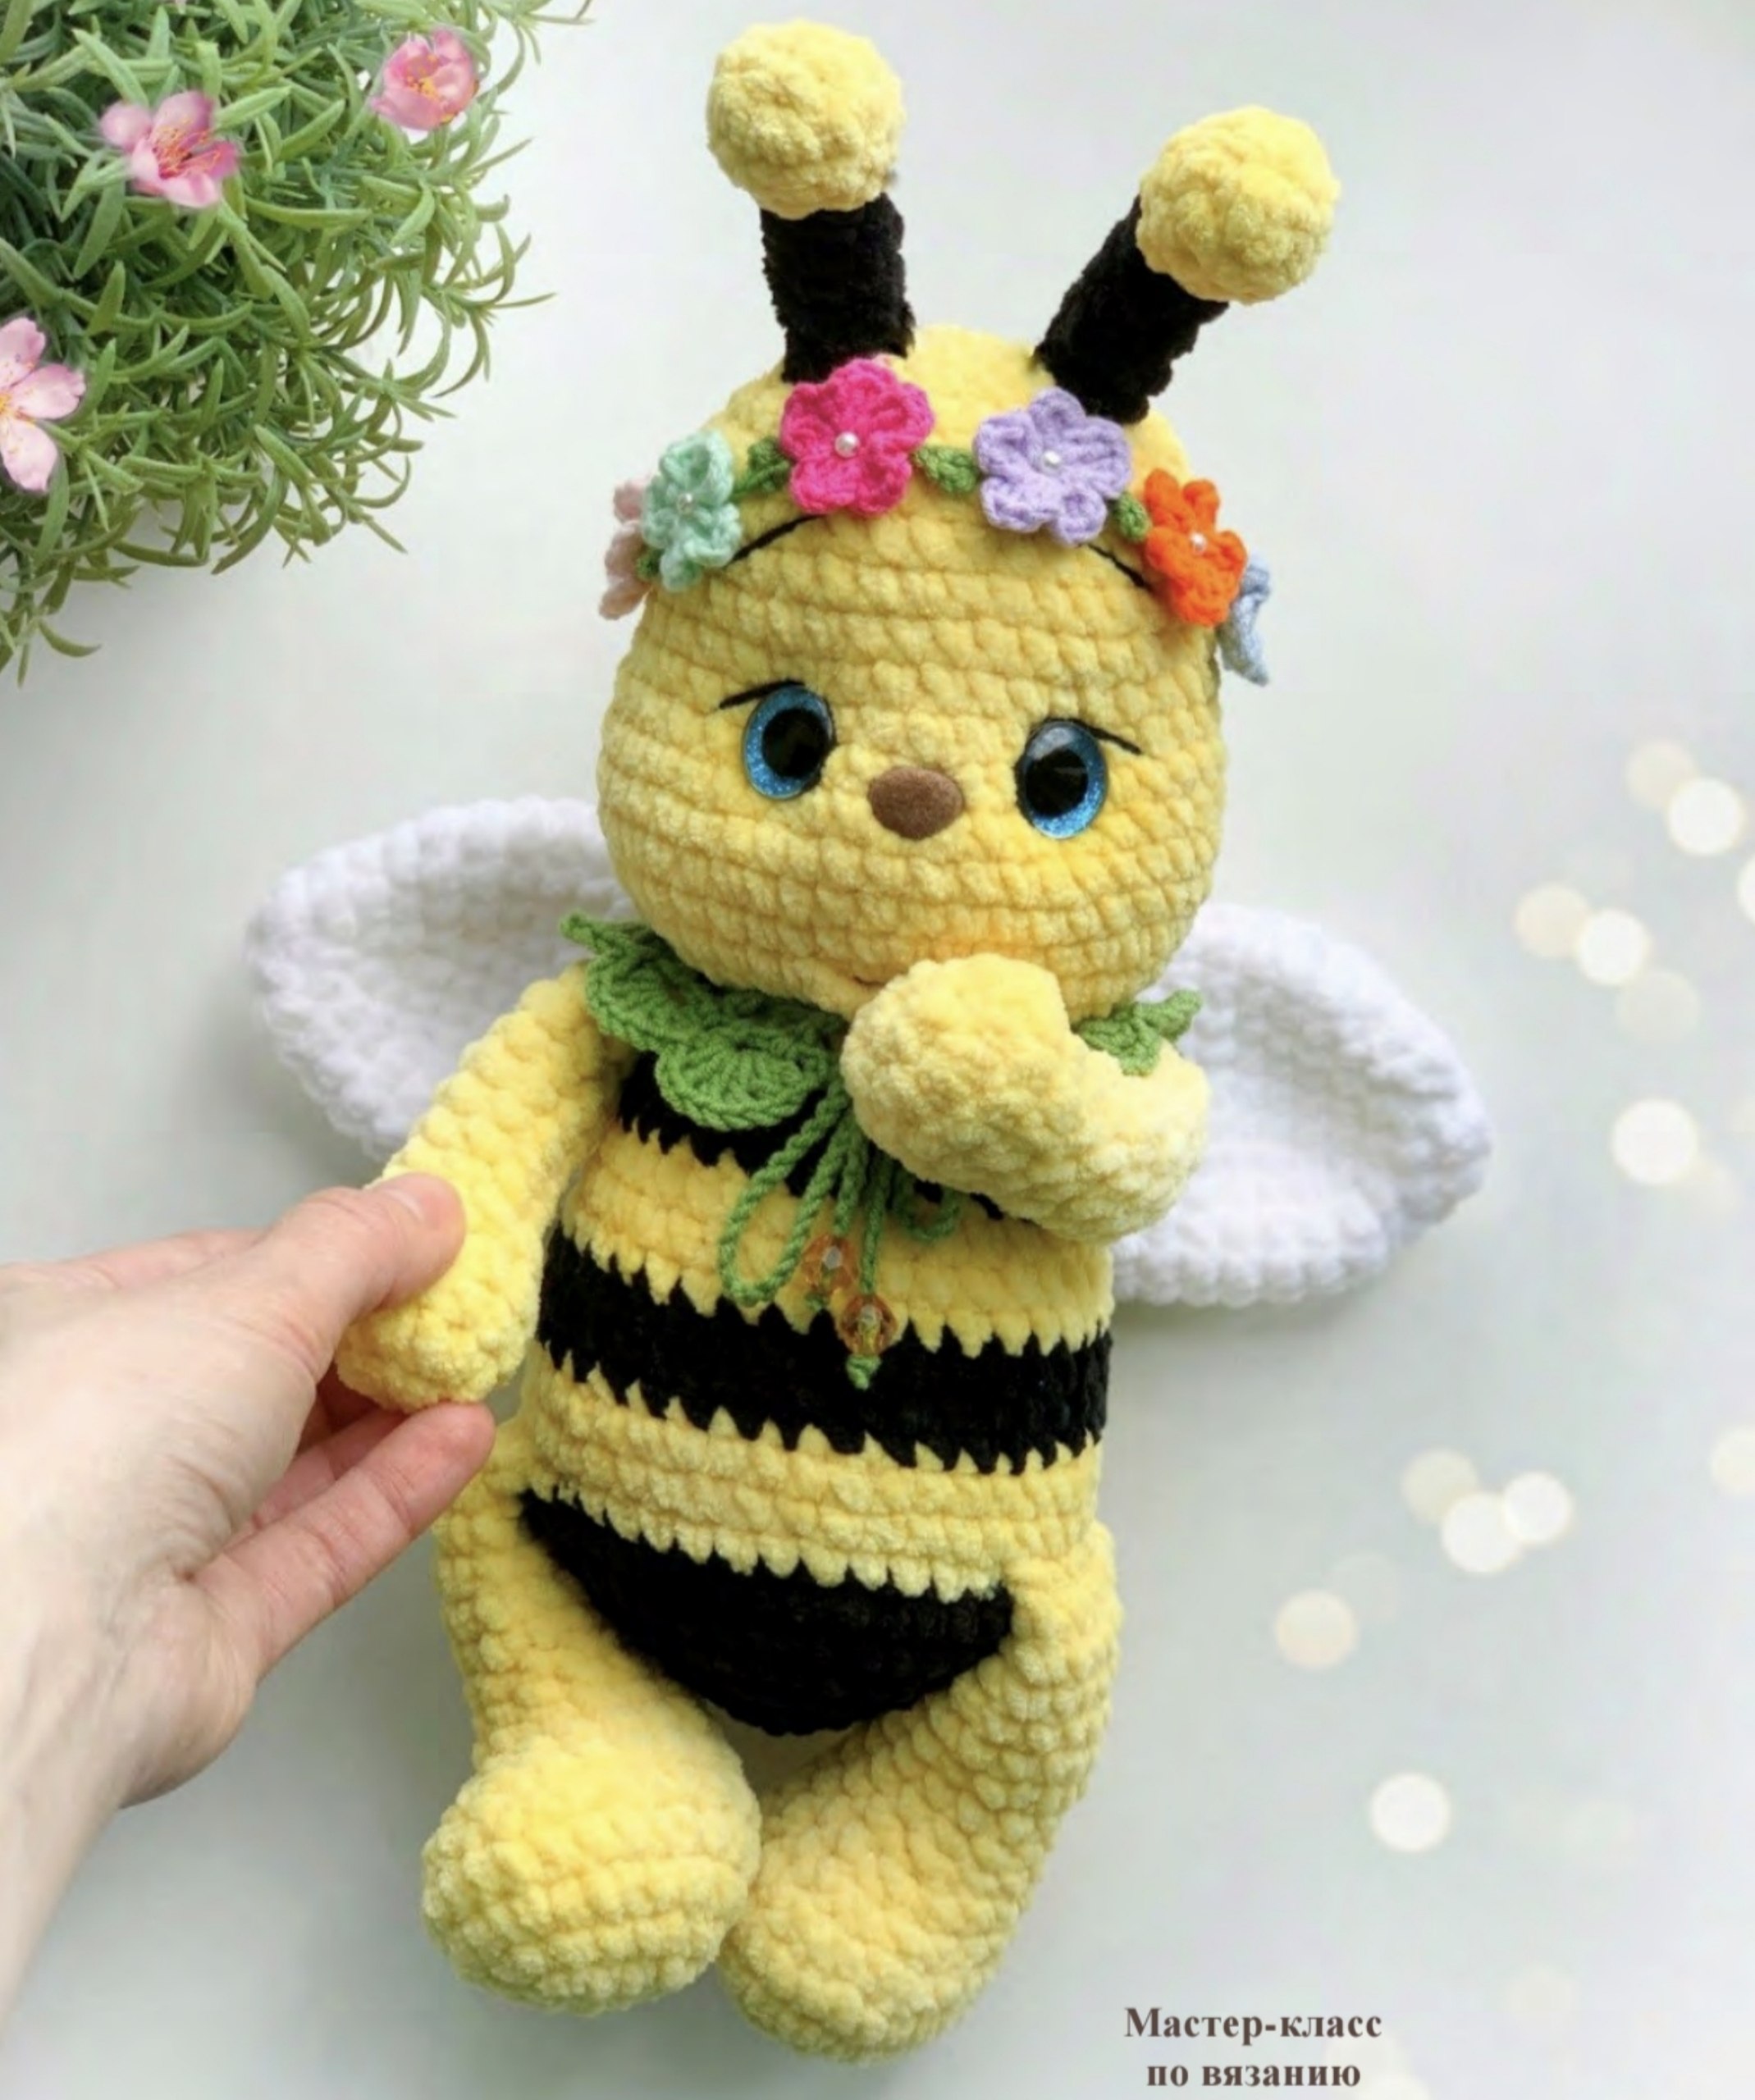
Adorable Plush Crochet Bee Pattern: A Step-by-Step Amigurumi Tutorial
Are you looking for your next cozy crochet project? There is nothing quite as charming as a tiny, chubby bee to brighten up a nursery or a craft shelf. This adorable, plush amigurumi bee is the perfect project for anyone looking to master the art of working with velvet or chenille yarns. With its oversized eyes, sweet flower headband, and tiny wings, this little bee is bound to become a favorite!
This tutorial is designed to be beginner-friendly, guiding you through every stitch to create a high-quality, professional-looking plushie. By the end of this guide, you will have a cuddly companion roughly 12 inches tall.
Materials & Abbreviations
To achieve the soft, huggable texture seen in the photos, I recommend using a bulky, plush-style yarn. Because plush yarn can be a bit “fussy,” having the right hook size is essential to ensure your stuffing doesn’t peek through.
What You Will Need
- Plush/Velvet Yarn: You will need yellow, black, and white. (Less than 1 skein of yellow, and about 1/3 of a skein each for black and white).
- Cotton Crochet Thread: For the delicate accessories like the headband and collar (Green and assorted colors for flowers).
- Crochet Hooks: A 4mm to 4.5mm hook for the main body and a 2.5mm hook for the smaller accessories.
- Safety Eyes: 16mm (approx. 0.6 inches) with a sparkly finish.
- Safety Nose: 13x15mm (approx. 0.5 inches).
- Stuffing: High-quality polyester fiberfill (hollowfiber).
- Embroidery Thread: A small amount of black thread for eyelashes and eyebrows.
- Yellow Thread: About 8 inches for facial shaping.
- Decorative Elements: Small beads for the center of the flowers.
- Tools: A large-eye tapestry needle, stitch markers, and scissors.
Abbreviations (US Terms)
- Ch: Chain
- SC: Single Crochet
- DC: Double Crochet
- HDC: Half Double Crochet
- Sl st: Slip stitch
- Inc: Increase (2 stitches in one stitch)
- Dec: Decrease (decrease 2 stitches together)
Step-by-Step Instructions
The Legs (Make 2)
We start with the legs to create a sturdy base for our bee.
Round 1: Ch 5.
Round 2: 2 SC in the 2nd ch from the hook, 1 SC, 1 SC, 3 SC in the last ch. Now, continue working along the other side of the foundation chain: 3 SC. (Total: 10 sts)
Round 3: Inc, Inc, Inc, 2 SC, Inc, Inc, Inc, 2 SC. (16 sts)
Round 4: (Inc, 1 SC) repeat 8 times. (24 sts)
Round 5: 24 SC.
Continue with 4 more SC to reach the center of the foot.
Round 6: 8 SC, Dec, 1 SC, Dec, 1 SC, Dec, 8 SC. (21 sts)
Round 7: 7 SC, Dec, 1 SC, Dec, 1 SC, Dec, 6 SC. (18 sts)
Round 8: 7 SC, 2 Dec, 7 SC. (16 sts)
Round 9: 6 SC, 2 Dec, 6 SC. (14 sts)
Round 10: 14 SC. (14 sts)
Round 11: 4 DC, 6 SC, 4 DC. (14 sts)
Round 12: 6 SC, Inc, 6 SC, Inc. (16 sts)
Rounds 13-16: 16 SC. (16 sts)
Stuff the leg about halfway so that it can stand up when the toy is assembled. Fold it in half and join the two sides by crocheting 8 SC through both layers. You may need an extra SC to ensure the fold is even.
The Paws/Arms (Make 2)
Round 1: Ch 2, 7 SC in the 2nd ch from the hook. (7 sts)
Round 2: Inc in every stitch. (14 sts)
Rounds 3-4: 14 SC.
Round 5: (Dec, 1 SC) repeat 4 times, then 1 Dec. (9 sts)
Rounds 6-13: 9 SC.
Stuff the paw halfway, fold it in half, and join both sides with 4 SC.
The Antennae (Make 2)
Yellow Part:
Round 1: Ch 2, 6 SC in the 2nd ch from the hook. (6 sts)
Round 2: Inc in every stitch. (12 sts)
Round 3: 12 SC.
Round 4: 6 Dec. (6 sts)
Black Part:
Rounds 5-10: 6 SC.
Stuff the antennae and leave a long tail for sewing.
The Body
We will work in a continuous spiral. Do not cut the yarn when changing colors; simply carry the previous color along or switch at the start of the next round.
Black Color:
Round 1: Ch 2, 6 SC in the 2nd ch from hook. (6 sts)
Round 2: Inc in every stitch. (12 sts)
Round 3: (1 SC, Inc) repeat 6 times. (18 sts)
Round 4: (2 SC, Inc) repeat 6 times. (24 sts)
Round 5: (3 SC, Inc) repeat 6 times. (30 sts)
Round 6: (4 SC, Inc) repeat 6 times. (36 sts)
Round 7: (5 SC, Inc) repeat 6 times. (42 sts)
Round 8: 42 SC.
Switch to Yellow Color:
Round 9: 7 SC, join the first leg (8 SC), 13 SC, join the second leg (8 SC), 6 SC. (42 sts)
Rounds 10-11: 42 SC.
Black Color:
Round 12: (5 SC, Dec) repeat 6 times. (36 sts)
Rounds 13-14: 36 SC.
Yellow Color:
Rounds 15-17: 36 SC.
Black Color:
Round 18: (4 SC, Dec) repeat 6 times. (30 sts)
Round 19: 30 SC.
Round 20: (3 SC, Dec) repeat 6 times. (24 sts)
Stuff the body firmly. You may now cut the black yarn.
Attaching the Arms
Before sewing, position the arms so they are parallel to the legs. Work in a spiral.
Round 21: 5 SC, join the first arm (4 SC, 8 SC), join the second arm (4 SC, 3 SC). (24 sts)
Round 22: (2 SC, Dec) repeat 6 times. (18 sts)
Round 23: Inc in every stitch. (36 sts)
Round 24: (5 SC, Inc) repeat 6 times. (42 sts)
Rounds 25-30: 42 SC.
Round 31: (5 SC, Dec) repeat 6 times. (36 sts)
Rounds 32-33: 36 SC.
The Head
Placement: Count 3 rounds from the top. Insert the safety eyes between rounds 3 and 4, leaving 8 stitches between them. Insert the safety nose in the center between rounds 4 and 5.
Round 34-36: 36 SC.
Round 37: (4 SC, Dec) repeat 6 times. (30 sts)
Round 38: (3 SC, Dec) repeat 6 times. (24 sts)
Round 39: (2 SC, Dec) repeat 6 times. (18 sts)
Stuff the head very firmly, paying extra attention to the cheek area to create a rounded look.
Round 40: (1 SC, Dec) repeat 6 times. (12 sts)
Round 41: 6 Dec. (6 sts)
Close the remaining hole with your needle.
The Wings
White Color:
Round 1: Ch 2, 6 SC in the 2nd ch from hook. (6 sts)
Round 2: Inc in each stitch. (12 sts)
Round 3: 12 SC.
Round 4: (1 SC, Inc) repeat 6 times. (18 sts)
Round 5: (2 SC, Inc) repeat 6 times. (24 sts)
Rounds 6-12: 24 SC.
Round 13: Dec, 10 SC, Dec, 10 SC. (22 sts)
Round 14: Dec, 9 SC, Dec, 9 SC. (20 sts)
Round 15: Dec, 8 SC, Dec, 8 SC. (18 sts)
Round 16: Dec, 7 SC, Dec, 7 SC. (16 sts)
Round 17: Dec, 6 SC, Dec, 6 SC. (14 sts)
Round 18: Inc, 6 SC, Inc, 6 SC. (16 sts)
Round 19: Inc, 7 SC, Inc, 7 SC. (18 sts)
Round 20: Inc, 8 SC, Inc, 8 SC. (20 sts)
Round 21: Inc, 9 SC, Inc, 9 SC. (22 sts)
Round 22: Inc, 10 SC, Inc, 10 SC. (24 sts)
Rounds 23-29: 24 SC.
Round 30: (2 SC, Dec) repeat 6 times. (18 sts)
Round 31: (1 SC, Dec) repeat 6 times. (12 sts)
Round 32: 6 Dec. (6 sts)
Close the opening. Pinch the wings in the middle with white thread to create shape, hide the small end, and use the long end to sew the wings to the bee’s back.
Accessories (Headband, Flowers, & Collar)
The Flower Headband
Green Thread:
Ch 40. *Ch 10, Sl st in the 5th ch from the hook, repeat 4 times. Repeat from * until you have used 35 chains.
The Tiny Flowers (Make 6)
Colorful Thread:
Ch 3. In the 3rd ch from the hook, work: (2 DC, 2 Ch, Sl st in same stitch). This creates your first petal. Repeat this process 4 more times into the same center stitch to create a 5-petal flower. Fasten off, pulling the tail to close the center tight. You can sew a small bead into the center for extra cuteness!
The Green Collar
Green Thread:
Ch a length that fits around the bee’s neck (approx. 50 chains).
Rounds 1 & 2: Work a filet mesh pattern (alternating DC and Ch).
Round 3: (3 Ch, 1 DC, 1 Ch, 1 DC in the first mesh square, Sl st in the next) repeat across.
Attach a 5-7 inch cord to the ends of the collar to tie it around the neck.
Finishing
Facial Detailing & Shaping
To give your bee that professional “squishy” look, you need to perform facial shaping (often called utyazhka):
- Thread a needle and enter under the neck.
- Bring the needle up through the top right of the eye (Point 2).
- Go through points 3, 4, 5, and back under the neck at point 6.
- Pull slightly to shape the cheek.
- Go through the head (Point 7) and come out the bottom of the right eye (Point 8).
- Go through 9, 10, 11, and back under the neck at Point 12.
- Tie two knots and hide the thread inside the head.
Finally, use your black embroidery thread to stitch small, delicate eyelashes and eyebrows above the eyes. If you want to go the extra mile, you can add a tiny “lip” by crocheting a small chain (5 Ch) and slip-stitching it to the bottom of the nose area.
Tips for Success
- Tension is Key: When working with plush yarn, try to keep your tension consistent. If you find your stitches are too loose, drop down half a hook size.
- Stuffing: Don’t be afraid to stuff! For amigurumi to look “cute,” they need to be firm. Use small pieces of stuffing at a time to avoid lumps.
- Safety First: If this toy is intended for a baby, please replace safety eyes with embroidered eyes to prevent any choking hazards.
- Color Changes: When changing from black to yellow in the body, try to do the color change on the last stitch of the previous round to make the transition seamless.