DIY Fuzzy Ginger Cat Crochet Pattern: A Complete Amigurumi Tutorial
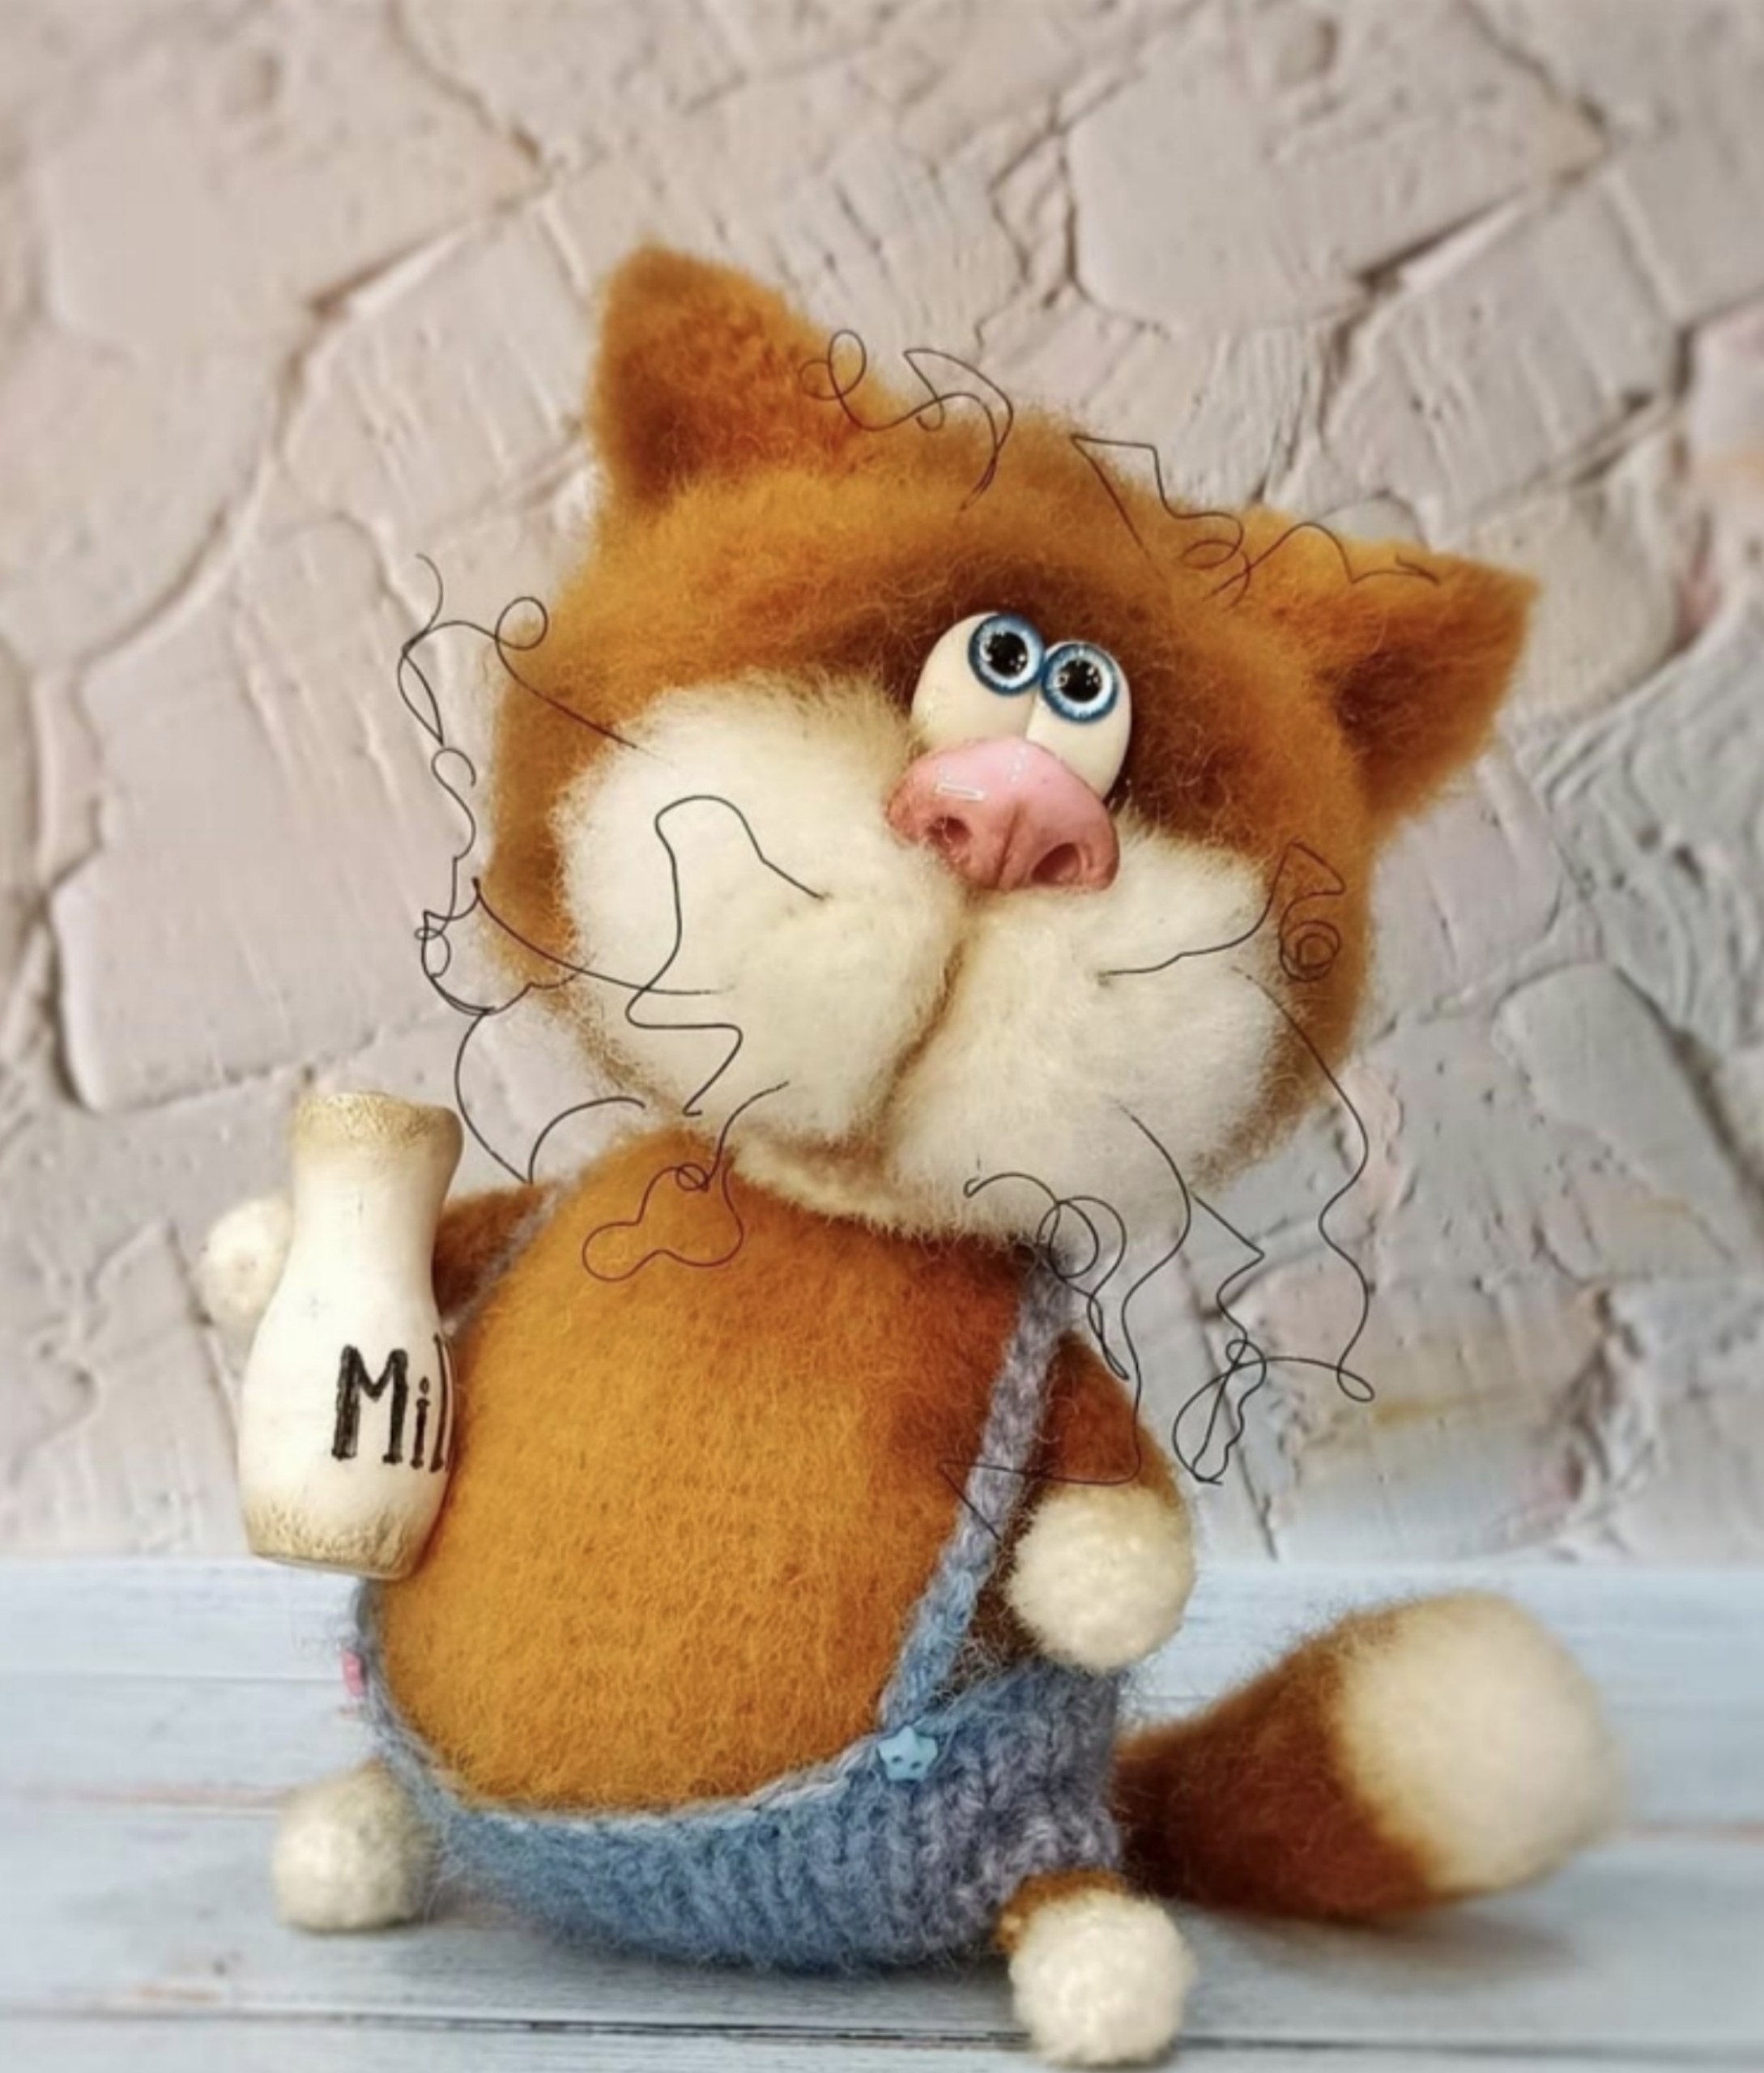
There is nothing quite as charming as a tiny, fuzzy companion to brighten up your home. If you are looking for a project that combines the classic joy of amigurumi with a unique, lifelike texture, this adorable ginger cat pattern is for you! This little kitty features a soft, “brushed” look that makes it feel incredibly huggable and whimsical.
This tutorial is designed to take you through the process of creating a character-filled cat, complete with a wire frame for posing, expressive clay eyes, and even a tiny pair of handmade overalls. Whether you are looking to make a unique gift or want to add a special piece to your own crochet collection, this detailed guide will help you every step of the way.
Materials & Abbreviations
To achieve the signature fuzzy look of this cat, I highly recommend using a yarn blend that includes mohair or a similar brushed fiber. The combination of standard cotton/acrylic yarn and mohair creates that beautiful, “unruly” fur effect.
What You Will Need
- Yarn: Medium weight yarn in orange/ginger and white (an Alize Real 40 or similar weight works well). Additionally, grab a strand of Kid Mohair in matching orange and white to hold together with your main yarn for extra fluff.
- Accent Yarn: A small amount of pink yarn for the mouth.
- Overalls Yarn: Blue yarn (to be worked with two strands held together).
- Hook: A crochet hook appropriate for your yarn weight (usually 2.5mm to 3.5mm).
- Stuffing: High-quality polyester fiberfill.
- Wire Frame: 1.2mm or 1.5mm gauge craft wire. You will need:
- Two 6.7-inch pieces for the legs.
- One 8.7-inch piece for the tail.
- Two 5.9-inch pieces for the arms.
- Details: White and pink polymer clay, 8mm cabochons or half-beads for the eyes, fishing line (for whiskers), and super glue.
- Finishing Tools: A pet slicker brush or a fine-tooth comb (essential for the “fluffing” stage), pastels or markers for shading, and clear varnish for the clay parts.
- Other: Electrical tape or adhesive tape (to cover wire ends), a tapestry needle, and stitch markers.
US Crochet Abbreviations
- MR: Magic Ring
- sc: Single crochet
- inc: Increase (2 sc in one stitch)
- dec: Decrease (sc 2 together)
- ch: Chain
- sl st: Slip stitch
- ch-1: Chain one (used as a turning chain)
Step-by-Step Instructions
The Ears (Make 2)
Work in ginger yarn. Marker use is optional here.
- Rnd 1: 6 sc in MR (6)
- Rnd 2: (1 sc, inc) x3 (9)
- Rnd 3: (2 sc, inc) x3 (12)
- Rnd 4: 12 sc (12)
- Rnd 5: (3 sc, inc) x3 (15)
- Rnd 6: (4 sc, inc) x3 (18)
- Rnd 7: (5 sc, inc) x3 (21)
- Sl st to close and fasten off.
The Mouth
The mouth is made of two parts: a pink inner part and a white outer part. You will work both parts in rows using the same pattern. For the pink part, fasten off; for the white part, do not fasten off.
- Rnd 1: 6 sc in MR, ch-1 and turn (6)
- Rnd 2: ch-1, (1 sc, inc) x3 (9)
Place the pink and white pieces together. Working through both layers simultaneously, crochet 9 sc around the edge to join them. Fasten off, leaving a long tail for sewing.
The Head
Start with white yarn. Use a stitch marker strictly!
- Rnd 1: 6 sc in MR (6)
- Rnd 2: 6 inc (12)
- Rnd 3: (1 sc, inc) x6 (18)
- Rnd 4: (2 sc, inc) x6 (24)
- Rnd 5: 4 sc, 3 inc, 10 sc, 3 inc, 4 sc (30)
- Rnd 6: 6 sc, (inc, 1 sc) x2, inc, 8 sc, (inc, 1 sc) x2, inc, 6 sc (36)
- Rnds 7-9: 36 sc (36)
Switch to ginger yarn.
- Rnd 10: 8 sc, 3 inc, 14 sc, 3 inc, 8 sc (42)
- Rnd 11: (6 sc, inc) x6 (48)
- Rnd 12: (1 sc, inc) x6, 24 sc, (inc, 1 sc) x6 (60)
- Rnds 13-15: 60 sc (60)
Creating the Frame Opening: We need a hole to insert the wire. In Rnd 16, work 28 sc, ch 4 (skipping 4 stitches on the base), then work 28 sc (60 total).
- Rnd 17: 28 sc, 4 sc in the ch-4 space, 28 sc (60)
- Rnd 18: (8 sc, dec) x6 (54)
- Rnd 19: (7 sc, dec) x6 (48)
- Rnd 20: (6 sc, dec) x6 (42)
- Rnd 21: 42 sc (42)
- Rnd 22: (5 sc, dec) x6 (36)
Stuff firmly with fiberfill. Continue decreasing:
- Rnd 23: (4 sc, dec) x6 (30)
- Rnd 24: (3 sc, dec) x6 (24)
- Rnd 25: (2 sc, dec) x6 (18)
- Rnd 26: (1 sc, dec) x6 (12)
- Rnd 27: 6 dec (6)
Fasten off. If necessary, add more stuffing through the frame opening.
Shaping the Face
To give the cat its cute snout, use sewing pins to mark five points. Place one pin at the center color change line, and two pins on either side (2 stitches away from the center). Place the remaining two pins on the bottom of the “muzzle” area. Using a tapestry needle and thread, pull the fabric through these points to create a protruding snout shape. This creates the perfect indentation for the eyes and nose.
The Body
Work in ginger yarn. Marker use is essential.
- Rnd 1: 6 sc in MR (6)
- Rnd 2: 6 inc (12)
- Rnd 3: 12 inc (24)
- Rnd 4: (3 sc, inc) x6 (30)
- Rnd 5: (4 sc, inc) x6 (36)
- Rnd 6: (5 sc, inc) x6 (42)
- Rnd 7: (6 sc, inc) x6 (48)
Attaching Limbs: In Rnd 8, we will join the legs and tail. Hold the first leg against the body and crochet through both the leg and the body: 3 sc, 10 sc. Now hold the tail against the body and crochet through both: 4 sc, 10 sc. Hold the second leg against the body: 3 sc, (inc, 2 sc) x3 (54).
Rnd 9: (3 sc, inc) x3, 3 sc (along the first leg), 10 sc, 4 sc (along the tail), 10 sc, 3 sc (along the second leg), (inc, 3 sc) x3 (60).
Continue with body shaping:
- Rnds 10-11: 60 sc (60)
- Rnd 12: (18 sc, dec) x3 (57)
- Rnd 13: (17 sc, dec) x3 (54)
- Rnd 14: 54 sc (54)
- Rnd 15: (7 sc, dec) x6 (48)
- Rnds 16-17: 48 sc (48)
- Rnd 18: (14 sc, dec) x3 (45)
- Rnd 19: (13 sc, dec) x3 (42)
- Rnd 20: (5 sc, dec) x6 (36)
- Rnds 21-22: 36 sc (36)
Attaching Arms: In Rnd 23, work 6 sc, hold the first arm against the body and crochet through both: 3 sc, 18 sc. Hold the second arm against the body and crochet through both: 3 sc, 6 sc (36).
Rnd 24: 6 sc, 3 sc (along the first arm), 18 sc, 3 sc (along the second arm), 6 sc (36).
Inserting the Frame: Wrap the ends of your wire pieces with tape. Insert the leg and tail wires into the body until they hit the bottom. Secure the loose ends together with tape. Insert the arm wires. Fill the body with more stuffing to secure the frame in place.
Continue shaping the body:
- Rnd 25: (10 sc, dec) x3 (33)
- Rnd 26: (9 sc, dec) x3 (30)
- Rnd 27: (3 sc, dec) x6 (24)
- Rnd 28: (6 sc, dec) x3 (21)
- Rnd 29: (5 sc, dec) x3 (18)
- Rnds 30-31: 18 sc (18)
Add extra stuffing and fasten off, leaving a tail for sewing the head.
Arms, Legs, and Tail
Arms (Make 2): White yarn first. MR 6, (1 sc, inc) x3 (9). 2 rows of 9 sc. Stuff. (1 sc, dec) (6). Switch to ginger yarn and work 7 rows of 6 sc. Fasten off.
Legs (Make 2): White yarn first. MR 6, (1 sc, inc) x3 (9). 2 rows of 9 sc. Stuff. (1 sc, dec) x3 (6). Switch to ginger yarn and work 5 rows of 6 sc. Do not stuff the ginger part. Fasten off.
Tail: White yarn first. MR 6, 6 inc (12), (1 sc, inc) x6 (18). 2 rows of 18 sc. Switch to ginger yarn. Stuff as you go. 5 rows of 18 sc, (4 sc, dec) x3 (15), 2 rows of 15 sc, (3 sc, dec) x3 (12), 2 rows of 12 sc, (1 sc, dec) x4 (8), 9 rows of 8 sc. Fasten off.
Optional: Tiny Overalls
Using blue yarn (double strand), cast on 32 stitches on knitting needles. Work in stockinette stitch for 12 rows (or more for longer pants). Sew the sides together, leaving an opening for the tail. Create two straps from chains and sew them to the waistband.
Finishing
The “Fluffing” Magic
This is the most important step! To get that soft, fuzzy look, use a pet slicker brush or a fine comb. Carefully brush the entire surface of the cat, being patient and thorough. Brush until the individual crochet stitches are no longer visible. Trim any stray long hairs on the paws, ears, and tail tip with scissors, and use a soft brush to smooth out the face.
Face and Details
- Eyes: Roll two small balls of white polymer clay, flatten them slightly, and insert your 8mm cabochons. Bake according to clay instructions and coat with clear varnish.
- Nose: Roll a small ball of pink polymer clay, shape it into a nose, and add small nostrils and a tiny line between them. Bake and varnish.
- Assembly: Use super glue to attach the eyes and nose to the shaped snout.
- Whiskers: Use thin fishing line to create realistic whiskers.
- Shading: Use dry pastels or markers to add soft shading under the eyes and inside the ears for a professional, lifelike finish.
Tips for Success
- Use Markers: Always use a stitch marker, especially when working with multiple colors or creating openings for the frame.
- Tension is Key: When joining limbs, keep your tension even so the body doesn’t look lumpy.
- Wire Safety: Always ensure wire ends are thoroughly covered with tape to prevent them from poking through the crochet fabric.
- Don’t Rush the Brushing: The “fluffy” look takes time. If you miss spots, the cat will look “patchy.” Take your time!