
DIY Crochet Snowman Pattern: Adorable Winter Amigurumi with Ushanka Hat
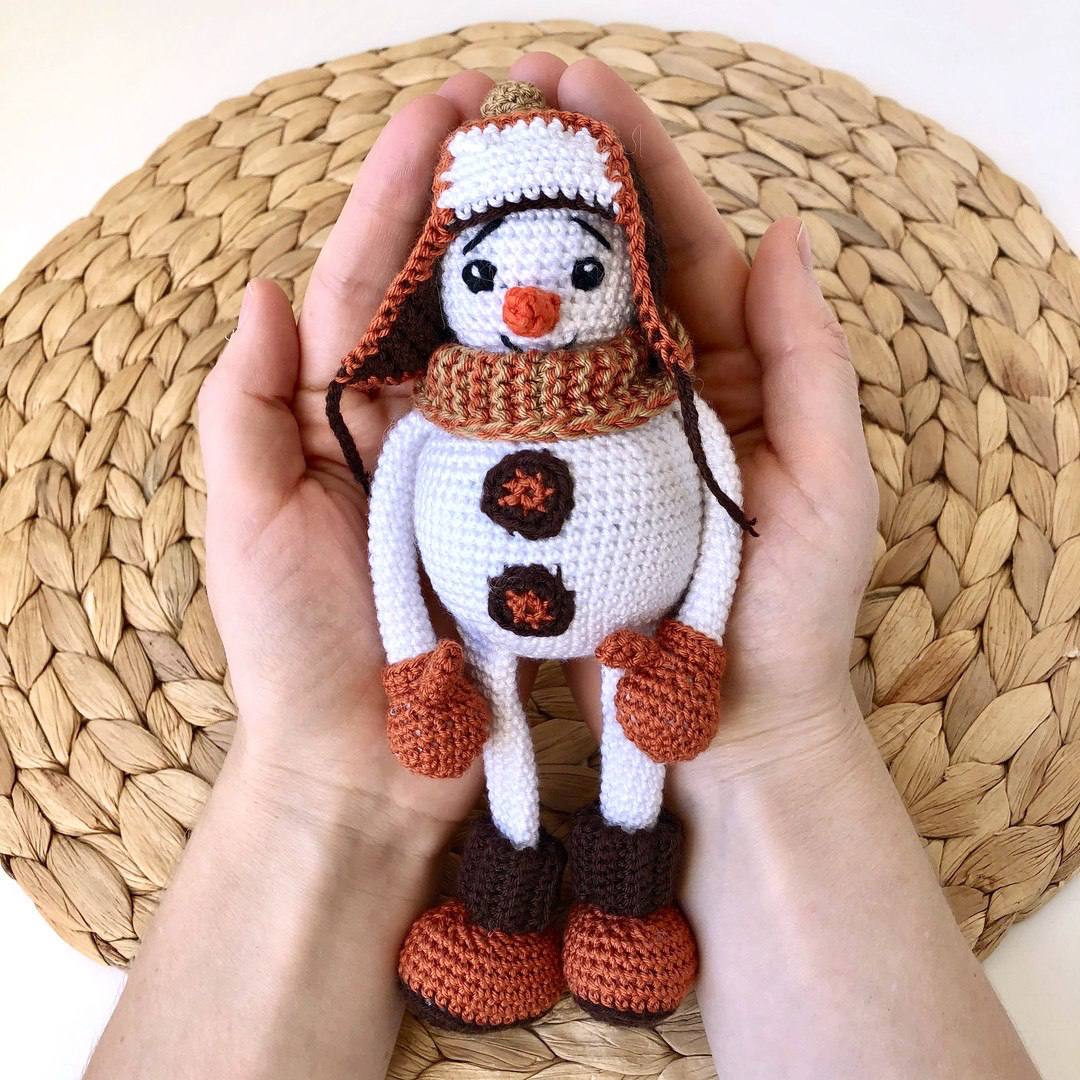
There is nothing quite as cozy as curling up with a warm cup of cocoa and a crochet hook during the winter months. If you are looking for your next seasonal project, look no further! This adorable crochet snowman is the perfect companion for your winter decor. Dressed in a charming, oversized ushanka hat (that classic Russian-style earflap hat), a warm scarf, and tiny mittens, this little guy is sure to bring a smile to anyone’s face.
This pattern is designed with beginners in mind. While it involves several small parts, the shapes are straightforward, and the assembly is very rewarding. Whether you want to make a gift for a child or a festive ornament for your bookshelf, this snowman is a delightful project that works up quickly once you get into the rhythm.
Materials & Abbreviations
To make this snowman, you will need several colors of yarn. I recommend using a medium-weight (worsted) cotton or acrylic yarn to ensure the stitches are tight and the stuffing doesn’t peek through.
Yarn Colors Needed:
- White: For the body, head, arms, and hat trim.
- Dark Brown: For the ushanka hat, the bottom of the boots, and the button details.
- Light Brown: For the mittens, the middle of the boots, and the buttons.
- Gold or Mustard Yellow: For the pompom on the hat and the scarf.
- Orange: For the carrot nose.
Other Supplies:
- Crochet hook (3.5mm or size appropriate for your yarn)
- Fiberfill stuffing
- Safety eyes (or black embroidery thread for eyes)
- Yarn needle for sewing
- Scissors
- Stitch marker (a piece of contrasting yarn works great!)
US Crochet Abbreviations:
- MR: Magic Ring
- ch: Chain
- sc: Single crochet
- inc: Increase (2 sc in one stitch)
- dec: Decrease (sc 2 stitches together)
- sl st: Slip stitch
- st(s): Stitch(es)
- BLO: Back loops only
- FLO: Front loops only
- rep: Repeat
Step-by-Step Instructions
The Body
Start with white yarn. We will be working in continuous rounds.
- Rnd 1: 6 sc in a MR (6)
- Rnd 2: inc in each st around (12)
- Rnd 3: (1 sc, inc) rep 6 times (18)
- Rnd 4: (2 sc, inc) rep 6 times (24)
- Rnd 5: (3 sc, inc) rep 6 times (30)
- Rnd 6: (4 sc, inc) rep 6 times (36)
- Rnd 7: (5 sc, inc) rep 6 times (42)
- Rnd 8: (6 sc, inc) rep 6 times (48)
- Rnd 9: (7 sc, inc) rep 6 times (54)
Pro Tip: Tie in a piece of contrasting yarn here to act as a row marker to help you keep track of your rounds!
- Rnds 10-19: 54 sc (54)
- Rnd 20: (7 sc, dec) rep 6 times (48)
- Rnd 21: 48 sc (48)
- Rnd 22: (6 sc, dec) rep 6 times (42)
- Rnd 23: 42 sc (42)
- Rnd 24: (5 sc, dec) rep 6 times (36)
Start stuffing the body firmly with fiberfill.
- Rnd 25: (4 sc, dec) rep 6 times (30)
- Rnd 26: (3 sc, dec) rep 6 times (24)
- Rnd 27: (2 sc, dec) rep 6 times (18)
Fasten off, leaving a long tail for sewing the head to the body. Stuff the top very firmly.
The Head
Using white yarn:
- Rnd 1: 6 sc in a MR (6)
- Rnd 2: inc in each st around (12)
- Rnd 3: (1 sc, inc) rep 6 times (18)
- Rnd 4: (2 sc, inc) rep 6 times (24)
- Rnd 5: (3 sc, inc) rep 6 times (30)
- Rnd 6: (4 sc, inc) rep 6 times (36)
Place your stitch marker here.
- Rnds 7-15: 36 sc (36)
- Rnd 16: (4 sc, dec) rep 6 times (30)
- Rnd 17: (3 sc, dec) rep 6 times (24)
Stuff the head firmly. Fasten off and leave a long tail for sewing.
Arms and Mittens
We will start with light brown yarn to create the mitten, then switch to white for the arm.
The Mitten
- Rnd 1: 6 sc in a MR (6)
- Rnd 2: inc in each st around (12)
- Rnd 3: (1 sc, inc) rep 6 times (18)
- Rnds 4-6: 18 sc (18)
- Rnd 7: (1 sc, dec) rep 6 times (12)
- Rnd 8: 12 sc (12)
Stuff the mitten firmly. Do not stuff the arm part!
The Arm
Switch to white yarn. Do not cut the light brown yarn; instead, leave it on the outside of the stitches to create a decorative edge.
- Rnd 9: Working in BLO (back loops only), (2 sc, dec) rep 3 times (9)
- Rnds 10-29: 9 sc (9)
Note: You can adjust the length of the arms by adding or subtracting rows.
Fold the arm in half and sc through both layers 4 times to close it. Fasten off, leaving a tail for sewing. To finish the mitten edge, join light brown yarn to the front loops and work 2 rounds of 12 sc.
The Thumb: Use light brown yarn.
Rnd 1: 5 sc in MR (5).
Rnds 2-4: 5 sc (5).
Sew the thumb to the mitten so it sits naturally.
Legs and Boots
Start with dark brown yarn for the boot base.
- Foundation: Ch 10.
- Rnd 1: Starting in 2nd ch from hook: 8 sc, 3 sc in the last ch, 7 sc, inc (20)
- Rnd 2: 8 sc, 3 inc, 8 sc, inc (24)
- Rnd 3: inc, 7 sc, (1 sc, inc) rep 3 times, 7 sc, inc, 1 sc (29)
Switch to light brown yarn and work in BLO:
- Rnds 4-8: 29 sc (29)
- Rnd 9: 8 sc, 3 dec, 1 triple decrease (3 sc together), 3 dec, 5 sc, 2 dec (19)
- Rnd 10: (1 sc, dec) rep 2 times, 1 sc, 1 triple decrease, (1 sc, dec) rep 3 times (12)
Switch to white yarn and work in BLO:
- Rnd 11: (4 sc, dec) rep 2 times (10)
- Rnds 12-31: 10 sc (10)
Note: Adjust leg length by adding or subtracting rows.
Fold the leg in half and sc through both layers 5 times to close. Stuff the boot part firmly, but leave the leg slightly less stuffed so it stays flexible.
The Sock Detail: To finish the boot, crochet a small piece in dark brown (Ch 13, work 16 rows of 12 sc in FLO). Fold it in half and sew it to the front of the boot at the 10th row of the leg.
The Ushanka Hat
Start with dark brown yarn, working in continuous rounds.
- Rnd 1: 6 sc in a MR (6)
- Rnd 2: inc in each st around (12)
- Rnd 3: (1 sc, inc) rep 6 times (18)
- Rnd 4: (2 sc, inc) rep 6 times (24)
- Rnd 5: (3 sc, inc) rep 6 times (30)
- Rnd 6: (4 sc, inc) rep 6 times (36)
- Rnd 7: (5 sc, inc) rep 6 times (42)
Continue for about 8-9 more rounds (or until it fits your snowman’s head). Once the size is right, mentally divide the hat into 4 sections: 11 sts (ear), 10 sts (back), 11 sts (ear), and 10 sts (front).
Making the Earflaps
Work the first ear in dark brown using rows (not rounds) without turning chains:
- Rnd 1: 11 sc (11)
- Rnd 2: 10 sc (10)
- Rnd 3: 9 sc (9)
- Rnd 4: 8 sc (8)
- Rnd 5: 7 sc (7)
- Rnd 6: 6 sc (6)
- Rnd 7: 5 sc (5)
- Rnd 8: 4 sc (4)
- Rnd 9: 3 sc (3)
- Rnd 10: 2 sc (2)
- Rnd 11: 1 sc (1)
Ch 10 for the tie, fasten off. Repeat for the second ear. For the front panel, join white yarn and work 10 sc in BLO for several rounds, then sew it to the top of the hat. Finish the edge with a round of slip stitches in light brown.
Pompom
Using gold yarn: 6 sc in MR, inc in each st (12), 12 sc, 6 dec (6). Fasten off.
The Nose and Buttons
- Nose: Use orange yarn. 6 sc in MR, 6 sc in BLO, 4 sc + 1 dec (5), 3 sc + 1 dec (4), 2 sc, skip 1 st, 1 sc (3). Fasten off and sew to the face.
- Buttons: Use light brown yarn for a 6 sc MR, then switch to dark brown for an inc round. Make two and sew to the body.
Finishing
Assembly is the most important part! Use a yarn needle to sew the head to the body. Sew the arms to the sides of the body, about 3-4 rows down from the neck. Sew the legs to the bottom of the body, making sure they are slightly toward the front so the snowman can sit upright. Finally, embroider the eyes, eyebrows, and a happy smile onto the face.
Tips
- Tension is Key: Since this is amigurumi, keep your stitches tight to prevent the stuffing from showing.
- The Scarf: For the scarf, you can use a small piece of gold and light brown yarn. While the pattern suggests knitting, you can easily crochet a small strip of 8 stitches in a textured stitch to achieve a similar look.
- Smoothing the Hat: If your hat ties look a bit wonky, you can lightly steam them with an iron to help them lay flat.