
How to Crochet an Angelic Frog: A Cute Amigurumi Tutorial
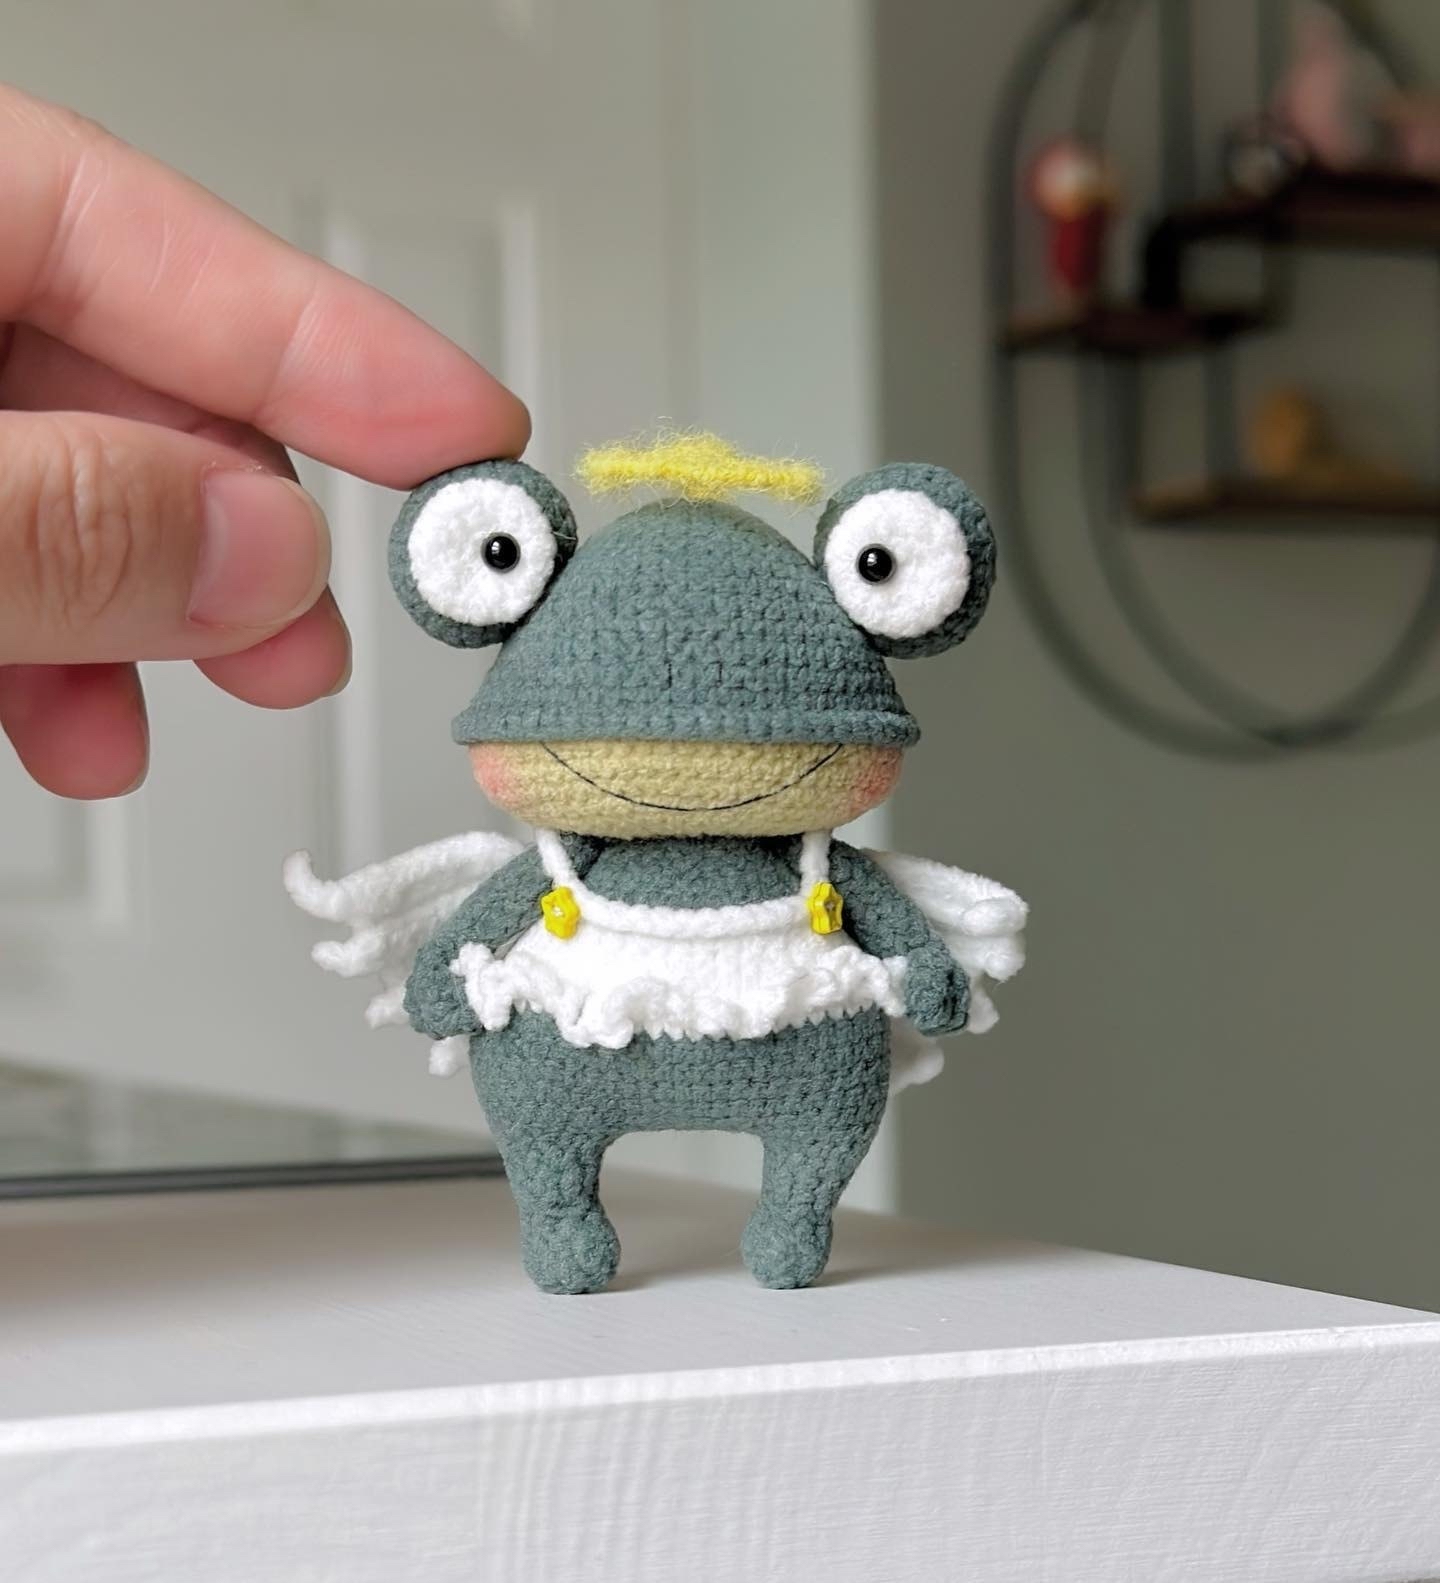
If you are looking for your next adorable crochet project, look no further! This whimsical little angel frog is the perfect addition to your amigurumi collection. With its tiny wings, soft green tones, and a glowing golden halo, this little character is a joy to make and even more fun to display. Whether you want to make a unique gift for a nursery or a tiny desk companion, this tutorial will guide you through every stitch to create your very own “Weird Friend” froggy angel.
Introduction
Crocheting amigurumi is all about patience and precision. This pattern is designed to be beginner-accessible, though it does require some attention to detail—especially when switching colors and working in the back loops to create shapes. This little frog features a unique “split” head design, where the face is a different shade of green than the back of the head, giving it a very expressive look. Don’t worry if your tension isn’t perfect on the first try; the charm of amigurumi lies in its handmade, slightly imperfect character!
Materials and Abbreviations
To ensure your frog turns out looking professional, I recommend using a fine-weight yarn and a small hook to keep your stitches tight. This prevents the stuffing from peeking through the gaps.
What You Will Need
- Yarn: Fine-weight/fingering weight wool or cotton (two-ply works best). You will need:
- Pine Green
- Emerald Green
- Creamy White
- Yellow fuzzy/eyelash yarn (for the halo)
- Crochet Hook: 1.2 mm (or the closest size you have that creates tight stitches).
- Safety Eyes: 3.0 mm black eyes.
- Other Supplies:
- Fiberfill stuffing
- A small amount of wire (for the halo)
- Waterproof glue or fabric adhesive (to secure wings and eyes)
- Tapestry needle and scissors
Abbreviations (US Terms)
- MR: Magic Ring
- sc: single crochet
- inc: increase (2 sc in one stitch)
- dec: decrease (sc 2 together)
- ch: chain
- sl st: slip stitch
- hdc: half double crochet
- BLO: back loop only
- st(s): stitch(es)
Step-by-Step Instructions
The Head
We will start the head using Pine Green yarn. Work in continuous rounds.
- Round 1: 6 sc in a MR (6)
- Round 2: 6 inc (12)
- Round 3: (1 sc, 1 inc) x6 (18)
- Round 4: (1 sc, 1 inc, 1 sc) x6 (24)
- Round 5: (3 sc, 1 inc) x6 (30)
- Round 6: (2 sc, 1 inc, 2 sc) x6 (36)
- Round 7: 6 sc, (1 sc, 1 inc) x3, 12 sc, (1 sc, 1 inc) x3, 6 sc (42)
- Round 8: 42 sc (42)
- Round 9: 6 sc, (1 sc, 1 inc, 1 sc) x3, 12 sc, (1 sc, 1 inc, 1 sc) x3, 6 sc (48)
- Rounds 10-11: 48 sc (48)
- Round 12: 9 sc, 6 inc, 18 sc, 6 inc, 9 sc (60)
- Round 13: 60 sc (60)
Switch to Emerald Green yarn:
- Round 14: 60 sc in BLO (60)
- Rounds 15-17: 60 sc (60)
- Round 18: 9 sc, 6 dec, 18 sc, 6 dec, 9 sc (48)
- Round 19: (2 sc, 1 dec, 2 sc) x8 (40)
- Round 20: (3 sc, 1 dec) x8 (32)
- Round 21: (1 sc, 1 dec, 1 sc) x8 (24)
Back of the Head (Pine Green): Locate the remaining loops from Round 13. Turn your work and work 60 sc into those loops to complete the back of the head. Stuff the head firmly as you finish.
The Eyes
Make two eye spheres. You can use black yarn or small safety eyes.
Eye Base (White/Black):
- Round 1: 6 sc in a MR (6)
- Round 2: 6 inc (12)
- Round 3: (1 sc, 1 inc) x6 (18)
- Round 4: (1 sc, 1 inc, 1 sc) x6 (24)
- Rounds 5-7: 24 sc (24)
- Round 8: (1 sc, 1 dec, 1 sc) x6 (18)
- Round 9: (1 sc, 1 dec) x6 (12)
- Round 10: 6 dec (6). Fasten off and leave a tail for sewing.
Note: For the white of the eyes, create a small 3-round circle of sc (MR 6, inc to 12, inc to 18) and sew it onto the eye spheres before attaching the black part.
The Legs and Body
First Leg (Pine Green):
- Round 1: Ch 4, turn. From the 2nd ch from hook: 2 sc, 3 sc in the next st, 1 sc, 1 inc (8)
- Round 2: 1 inc, 1 sc, 3 inc, 1 sc, 2 inc (14)
- Round 3: 2 sc, 5 dec, 2 sc (9)
- Round 4: 1 sc, 3 dec, 2 sc (6)
- Round 5: 1 sc, 3 inc, 2 sc (9)
- Round 6: 9 sc (9)
- Round 7: 3 sc, 3 inc, 3 sc (12)
- Fasten off, leaving a tail for sewing.
Second Leg (Pine Green): Repeat the steps for the first leg, but do not fasten off the yarn.
Joining the Legs and Body:
- Round 8: Work 3 sc onto the second leg, ch 6, then join to the 10th stitch of the first leg. 2 sc, (1 inc, 3 sc) x2, 7 sc, (1 inc, 3 sc) x2 (30)
- Round 9: (3 sc, 1 inc, 3 sc) x6 (36)
- Round 10: (7 sc, 1 inc) x6 (42)
- Rounds 11-14: 54 sc, increasing evenly to reach 54 stitches.
Transition to White (The Skirt):
- Round 15: 54 sc (54)
- Round 16: 14 sc, (1 sc, 1 dec, 1 sc) x3, 16 sc, (1 sc, 1 dec, 1 sc) x3 (48)
- Round 17: 14 sc, (1 sc, 1 dec) x3, 16 sc, (1 sc, 1 dec) x3 (42)
- Round 18: (5 sc, 1 dec) x6 (36)
- Round 19: 36 sc (36)
Return to Pine Green:
- Round 20: 36 sc (36)
- Round 21: (2 sc, 1 dec, 2 sc) x6 (30)
- Round 22: 30 sc (30)
- Round 23: (3 sc, 1 dec) x6 (24)
- Round 24: 24 sc (24)
The Arms
Arms (Pine Green):
- Round 1: 5 sc in a MR (5)
- Round 2: 5 inc (10)
- Rounds 3-5: 10 sc (10)
- Round 6: 1 dec, 8 sc (9)
- Rounds 7-9: 9 sc (9)
- Round 10: (1 sc, 1 dec) x3 (6)
- Round 11: To finish the edge, fold the edge and work: [sl st, ch 4, turn, 4 sc on the chain, 1 sc into the base, sl st]. Do not stuff the arms.
The Wings
Wings (Creamy White – worked in rows):
- Row 1: Ch 9, turn. From the 2nd ch from hook: 2 sc, 5 hdc, 3 ch, turn (3/3)
- Row 2: sl st, 1 sc, 5 hdc, 2 sc, sl st (3/3)
- Row 3: sl st, 2 sc, 5 hdc, 4 ch, turn (3/3)
- Row 4: sl st, 1 sc, 6 hdc, 1 inc, 1 sc, sl st (3/3)
- Row 5: sl st, 2 sc, 1 inc, 6 hdc, 5 ch, turn (3/3)
- Row 6: sl st, 1 sc, 8 hdc, 1 inc, 3 sc, sl st (3/3)
- Row 7: sl st, 4 sc, 1 inc hdc, 7 sc, 6 ch, turn (3/3)
- Row 8: 2 sl st, 3 sc, 7 hdc, 1 inc hdc, 4 sc, 2 sl st.
Leave a long tail for sewing the wings to the body.
Finishing
Now it is time to bring your angel frog to life!
- Assembly: Sew the eyes between rounds 7 and 9 of the head. Use a bit of glue to ensure they stay in place.
- Wings & Arms: Sew the wings to the sides of the body. Sew the arms onto the body, skipping about 5 stitches under each “armpit” area. Create the straps by crocheting from the arms to the skirt (14 sc, 8 ch, 14 sc).
- The Halo: Create a small ring using wire. Wrap the yellow fuzzy yarn around the wire until it is completely covered. Secure it and sew it to the top of the head near Round 3.
- Face Details: Use black thread to embroider small nostrils around round 11 and a sweet little mouth between rounds 14 and 17.
Tips
To make your amigurumi look its absolute best, keep these tips in mind:
- Tension is Key: Since this pattern uses a very small hook, try to keep your stitches tight. This ensures the stuffing doesn’t show and helps the frog hold its shape.
- Stuffing: When stuffing the head and body, push the fiberfill into the corners so there are no lumps.
- Color Changes: When changing colors, try to change the yarn on the final pull-through of the last stitch of the previous color to get a clean line.
- Safety First: If you are making this for a small child, avoid using safety eyes. Instead, embroider the eyes with black yarn to ensure it is 100% safe for little ones.