Crochet Alpaca Pattern: A Cute Amigurumi Tutorial for Beginners
Are you looking for your next adorable crochet project? This whimsical amigurumi alpaca is the perfect addition to your handmade collection! Whether you want to create a sweet nursery decoration or a unique gift for a friend, this little alpaca is designed to be charming and easy to follow. If you are a beginner looking to practice your amigurumi skills, this pattern is a wonderful way to master shaping, color changes, and assembly.
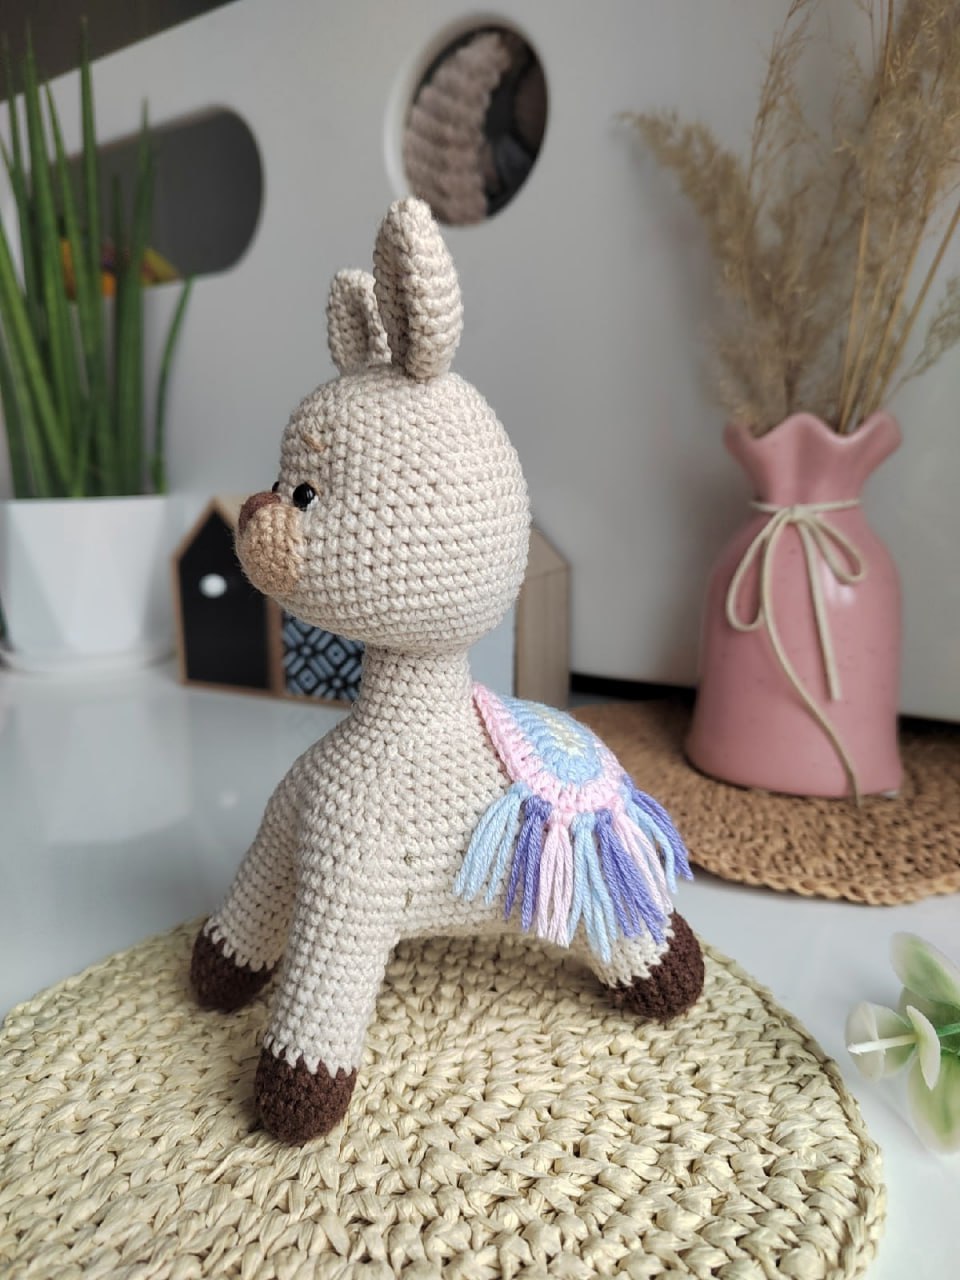
This pattern features a soft, rounded body, expressive eyes, and even a colorful little poncho to give your alpaca some extra personality. Grab your favorite hook and some cozy cotton yarn, and let’s get started on making your very own crochet alpaca!
Materials & Abbreviations
To ensure your alpaca turns out looking just like the photos, I recommend using a smooth cotton or cotton-blend yarn. This helps define your stitches and makes the toy hold its shape beautifully.
Materials Needed:
- Yarn: A cotton/acrylic blend (approximately 180 yards per 50g / 1.7 oz ball). Recommended weights are similar to Yarn Art Jeans, Gazelle Baby Cotton, or Alize Cotton Gold. You will need:
- Main color (Cream/Off-white)
- Accent color (Coffee/Brown for legs and snout)
- Scraps of various colors for the colorful poncho
- Crochet Hook: 2.0mm to 2.5mm (depending on your tension).
- Safety Eyes: 4mm eyes.
- Stuffing: Polyester fiberfill or polyfill.
- Other Tools: Scissors, a tapestry needle for sewing, and stitch markers.
Abbreviations (US Terms):
- MR: Magic Ring
- ch: Chain
- sc: Single crochet
- inc: Increase (2 sc in one stitch)
- dec: Decrease (sc 2 together)
- hdc: Half double crochet
- dc: Double crochet
- sl st: Slip stitch
- BLO: Back loop only
- st(s): Stitch(es)
- rep: Repeat
Step-by-Step Instructions
Front Legs (Make 2)
Start with your accent color (Coffee/Brown).
- 6 sc in MR (6)
- 6 inc (12)
- (1 sc, 1 inc) x 6 (18)
- 4-6. 18 sc (18)
- Switch to Main Color (Cream/Off-white)
- 7. 18 sc (18)
- 8-13. 18 sc (18)
Fasten off, leaving a long tail for sewing. Repeat for the second leg.
Back Legs (Make 2)
Start with your accent color (Coffee/Brown).
- 6 sc in MR (6)
- 6 inc (12)
- (1 sc, 1 inc) x 6 (18)
- 4-6. 18 sc (18)
- Switch to Main Color (Cream/Off-white)
- 7-11. 18 sc (18)
Do not fasten off on the second leg. We will use it to join the legs together to begin the body.
The Body
We will join the legs and work in rows to create the belly area.
- Joining the Legs: On the second leg, join the first leg by working 12 sc along the first leg, 4 ch, 18 sc along the second leg, 6 sc in the chain spaces, and 6 sc along the first leg.
- Starting the Rows: 12 sc, 5 sc in the ch-space, 8 sc along the second leg, 1 ch, and then start working in the opposite direction for the next row.
- Row 14-16: 21 sc, 1 ch, turn.
- Row 17: 1 dec, 17 sc, 1 dec = 19 sts, 1 ch, turn.
- Row 18: 19 sc, 1 ch, turn.
- Row 19: 1 dec, 15 sc, 1 dec = 17 sts, 1 ch, turn.
- Row 20: 17 sc, 1 ch, turn.
- Row 21: 1 dec, 13 sc, 1 dec = 15 sts, 1 ch, turn.
- Row 22: 15 sc, 1 ch, turn.
- Row 23: 1 dec, 11 sc, 1 dec = 13 sts, 1 ch, turn.
- Row 24: 13 sc, 1 ch, turn.
- Row 25: 13 sc, 1 ch, turn.
- Attaching Front Legs: Now, attach the front legs. Work 5 sc together with the front leg, 3 sc along the body, then 5 sc together with the other front leg. Continue working in a circle from here.
- Completing the Shape: Follow the decreasing pattern in the pattern notes (Rows 27-44) to taper the body toward the head. Ensure you stuff the body firmly as you go.
- Final Rounds: Rows 45-48: 18 sc.
Head
Using the Main Color.
- (1 sc, 1 inc) x 9 (27)
- (1 inc, 1 sc) x 13, 1 sc (40)
- (3 sc, 1 inc) x 5, 19 sc (45)
- 8 sc, 1 inc, (6 sc, 1 inc) x 2, 22 sc (48)
- 8 sc, 1 inc, (7 sc, 1 inc) x 2, 23 sc (51)
- 8 sc, 1 inc, (8 sc, 1 inc) x 2, 24 (54)
- 7-12. 54 sc (54)
- 13. (7 sc, 1 dec) x 6 (48)
- 14. 48 sc (48)
- 15. (6 sc, 1 dec) x 6 (42)
- 16-18. 42 sc (42)
- 19. (5 sc, 1 dec) x 6 (36)
- 20. (4 sc, 1 dec) x 6 (30)
- 21. (3 sc, 1 dec) x 6 (24)
- 22. (2 sc, 1 dec) x 6 (18)
- 23. (1 sc, 1 dec) x 6 (12)
Fasten off and pull the opening tight.
Muzzle (Snout)
Using the Accent Color (Coffee/Brown).
- 5 ch. Starting in the 2nd ch from hook: 3 sc, 3 sc in the last ch. Working on the other side of the chain: 2 sc, 2 sc in the last ch (10)
- 1 inc, 2 sc, 3 inc, 2 sc, 2 inc (16)
- 4. (1 inc, 2 sc), 2 sc, (1 inc, 2 sc) x 3, 2 sc, (1 inc, 2 sc) x 2 (22)
- 5-6. 22 sc (22)
Fasten off, leaving a tail for sewing. Stuff lightly and prepare to attach to the head.
Ears (Make 2)
Using the Main Color.
- 6 sc in MR (6)
- (1 sc, 1 inc) x 3 (9)
- (1 inc, 2 sc) x 3 (12)
- (3 sc, 1 inc) x 3 (15)
- (1 inc, 4 sc) x 3 (18)
- 6-8. 18 sc (18)
- 9. (1 dec, 7 sc) x 2 (16)
- 10. (1 dec, 5 sc) x 2 (14)
- 11. (1 dec, 4 sc) x 2 (12)
Fasten off, leaving a long tail for sewing.
Tail
Using the Main Color.
- 6 sc in MR (6)
- 6 inc (12)
- 12 sc (12)
- 6 dec (6)
Fasten off.
Colorful Poncho
This is worked in an oval shape using various colors.
- Round 1: 16 ch. Starting in 2nd ch from hook: 14 sc, 3 sc in last ch. Working on the other side of the chain: 13 sc, 2 sc in last ch (32). Fasten off.
- Round 2: Using hdc, 1 inc, 13 hdc, 3 inc, 13 hdc, 2 inc (38). Fasten off.
- Round 3: Using hdc, (1 hdc, 1 inc), 13 hdc, (1 hdc, 1 inc) x 3, 13 hdc, (1 hdc, 1 inc) x 2 (44). Fasten off.
Fringe: Cut approximately 40 pieces of yarn in three different colors, each about 6-7 inches long. Fold two strands together, fold them in half, and use your crochet hook to pull them through the stitches along the edge of the poncho.
Finishing
Assembly Tips
The assembly is where your alpaca really comes to life! Follow these steps carefully:
- The Muzzle: Sew the muzzle onto the head between rows 8 and 13.
- Eye Indentation: To give your alpaca those cute, deep eyes, use a needle and thread to pull the stuffing slightly inward where the eyes will go. This creates a “socket” look. You can also place a small piece of white felt behind the eyes for a brighter look.
- Eyes and Nose: Insert the safety eyes into the indentations. You can then sew or glue a small nose onto the muzzle.
- Ears: Sew the ears to the top of the head.
- Final Details: Sew the tail to the back and the poncho around the body. Finally, sew the head onto the body.
Tips
- Tension is Key: If you notice large gaps between your stitches, try using a smaller crochet hook. This keeps the stuffing from peeking through.
- Stuffing: Stuff your pieces firmly so they maintain their shape, but don’t overstuff to the point where the stitches stretch or the toy becomes too hard.
- Stitch Markers: Always use a stitch marker or a piece of contrast yarn to mark the first stitch of every round. This is essential for amigurumi to prevent mistakes.
- Spiral Working: Remember to work in continuous rounds (spirals) unless the pattern specifically tells you to work in rows.