Cute Lion Amigurumi Crochet Pattern: A Step-by-Step Tutorial
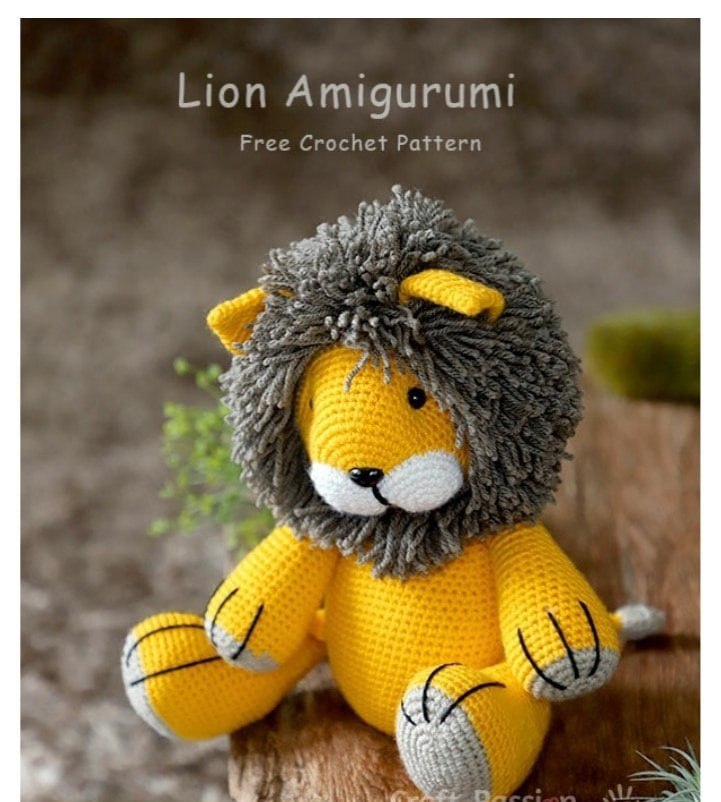
Are you looking for a new crochet project that is as adorable as it is huggable? Look no further! This Lion Amigurumi is the perfect project for anyone who loves wildlife or wants to create a special, handmade gift for a little one. This “King of the Jungle” is designed to be a soft, cuddly companion that looks wonderful whether it is sitting on a shelf or being held tight during naptime.
Whether you are an intermediate crocheter looking for a fun challenge or an advanced maker wanting to perfect your amigurumi skills, this pattern offers plenty of opportunities to practice color changes, working in the round, and assembly. Once finished, your lion will stand about 13.5 inches tall or sit at approximately 10.5 inches, making it a substantial and impressive piece.
Materials & Abbreviations
Before you pick up your hook, ensure you have all the necessary supplies ready. For the best results, I recommend using a consistent tension to ensure your stuffing stays securely inside the toy.
Materials Needed
- Crochet Hook: 2.5mm hook
- Yarn: DK weight lightweight acrylic yarn in the following colors:
- Yellow (Main body color)
- Light Khaki (Limbs and ear bases)
- Dark Brown (Mane)
- Beige (Muzzle)
- Black (Details and toe lines)
- Stuffing: Polyester fiberfill
- Safety Features:
- 1 pair of 10mm Dome-Button Eyes
- 1 piece of 18mm Safety Nose
- Tools:
- Long darning needle
- Water-erasable fabric marker
- 4-inch piece of cardboard (for making the mane)
- Scissors
- Pins
Abbreviations (US Terms)
- ch: chain
- sc: single crochet
- inc: increase (2 sc in the same stitch)
- inv dec: invisible decrease
- ps3: puff stitch (hdc3tog)
- slst: slip stitch
Step-by-Step Instructions
Follow these instructions carefully. Remember to work in continuous rounds for amigurumi to avoid visible seams.
The Body
Starting with Yellow yarn:
- Round 1: ch 5, inc in 2nd ch from hook, sc 2, 5sc in the last ch. Continue on the other side of the chain base, sc 2, 3sc in the last ch. {14}
- Round 2: inc, sc 4, [inc] 3 times, sc 4, [inc] 2 times. {20}
- Round 3: inc, sc 6, [inc] 2 times, sc, inc, sc 6, [inc] 2 times, sc. {26}
- Round 4: inc, sc 8, [inc, sc] 2 times, inc, sc 8, [inc, sc] 2 times. {32}
- Round 5: inc, sc 10, inc, sc 2, inc, sc, inc, sc 10, inc, sc 2, inc, sc. {38}
- Round 6: inc, sc 12, [inc, sc 2] 2 times, inc, sc 12, [inc, sc 2] 2 times. {44}
- Round 7: inc, sc 14, inc, sc 3, inc, sc 2, inc, sc 14, inc, sc 3, inc, sc 2. {50}
- Round 8: inc, sc 16, [inc, sc 3] 2 times, inc, sc 16, [inc, sc 3] 2 times. {56}
- Round 9: sc around. {56}
- Round 10: sc 25, inc, sc 27, inc, sc 2. {58}
- Round 11: sc 26, inc, sc 28, inc, sc 2. {60}
- Round 12: sc 27, inc, sc 29, inc, sc 2. {62}
- Round 13: sc 28, inc, sc 30, inc, sc 2. {64}
- Rounds 14–23: sc around. {64}
- Round 24: sc 6, [inv dec, sc 14] 3 times, inv dec, sc 8. {60}
- Round 25: sc around. {60}
- Round 26: sc 6, [inv dec, sc 13] 3 times, inv dec, sc 7. {56}
- Round 27: sc around. {56}
- Round 28: sc 6, [inv dec, sc 12] 3 times, inv dec, sc 6. {52}
- Round 29: sc around. {52}
- Round 30: sc 6, [inv dec, sc 11] 3 times, inv dec, sc 5. {48}
- Round 31: sc around. {48}
- Round 32: sc 6, [inv dec, sc 10] 3 times, inv dec, sc 4. {44}
- Round 33: sc around. {44}
- Round 34: sc 6, [inv dec, sc 9] 3 times, inv dec, sc 3. {40}
- Round 35: sc around. {40}
- Round 36: sc 6, [inv dec, sc 8] 3 times, inv dec, sc 2. {36}
- Round 37: sc around. {36}
- Round 38: [sc 4, inv dec] around. {30}
- Stuff the body firmly with polyester fiberfill.
- Round 39: sc around. {30}
- Round 40: sc 2, [inv dec, sc 3] 5 times, inv dec, sc. {24}
- Round 41: [sc 2, inv dec] around. {18}
- Round 42: [inv dec, sc] around. {12}
- Round 43: [inv dec] around. {6}
- Fasten off and leave a long tail for sewing.
The Head
Starting with Yellow yarn:
- Round 1: sc 6 in magic ring. {6}
- Round 2: [inc] around. {12}
- Round 3: [inc, sc] around. {18}
- Round 4: [sc 2, inc] around. {24}
- Round 5: [inc, sc 3] around. {30}
- Round 6: sc 2, [inc, sc 4] 5 times, inc, sc 2. {36}
- Round 7: [inc, sc 5] around. {42}
- Round 8: sc around. {42}
- Round 9: sc 3, [inc, sc 6] 5 times, inc, sc 3. {48}
- Round 10: sc around. {48}
- Round 11: [inc, sc 7] around. {54}
- Rounds 12–13: sc around. {54}
- Round 14: sc 4, [inc, sc 8] 5 times, inc, sc 4. {60}
- Rounds 15–16: sc around. {60}
- Round 17: [inc, sc 9] around. {66}
- Rounds 18–24: sc around. {66}
- Round 25: [inv dec, sc 9] around. {60}
- Round 26: sc around. {60}
- Round 27: sc 4, [inv dec, sc 8] 5 times, inv dec, sc 4. {54}
- Round 28: sc around. {54}
- Round 29: [inv dec, sc 7] around. {48}
- Round 30: sc 3, [inv dec, sc 6] 5 times, inv dec, sc 3. {42}
- Round 31: [inv dec, sc 5] around. {36}
- Round 32: sc 2, [inv dec, sc 4] 5 times, inv dec, sc 2. {30}
- Round 33: [inv dec, sc 3] around. {24}
- Stuff with polyester filling. Remove some stuffing to install the safety nose. Re-stuff the head.
- Round 34: sc, [inv dec, sc 2] 5 times, inv dec, sc. {18}
- Round 35: [inv dec, sc 1] around. {12}
- Round 36: [inv dec] around. {6}
- Fasten off and hide the yarn end.
Muzzle
Make 2 with Beige yarn:
- Round 1: sc 6 in magic ring. {6}
- Round 2: [inc] around. {12}
- Round 3: [inc, sc] around. {18}
- Round 4: [sc 2, inc] around. {24}
- Round 5: [inc, sc 3] around. {30}
- Fasten off and leave a long tail for sewing. Sew the two circles together along the sides (approximately 4 stitches) to create the muzzle shape.
Ears
Make 2 with Yellow yarn:
- Round 1: sc 4 in magic ring. {4}
- Round 2: sc around. {4}
- Round 3: [inc] around. {8}
- Round 4: sc around. {8}
- Round 5: [inc, sc] around. {12}
- Round 6: [inc, sc 2] around. {16}
- Round 7: [inc, sc 3] around. {20}
- Round 8: sc around. {20}
- Round 9: [inc, sc 4] around. {24}
- Rounds 10–15: sc around. {24}
- Fasten off and leave a long tail. Fold the ear and sew the bottom to create a scooped appearance.
Arms
Make 2, starting with Light Khaki yarn:
- Round 1: sc 6 in magic ring. {6}
- Round 2: [inc] around. {12}
- Round 3: [inc, sc] around. {18}
- Round 4: [sc 2, inc] around. {24}
- Round 5: [inc, sc 3] around. {30}
- Change color to Yellow.
- Rounds 6–10: sc around. {30}
- Round 11: [sc 8, inv dec] around. {27}
- Rounds 12–13: sc around. {27}
- Round 14: [sc 7, inv dec] around. {24}
- Rounds 15–16: sc around. {24}
- Round 17: [sc 6, inv dec] around. {21}
- Rounds 18–19: sc around. {21}
- Round 20: [sc 5, inv dec] around. {18}
- Rounds 21–22: sc around. {18}
- Round 23: [sc 4, inv dec] around. {15}
- Rounds 24–35: sc around. {15}
- Fasten off and leave a long tail. Fill the bottom 2/3 of the arms firmly with stuffing.
Legs
Make 2, starting with Light Khaki yarn:
- Round 1: ch 5, inc in 2nd ch from hook, sc 2, 5sc in the last ch. Continue on the other side of the chain base, sc 2, 3sc in the last ch. {14}
- Round 2: inc, sc 4, [inc] 3 times, sc 4, [inc] 2 times. {20}
- Round 3: inc, sc 6, [inc] 2 times, sc, inc, sc 6, [inc] 2 times, sc. {26}
- Round 4: inc, sc 8, [inc, sc] 2 times, inc, sc 8, [inc, sc] 2 times. {32}
- Round 5: inc, sc 10, inc, sc 2, inc, sc, inc, sc 10, inc, sc 2, inc, sc. {38}
- Round 6: inc, sc 12, [inc, sc 2] 2 times, inc, sc 12, [inc, sc 2] 2 times. {44}
- Change color to Yellow.
- Rounds 7–10: sc around. {44}
- Round 11: sc 14, inv dec, sc 12, inv dec, sc 14. {42}
- Rounds 12–13: sc 14, inv dec, sc 10, inv dec, sc 14. {40}
- Round 14: sc 14, inv dec, sc 8, inv dec, sc 14. {38}
- Round 15: sc 14, inv dec, sc 6, inv dec, sc 14. {36}
- Round 16: sc 14, inv dec, sc 4, inv dec, sc 14. {34}
- Round 17: sc 14, inv dec, inv dec, sc 14. {30}
- Round 18: sc around. {30}
- Round 19: [sc 6, inv dec] 3 times, sc 6. {27}
- Rounds 20–21: sc around. {27}
- Round 22: sc 6, [inv dec, sc 5] 3 times. {24}
- Rounds 23–24: sc around. {24}
- Round 25: sc 5, inv dec, sc 10, inv dec, sc 5. {22}
- Rounds 26–27: sc around. {22}
- Round 28: sc 5, inv dec, sc 9, inv dec, sc 4. {20}
- Rounds 29–30: sc around. {20}
- Round 31: sc 4, inv dec, sc 8, inv dec, sc 4. {18}
- Fasten off and leave a long tail. Fill the bottom 2/3 of the legs firmly with stuffing.
Tail
Starting with Yellow yarn:
- ch 4, slst to form a ring.
- ch 1, sc 4 into the ring. sc around until the tail is about 4 inches long, slst.
- Change color to Light Khaki.
- ch 3, ps3 in each stitch, slst.
- Hide both yarn ends inside the tail.
- ch, inv dec around, slst, ch.
- Fasten off. Trim near the knot. Apply a tiny bit of craft glue to the end to help shape it into a point.
Finishing
Now comes the fun part—bringing your lion to life! Follow these assembly steps carefully to ensure he looks just right.
Assembly Steps
- The Face: Pin the muzzle to the head, centering it at the 2nd round of the head. Sew around the muzzle, stuffing it slightly before finishing. Sew a small philtrum line using black yarn below the nose. Install the safety nose through the starting hole of the head. Finally, sew the dome-button eyes at round 13, approximately 17 stitches apart.
- The Ears: Sew the ears to the head, positioning them about 6 rounds behind the eyes. The base of the ear should form a triangular contact area with the head.
- The Head and Body: Mark a centerline on the top of the body and the bottom of the head. Position the head on the body, sewing it 1 stitch away from the centerlines. Sew about 7 stitches from the center to the front, 2 stitches to the side, 9 stitches to the back, and 2 stitches to the other side to complete the connection. The head should tilt slightly forward.
- Limbs and Tail: Sew the arms to the sides of the body, next to the head-body seam. Sew the legs to the body at round 15 (counting from the bottom). Finally, sew the tail to the back of the body.
- The Details: Using black yarn, sew 3 small lines on each limb to represent the lion’s toes.
- The Mane: Wind Dark Brown yarn around a 4-inch piece of cardboard to create approximately 1,000 strips, each about 4 inches long. Starting from the back of the head, fasten a strip into every stitch. Continue until you are 2 rounds away from the eyes and 4 rounds away from the ears. Add extra density around the chin following the shape of the muzzle.
Tips for Success
- Achieving Stability: If you want your lion to stand on its own legs, try stuffing some plastic beads or stuffing pellets into the feet and the bottom of the body. This adds weight and helps maintain a standing position.
- Firm Stuffing: Always stuff your amigurumi pieces firmly and densely. This helps maintain the desired shape and prevents the stuffing from shifting or looking lumpy.
- Tension Matters: Your individual crochet tension will affect the final size. If your tension is very tight, your lion might turn out slightly smaller than the suggested dimensions.
- Mane Patience: Fastening the mane is time-consuming but worth it! It provides that iconic, fluffy look that makes the lion so cozy to cuddle.