Crochet Goose Pattern: An Adorable Amigurumi Tutorial
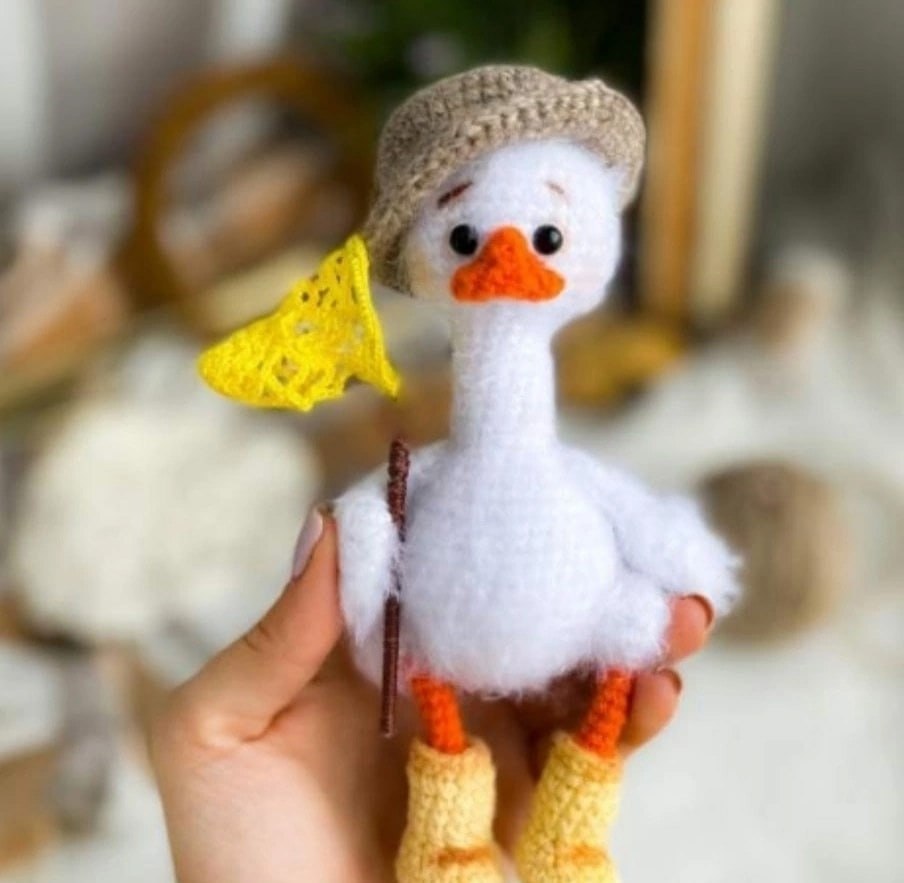
Are you looking for your next whimsical crochet project? This adorable little goose is the perfect addition to your amigurumi collection! Whether you want to make a nursery decoration, a unique gift for a friend, or a cute desk companion, this little feathered friend is sure to bring a smile to anyone’s face. This tutorial is designed to be beginner-friendly, guiding you through every step to create a character with tons of personality.
The secret to this goose’s charm lies in the textures. By using a fuzzy, eyelash-style yarn for the body, we create a soft, downy look that makes the goose look incredibly realistic and cuddly. Grab your hook and let’s get started on this delightful DIY project!
Materials & Abbreviations
Before you dive in, gather all your supplies. Using the right yarn and hook tension is key to getting that perfect, stuffed shape.
Materials Needed:
- Main Body Yarn: White, fuzzy “eyelash” style cotton yarn (approx. 50-100 yards).
- Legs & Beak Yarn: Medium weight cotton yarn in Orange and Yellow.
- Hat Yarn: Natural wool or acrylic yarn in a beige or tan color.
- Details Yarn: Strong white thread for sewing and brown thread for embroidery (eyebrows).
- Eyes: 6mm safety eyes.
- Wire: 1.5mm to 2mm craft wire (approx. 6 inches long) for the legs.
- Stuffing: Polyester fiberfill.
- Hook: 1.5mm crochet hook (or a size appropriate for your chosen yarn to ensure tight stitches).
- Extras: Brown dry pastel for blushing/shading and a needle for sewing.
US Crochet Abbreviations:
- MR: Magic Ring
- SC: Single Crochet
- INC: Increase (2 SC in one stitch)
- DEC: Decrease (2 SC worked together)
- CH: Chain
- SL ST: Slip Stitch
- 3-in-1: Three single crochets worked into one stitch
- BLO: Back Loops Only
- FLO: Front Loops Only
Step-by-Step Instructions
The Head, Neck, and Body
Work this entire section with the white fuzzy yarn.
R1: 6 SC in MR (6)
R2: 6 INC (12)
R3: (1 SC, INC) repeat 6 times (18)
R4: (2 SC, INC) repeat 6 times (24)
R5: (3 SC, INC) repeat 6 times (30)
R6-7: SC in each stitch (30)
R8: (4 SC, INC) repeat 6 times (36)
R9-11: SC in each stitch (36)
Eye Placement: Between rounds 10 and 11, insert your 6mm safety eyes. Space them 5 stitches apart. Use your stitch marker as a guide to ensure they are centered relative to the back of the head.
R12: (4 SC, DEC) repeat 6 times (30)
R13: (3 SC, DEC) repeat 6 times (24)
R14: (2 SC, DEC) repeat 6 times (18)
R15: (3 SC, DEC) repeat 3 times, then 3 SC (15)
R16-24: SC in each stitch (15)
R25: (3 SC, INC) repeat 3 times, then 3 SC (18)
R26: (2 SC, INC) repeat 6 times (24)
R27: 8 INC, 16 SC (32)
R28: (1 SC, INC) repeat 8 times, then 16 SC (40)
R29: SC in each stitch (40)
R30: 10 SC, INC, 2 SC, INC, 26 SC (42)
R31: SC in each stitch (42)
R32: (6 SC, INC) repeat 6 times (48)
R33-34: SC in each stitch (48)
R35: 24 SC, (6 SC, DEC) repeat 3 times (45)
R36: 21 SC, (6 SC, DEC) repeat 3 times (42)
R37: (5 SC, DEC) repeat 6 times (36)
R38 (Creating the Tail Ridge): 4 SC, DEC, 3 SC. Now, switch to working in FLO (Front Loops Only): 1 SC, DEC, 4 SC. Then, return to working in both loops as usual.
The Tail: CH, turn, 5 SC, CH, turn, 4 SC, CH, turn, 3 SC, CH, turn, 2 SC. Descend down the sides of the tail by working 5 SC on each side. DEC, (4 SC, DEC) repeat 3 times (30).
R39: 8 SC, [working in BLO under the tail] 6 SC, 16 SC (30)
R40: (3 SC, DEC) repeat 6 times (24)
R41: (2 SC, DEC) repeat 6 times (18)
R42: (1 SC, DEC) repeat 6 times (12)
R43: 6 DEC. Fasten off and close the opening tightly.
The Cute Little Boots and Legs
We will work this in three color sections: Yellow, Orange, and White.
Part 1: The Yellow Base
R1: CH 6, 4 SC, 3-in-1, 3 SC, INC (12)
R2: INC, 3 SC, 3 INC, 3 SC, 2 INC (18)
R3: SC in each stitch using BLO (18)
R4: SC in each stitch (18)
R5: 4 SC, 2 DEC, 2 SC, 2 DEC, 4 SC (14)
R6: 4 SC, 3 DEC, 4 SC (11)
Wire Tip: Take your ~6 inch wire and bend one end. Insert it into the yellow part and shape it like a boot. Bend the remaining end once you finish the leg to secure it.
R7: 4 SC, 2 INC, 5 SC (13)
R8-11: SC in each stitch using BLO (13)
Part 2: The Orange Middle
Switch to orange yarn. Work 8 rows total. To get the color detail, work a few rows in orange, then for Round 11, work one round in yellow using FLO, then return to orange for the remaining rows.
Part 3: The White Top
Switch to white yarn.
R22: 1 SC, 5 INC, 1 SC (12)
R23: 2 SC, 8 INC, 2 SC (20)
R24: SC in each stitch (20)
R25: 1 SC, DEC until the end of the round
R26: DEC until the end of the round. Fasten off. Stuff the white part very lightly and press it flat.
The Beak
Work in Orange. Do not stuff.
R1: CH 6
R2: INC, 1 SC, 3-in-1, 1 SC, 3-in-1, 4 SC (14)
R3: INC, 3 SC, 3-in-1, 3 SC, INC, 5 SC (18)
R4: SC in each stitch (18).
Once finished, shape the beak into triangles to create a slight “hump” on the nose for character.
The Wings
Work in White. Do not stuff.
R1: 6 SC in MR (6)
R2: 6 INC (12)
R3: (1 SC, INC) repeat 6 times (18)
R4-5: SC in each stitch (18)
R6: (1 SC, DEC) repeat 6 times (12)
R7-12: SC in each stitch (12).
Finish by sewing the edges closed or crocheting around the edge with 6 SC through both loops.
The Tiny Hat
Work in Tan/Beige yarn.
R1: 6 SC in MR (6)
R2: 6 INC (12)
R3: (1 SC, INC) repeat 6 times (18)
R4: (2 SC, INC) repeat 6 times (24)
R5: (3 SC, INC) repeat 6 times (30)
R6: (4 SC, INC) repeat 6 times (36)
R7: SC in each stitch using BLO (36)
R8: SC in each stitch (36)
R9: SC in each stitch using BLO (36)
R10: (1 SC, INC) until end of round
R11: 2 rounds of SC
R12: 1 round of SL ST to finish.
Finishing
Now comes the fun part—bringing your goose to life!
Assembly Guide:
- Wings: Sew the wings onto the body between rounds 25 and 26. Attach them at a slight angle, leaving about 8-9 stitches of space between them at the belly.
- Legs: Attach the legs at round 37, positioned just slightly above the tail. Ensure the wire is shaped correctly to help the goose stand or sit.
- Face: Sew the beak to the front of the head. Use brown thread to embroider small, cute eyebrows above the eyes. If you want to add more detail, you can use white thread to highlight the eyes.
- The Final Touch: To get that “fluffy” look, take a small brush and gently brush out the surface of the white fuzzy yarn. This will make the goose look soft and downy!
Tips for Success
- Tension is Key: When working with fuzzy yarn, it can be hard to see your stitches. Use stitch markers liberally to stay on track!
- Fit Check: Since everyone’s tension is different, always try the hat on the head as you go. If it’s too small, add an extra increase round; if it’s too big, add a decrease round.
- Wire Safety: When using wire for legs, make sure to bend the ends inward so they don’t poke through the crochet fabric.
- Blushing: Use a little bit of brown dry pastel on a soft brush to add a slight “blush” to the cheeks for an even cuter appearance.