Adorable Amigurumi Panda Crochet Pattern: A Step-by-Step Tutorial
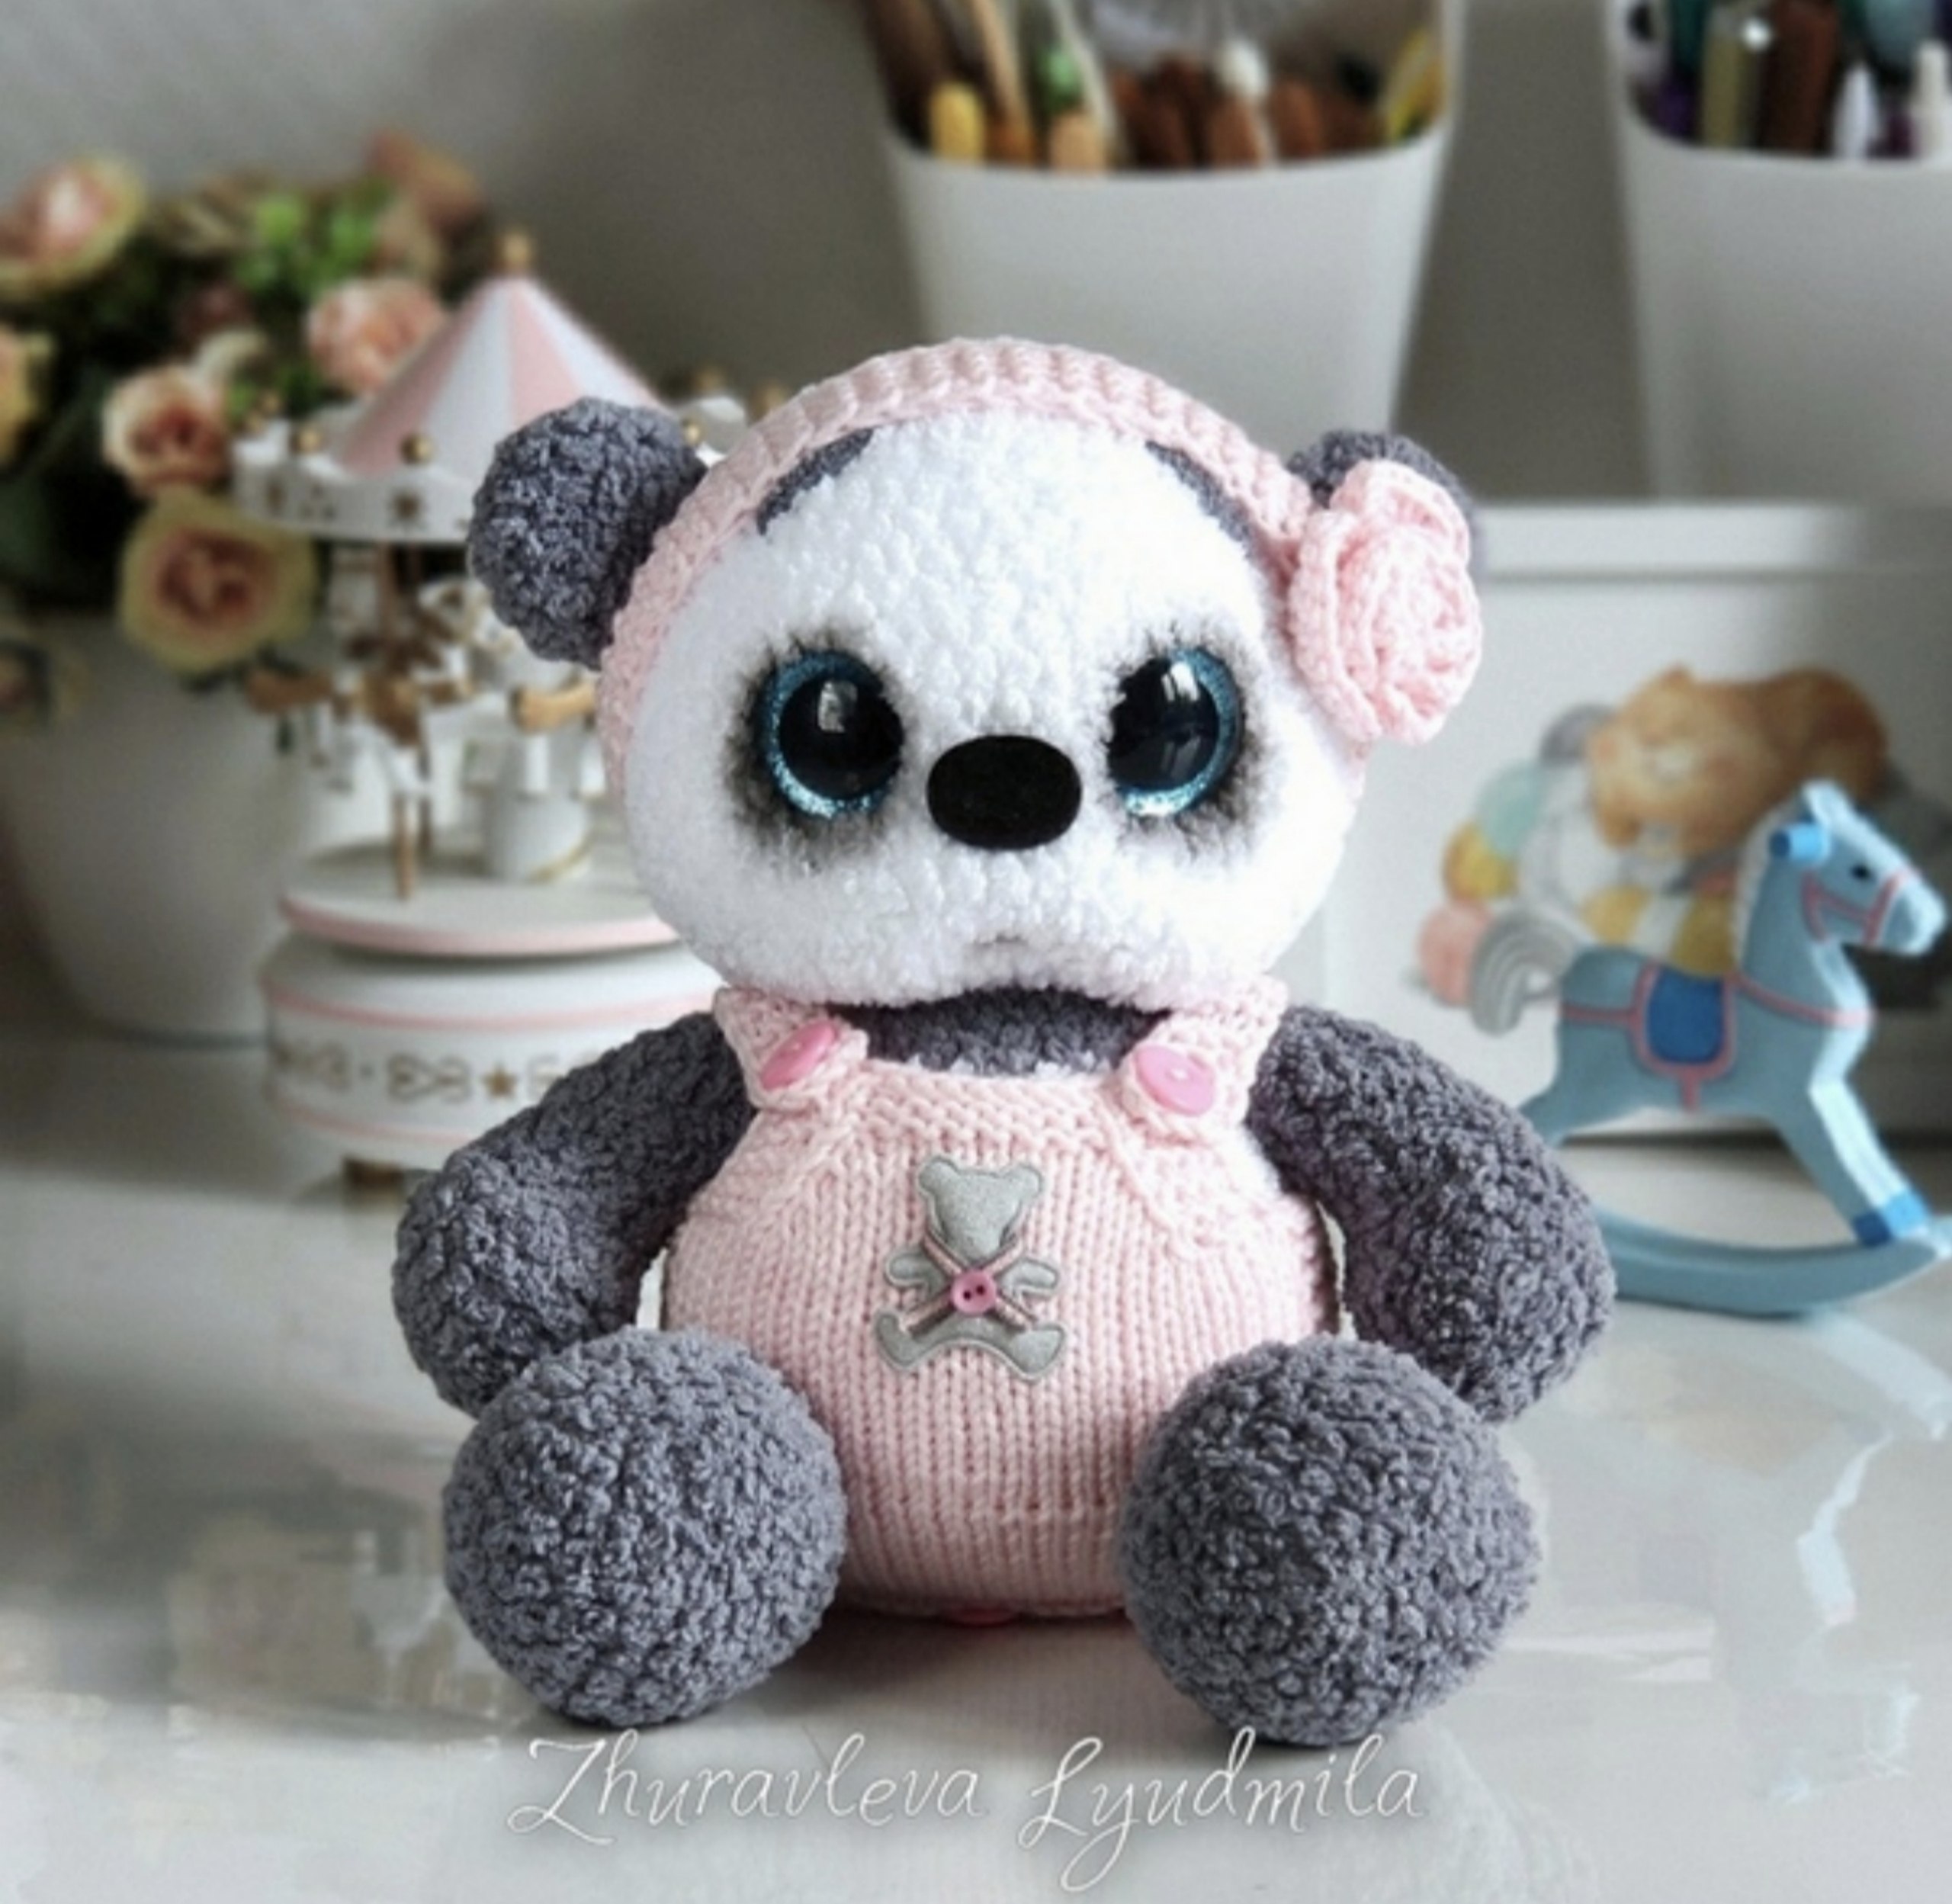
Are you looking for a project that is as soft as a cloud and absolutely darling? This adorable amigurumi panda is the perfect project for your next crochet session! With its oversized, expressive eyes and a charming pink knitted romper, this little panda is destined to become a favorite snuggle buddy or a standout piece in your nursery decor. Using velvet-style chenille yarn makes the finished plushie incredibly tactile and huggable.
In this detailed tutorial, we will walk you through every step, from crafting the tiny limbs to assembling the body and even knitting a custom outfit. Whether you are a beginner looking to practice your amigurumi skills or an experienced crafter wanting a relaxing weekend project, this panda pattern is designed to be accessible and rewarding.
Materials & Abbreviations
To ensure your panda turns out just like the photos, please gather the following supplies. Using a chenille or velvet yarn is highly recommended for that signature “soft” look.
Materials Needed
- Yarn (Body): Approximately 50g of white chenille/velvet yarn and 50g of black/dark gray chenille/velvet yarn.
- Yarn (Outfit): Pink baby cotton yarn (for the knitted romper).
- Crochet Hook: 2.75mm or 3mm.
- Knitting Needles: 2mm (for the romper) or a 1.5mm crochet hook if you prefer to crochet the outfit.
- Safety Eyes: 24mm (approximately 1 inch) black safety eyes.
- Nose: Small black bead or safety nose (approx. 0.08 inches).
- Stuffing: High-quality polyester fiberfill.
- Notions: Large tapestry needle, scissors, stitch markers, and matching thread for sewing.
- Embellishments: 5 small pink buttons and a decorative appliqué for the romper.
- Facial Detailing: Dry pastels or eyeshadow and a stiff brush to create the dark eye patches.
US Crochet & Knitting Abbreviations
This pattern uses standard US terminology. Please ensure you are following US terms to avoid mistakes!
- mr: magic ring
- ch: chain
- sc: single crochet
- dc: double crochet
- inc: increase (2 sc in one stitch)
- dec: decrease (sc two stitches together)
- sl st: slip stitch
- st(s): stitch(es)
- yo: yarn over
- k: knit
- p: purl
- k2tog: knit two together
Step-by-Step Instructions
The Panda’s Limbs
Upper Arms (Make 2)
Work in black yarn using a spiral technique. Stuff the bottom part of the arm firmly and the top part lightly to create a natural shape.
- R1: Ch 6. Starting from the 2nd ch from the hook: 4 sc, 3 sc in one st, 3 sc, 1 inc = 12 sc.
- R2: 1 inc, 3 sc, 3 inc, 3 sc, 2 inc = 18 sc.
- R3-5: 18 sc (3 rounds).
- R6: 6 dec, 6 sc = 12 sc.
- R7-9: 12 sc (3 rounds).
- R10: (4 sc, 1 dec) x 2 = 10 sc.
- R11-12: 10 sc (2 rounds).
- R13: (3 sc, 1 dec) x 2 = 8 sc.
- R14: 8 sc.
Fasten off, leaving a long tail. Fold the piece in half and join the two sides together by working 4 sc through both layers.
Lower Legs (Make 2)
Work in black yarn using a spiral technique.
- R1: 6 sc in a magic ring = 6 sc.
- R2: 6 inc = 12 sc.
- R3: (1 sc, 1 inc) x 6 = 18 sc.
- R4: (2 sc, 1 inc) x 6 = 24 sc.
- R5: (3 sc, 1 inc) x 6 = 30 sc.
- R6-8: 30 sc (3 rounds).
- R9: 6 sc, (1 sc, 1 dec) x 6, 6 sc = 24 sc.
- R10: 3 sc, (1 sc, 1 dec) x 6, 3 sc = 18 sc.
- R11: (2 sc, 1 dec) x 4, 2 sc = 14 sc.
- R12-14: 14 sc (3 rounds).
- R15: (5 sc, 1 dec) x 2 = 12 sc.
- R16: 12 sc.
- R17: (4 sc, 1 dec) x 2 = 10 sc.
- R18: 10 sc.
Fold in half and join the sides with 5 sc.
The Panda’s Body
The body starts in white yarn and transitions to black. Work in a spiral.
White Section (Belly)
- R1: Ch 7. Starting from the 2nd ch from the hook: 1 inc, 4 sc, 4 sc in one st, 4 sc, 1 inc = 16 sc.
- R2: 2 inc, 4 sc, 4 inc, 4 sc, 2 inc = 24 sc.
- R3: (1 sc, 1 inc) x 2, 4 sc, (1 sc, 1 inc) x 4, 4 sc, (1 sc, 1 inc) x 2 = 32 sc.
- R4: (2 sc, 1 inc) x 2, 4 sc, (2 sc, 1 inc) x 4, 4 sc, (2 sc, 1 inc) x 2 = 40 sc.
- R5: (3 sc, 1 inc) x 2, 4 sc, (3 sc, 1 inc) x 4, 4 sc, (3 sc, 1 inc) x 2 = 48 sc.
- R6: 48 sc.
Attaching the Lower Legs
While working the next round, you will attach the legs. Place the leg against the body with the convex side facing inward (as if they are looking at each other).
- R7: 5 sc worked together with the first leg, 18 sc, 5 sc worked together with the second leg, 20 sc = 48 sc.
- R8-14: 48 sc (7 rounds).
- R15: 30 sc, (1 dec, 1 sc) x 6 = 42 sc.
- R16: (5 sc, 1 dec) x 6 = 36 sc.
- R17: 15 sc (these are offset stitches; the next round will start from the 16th stitch).
Black Section (Lower Body)
Switch to black yarn.
- R18: 36 sc.
- R19: (4 sc, 1 dec) x 6 = 30 sc.
- R20: 30 sc.
- R21: (3 sc, 1 dec) x 6 = 24 sc.
- R22: 24 sc.
Attaching the Upper Arms
- R23: 5 sc, 4 sc worked together with the first arm, 7 sc, 4 sc worked together with the second arm, 4 sc = 24 sc.
- R24: 24 sc.
The Panda’s Head
Switch to white yarn.
- R25: 24 inc = 48 sc.
- R26: (7 sc, 1 inc) x 6 = 54 sc.
- R27: (8 sc, 1 inc) x 6 = 60 sc.
- R28-35: 60 sc (8 rounds).
- R36: (8 sc, 1 dec) x 6 = 54 sc.
- R37: (7 sc, 1 dec) x 6 = 48 sc.
- R38: 48 sc.
- R39: (6 sc, 1 dec) x 6 = 42 sc.
- R40: 42 sc.
- R41: (5 sc, 1 dec) x 6 = 36 sc.
- R42: 36 sc.
- R43: (4 sc, 1 dec) x 6 = 30 sc.
- R44: (3 sc, 1 dec) x 6 = 24 sc.
- R45: (2 sc, 1 dec) x 6 = 18 sc.
- R46: (1 sc, 1 dec) x 6 = 12 sc.
- R47: 6 dec = 6 sc.
Stuff the head evenly. Fasten off, leaving a long tail, and weave the end through the remaining stitches to close the hole.
Extra Details: Ears, Tail, and Headband
Ears (Make 2)
Work in black yarn.
- R1: 6 sc in mr = 6 sc.
- R2: 6 inc = 12 sc.
- R3: (1 sc, 1 inc) x 6 = 18 sc.
- R4-5: 18 sc (2 rounds).
- R6: 9 dec = 9 sc.
Fold in half and join with 4 sc. Sew to the top of the head.
Tail
Work in black yarn.
- R1: 6 sc in mr = 6 sc.
- R2: 6 inc = 12 sc.
- R3: (1 sc, 1 inc) x 6 = 18 sc.
- R4-5: 18 sc (2 rounds).
- R6: (1 sc, 1 dec) x 6 = 12 sc.
Stuff lightly and sew to the back of the body.
Headband
Use pink yarn.
Cast on 6 stitches and work in knit rows for approximately 100 rows. Fasten off, seam the two sides together, and attach a small crocheted flower for a sweet touch.
Finishing
Assembly & Detailing
Now it is time to bring your panda to life! The facial details are what give this character its personality.
- Eyes: Insert the 24mm safety eyes between rounds 35 and 36, approximately 9-10 stitches apart.
- Nose: Place the nose between rounds 33 and 34, centered between the eyes.
- Eye Patches: Use a stiff brush and dark eyeshadow or dry pastels to shade the area around the eyes. This creates the iconic panda look.
The Pink Bodysuit (Knitting Pattern)
This part is knitted using pink baby cotton yarn.
Front Part
- R1-2: Cast on 19 stitches. Knit 2 rows.
- R3: 2 k, yo, k2tog, 5 k, yo, k2tog, 5 k, yo, k2tog, 1 k = 19 sts. (These yarn overs create the buttonholes).
- R4-6: Knit 3 rows.
- R7: 4 k, 11 p, 4 k = 19 sts.
- R8: 4 k, yo, 11 k, yo, 4 k = 21 sts.
- R9: 4 k, 13 p, 4 k = 21 sts.
- R10: 21 k.
- R11: 4 k, 13 p, 4 k = 21 sts.
- R12: 4 k, yo, 13 k, yo, 4 k = 23 sts.
- R13: 4 k, 15 p, 4 k = 23 sts.
- R14: 23 k.
- R15: 4 k, 15 p, 4 k = 23 sts.
- R16: 4 k, yo, 15 k, yo, 4 k = 25 sts.
- R17: 4 k, 17 p, 4 k = 25 sts.
Back Part
Cast on 19 stitches.
- R1-6: Knit 6 rows.
- R7: 4 k, 11 p, 4 k = 19 sts.
- R8: 19 k.
- R9: 4 k, 11 p, 4 k = 19 sts.
- R10: 4 k, yo, 11 k, yo, 4 k = 21 sts.
- R11: 4 k, 13 p, 4 k = 21 sts.
- R12: 4 k, yo, 13 k, yo, 4 k = 23 sts.
- R13: 4 k, 15 p, 4 k = 23 sts.
- R14: 4 k, yo, 15 k, yo, 4 k = 25 sts.
- R15: 4 k, 17 p, 4 k = 25 sts.
- R16: 4 k, yo, 17 k, yo, 4 k = 27 sts.
- R17: 4 k, 19 p, 4 k = 27 sts.
- R18: 10 k, bind off 7, 10 k = 20 sts.
- R19: 4 k, p2tog, 7 k, p2tog, 4 k = 27 sts.
- R20: 4 k, yo, 19 k, yo, 4 k = 29 sts.
- R21: 4 k, 21 p, 4 k = 29 sts.
Joining: In R22, join the front and back pieces by working 29 k, ch 4, join to front 25 k, ch 4 = 62 sts. Work in the round from here.
- R23: Join pieces and work in the round: 4 p, 21 k, 12 p, 17 k, 8 p = 62 sts.
- R24: 62 k.
- R25: 29 k, 4 p, 25 k, 4 p = 62 sts.
- R26: 62 k.
- R27: 29 k, 4 p, 25 k, 4 p = 62 sts.
- R28: 62 k.
- R29: 29 k, 4 p, 25 k, 4 p = 62 sts.
- R30: 62 k.
- R31: 29 k, 4 p, 25 k, 4 p = 62 sts.
- R32: 62 k.
- R33: 29 k, 4 p, 25 k, 4 p = 62 sts.
- R34: 62 k.
- R35: 29 k, 4 p, 25 k, 4 p = 62 sts.
- R36: 62 k.
- R37: 29 k, 4 p, 25 k, 4 p = 62 sts.
- R38: 62 k.
- R39: 29 k, 4 p, 25 k, 4 p = 62 sts.
- R40: 4 p, 21 k, 4 p, bind off 4, 4 p, 17 k, 4 p, bind off 4 = 54 sts.
Straps & Finishing the Outfit
Using pink yarn: Cast on 35 ch. Starting from the 2nd ch: 34 sl st. Work 14 sc around the front part. Repeat for the second strap, working approx 20 sc around the side. Complete the straps and edge the bottom of the romper with sc. Finally, sew the buttons into the buttonholes on the front and attach the decorative appliqué.
Crochet Skirt
Work in a circle around the bottom edge of the 9th row of the front piece.
- R1: 3 dc in every stitch = 168 dc.
- R2-3: 168 dc (2 rounds).
Fasten off and weave in all ends.
Tips
- Tension is Key: When working with velvet yarn, try to maintain even tension. It can be slippery, so a slightly smaller hook might help keep your stitches tight.
- Stuffing: For amigurumi, it is always better to over-stuff slightly rather than under-stuff to ensure no holes appear between your stitches.
- Color Transitions: When switching between white and black for the body, make sure to pull the new color through the final loop of the previous stitch for a clean transition.
- Assembly: Use stitch markers for everything! It helps ensure your rounds and limb placements are perfectly symmetrical.