DIY Adorable Amigurumi Bear Crochet Pattern: A Beginner-Friendly Tutorial
Introduction
Are you looking for the perfect weekend crochet project? There is nothing quite as heartwarming as a handmade plushie, and this adorable little amigurumi bear is the ultimate companion. Whether you are making a nursery decoration, a thoughtful gift for a loved one, or simply adding a cute new friend to your own collection, this bear is designed to be as joyful to make as it is to hold.
This pattern is specifically crafted to be beginner-friendly. While it involves some color changes and shaping, the construction is straightforward, and the results are incredibly professional. By following this detailed guide, you will learn how to work in the round, manage color transitions, and assemble various limbs to create a cohesive, charming character. Grab your favorite hook and let’s get started on creating your very own little bear!
Materials & Abbreviations
Materials Needed
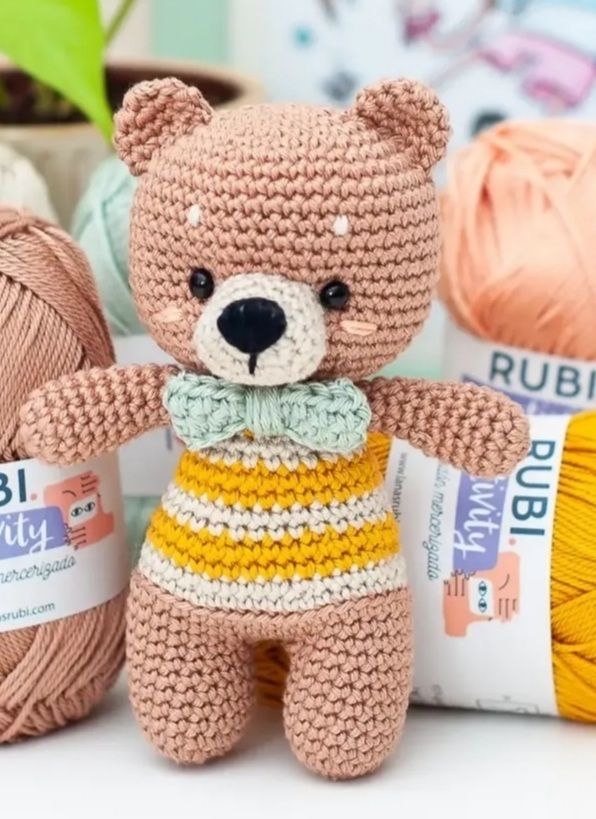
To ensure your bear turns out looking just like the photos, I recommend using a smooth, mercerized cotton yarn. This provides excellent stitch definition, which is crucial for amigurumi. You will need the following:
- Yarn (Mercerized Cotton):
- Light Brown (Main body color)
- Beige (Muzzle, stripes, and eyebrows)
- Mustard Yellow (Stripes)
- Light Green (Bowtie)
- Black (Nose and eyes)
- Salmon/Pink (Blush)
- Crochet Hook: 2.5 mm (or a size that creates tight, dense stitches)
- Safety Eyes: 6 mm black safety eyes
- Stuffing: Approximately 1 oz (30g) of polyester fiberfill
- Notions: Yarn needle, scissors, and stitch markers
Crochet Abbreviations
This pattern uses standard US crochet terminology. Please ensure you are following US terms to avoid confusion with stitch heights.
- ch: chain
- sc: single crochet
- inc: increase (2 sc in the same stitch)
- dec: decrease (sc 2 stitches together)
- hdc: half double crochet
- sl st: slip stitch
- BLO: back loop only
- st(s): stitch(es)
- R: round
Step-by-Step Instructions
The Head
Worked in Light Brown yarn.
Start with a magic ring of 6 sc (6). Do not fasten off.
R1: inc in each st around (12)
R2: (1 sc, 1 inc) repeat 6 times (18)
R3: 1 sc, 1 inc, (2 sc, 1 inc) repeat 5 times, 1 sc (24)
R4: (3 sc, 1 inc) repeat 6 times (30)
R5: 2 sc, 1 inc, (4 sc, 1 inc) repeat 5 times, 2 sc (36)
R6: (5 sc, 1 inc) repeat 6 times (42)
R7: 3 sc, 1 inc, (6 sc, 1 inc) repeat 5 times, 3 sc (48)
R8-R17: sc in each st around (48) — Note: This is 10 rounds total.
Eye Placement: Before continuing, insert your 6mm safety eyes between Rounds 15 and 16. Ensure they are spaced 8 stitches apart.
R18: 3 sc, 1 dec, (6 sc, 1 dec) repeat 5 times, 3 sc (42)
R19: (5 sc, 1 dec) repeat 6 times (36)
R20: 2 sc, 1 dec, (4 sc, 1 dec) repeat 5 times, 2 sc (30)
R21: (3 sc, 1 dec) repeat 6 times (24)
R22: 1 sc, 1 dec, (2 sc, 1 dec) repeat 5 times, 1 sc (18)
Stuff the head firmly.
R23: (1 sc, 1 dec) repeat 6 times (12)
Join with a slip stitch. Fasten off, leaving a long tail for sewing.
The Ears (Make 2)
Worked in Light Brown yarn.
Start with a magic ring of 6 sc (6).
R1: inc in each st around (12)
R2-R3: sc in each st around (12)
Join with a slip stitch. Fasten off, leaving a long tail. Do not stuff the ears; instead, fold them in half and flatten them out.
The Muzzle
Worked in Beige yarn.
Start with a magic ring of 6 sc (6).
R1: inc in each st around (12)
R2: (1 sc, 1 inc) repeat 6 times (18)
R3-R5: sc in each st around (18)
Join with a slip stitch. Fasten off, leaving a long tail. Stuff very lightly.
The Bowtie
Worked in Light Green yarn.
Ch 20. Starting in the 3rd ch from the hook, work 18 hdc in each chain. Turn the work. Ch 2, work 18 hdc across.
To create the knot: Fold the rectangle in half and wrap the yarn several times around the center to create a bow shape. Secure it and fasten off, leaving a long tail for sewing to the neck.
The Legs (Make 2)
Worked in Light Brown yarn.
Start with a magic ring of 6 sc (6).
R1: inc in each st around (12)
R2: (1 sc, 1 inc) repeat 6 times (18)
R3-R8: sc in each st around (18)
Note for Leg 1: Join with a slip stitch, fasten off, and leave a tail.
Note for Leg 2: Do NOT fasten off or join. You will continue crocheting directly from this leg to join the two legs together for the body.
Stuff both legs lightly.
The Body
Starting from the second leg.
To join the legs, you will create the crotch area. Ch 3, then work 18 sc into the first leg, ch 3, then work 18 sc into the second leg (42 total stitches).
R1: sc in each st around (42)
R2-R4: sc in each st around (42) — (Use Light Brown)
R5: sc in BLO (Back Loops Only) in each st around (42) — (Switch to Beige)
R6: (5 sc, 1 dec) repeat 6 times (36) — (Beige)
R7-R8: sc in each st around (36) — (Switch to Mustard)
R9-R10: sc in each st around (36) — (Switch to Beige)
R11-R12: sc in each st around (30) — (Switch to Mustard)
R13-R14: sc in each st around (30) — (Switch to Beige)
R15: 1 sc, 1 dec, (2 sc, 1 dec) repeat 5 times, 1 sc (18) — (Switch to Mustard)
R16: (1 sc, 1 dec) repeat 6 times (12) — (Mustard)
Join with a slip stitch, fasten off, and stuff the body well.
The Arms (Make 2)
Worked in Light Brown yarn.
Start with a magic ring of 6 sc (6).
R1: inc in each st around (12)
R2-R6: sc in each st around (12)
R7: (2 sc, 1 dec) repeat 3 times (9)
R8-R12: sc in each st around (9)
Join with a slip stitch, fasten off, leaving a long tail. Stuff lightly.
Finishing
Now comes the fun part—bringing your bear to life! Follow these steps carefully to assemble your piece:
- Muzzle: Sew the muzzle to the head between Rounds 15 and 20, centered between the eyes.
- Nose: Using black yarn, embroider a small triangle on the muzzle to create the nose.
- Ears: Sew the ears to the top of the head between Rounds 5 and 9.
- Blush: Using salmon/pink yarn, make a few horizontal stitches just below the eyes for a cute rosy cheek effect.
- Eyebrows: Using beige yarn, embroider small eyebrows just above the eyes on Round 10.
- Body Closure: Use light brown yarn to sew the bottom opening of the body shut.
- Head Attachment: Sew the head onto the body.
- Arms: Sew the arms to the sides of the body, at the point where the arms meet the head.
- Tail: Use light brown yarn to embroider a small, ball-shaped tail on the back of the body.
- Bowtie: Finally, sew the green bowtie around the neck.
Tips
To ensure your amigurumi looks its absolute best, keep these professional tips in mind:
- Use Stitch Markers: When working in the round, it is incredibly easy to lose track of your first stitch. Always use a marker to keep your place.
- Tension is Key: Try to keep your tension consistent. If your stitches are too loose, the stuffing might show through. If they are too tight, it might be hard to manipulate the hook.
- Stuffing Technique: When stuffing, push the fiberfill into the corners and crevices. This prevents lumps and gives your bear a smooth, professional shape.
- Color Changes: When changing colors, perform the final stitch of the old color and the first stitch of the new color in the same stitch to ensure a clean transition.
- Safety First: If you are making this for a baby or a small child, consider embroidering the eyes instead of using plastic safety eyes to prevent any choking hazards.