Crochet Seal Pattern: How to Make an Adorable Amigurumi Seal
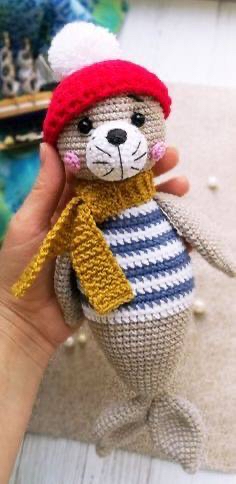
There is nothing quite as heartwarming as a handmade plushie, especially one as charming as this little seal! Whether you are looking for the perfect gift for a child or a new companion for your own crochet collection, this adorable amigurumi seal is a project you will fall in love with. With its cozy red hat, bright yellow scarf, and classic nautical stripes, this little ocean friend is full of personality.
This pattern is designed with a beginner-friendly approach in mind. While it does require some knowledge of basic amigurumi techniques—like working in the round and making increases and decreases—the instructions are straightforward and easy to follow. By the time you finish, you will have a delightful little seal measuring approximately 10 inches tall, ready to bring a splash of joy to any room!
Materials & Abbreviations
Before you dive into this project, gather all your supplies. Having everything ready will make your crochet journey much more relaxing and enjoyable.
Materials Needed
- Yarn for the Body: Medium weight (worsted) yarn. You will need gray (main color), white (for stripes), and dark blue (for stripes).
- Yarn for Accessories: Any yarn you like for the accessories! For this version, we are using red wool for the hat and yellow yarn for the scarf.
- Crochet Hook: A 2mm (approximately B/1) crochet hook works best to keep your stitches tight and prevent stuffing from showing through.
- Stuffing: Polyester fiberfill (poly-fill) to make your seal nice and squishy.
- Eyes: 4mm to 5mm black safety eyes or black beads.
- Embroidery: Black embroidery floss for the whiskers and nose details, and pink yarn or thread for the cute rosy cheeks.
- Tools: A large tapestry needle for sewing, scissors, and some sewing pins to help hold pieces in place during assembly.
Abbreviations (US Terms)
- MR: Magic Ring
- SC: Single Crochet
- INC: Increase (2 SC in the same stitch)
- DEC: Decrease (sc 2 together)
- SL ST: Slip Stitch
- HDC: Half Double Crochet
- DC: Double Crochet
- CH: Chain
- BLO: Back Loops Only
- ST: Stitch
Step-by-Step Instructions
The Head
We begin with the head using your gray yarn. Working in continuous rounds:
- R1: 6 SC in a MR (6)
- R2: 6 INC (12)
- R3: (1 SC, INC) x 6 (18)
- R4: (2 SC, INC) x 6 (24)
- R5: (3 SC, INC) x 6 (30)
- R6: (4 SC, INC) x 6 (36)
- R7: (5 SC, INC) x 6 (42)
- R8: (6 SC, INC) x 6 (48)
- R9: (7 SC, INC) x 6 (54)
- R10-19: 54 SC (10 rounds total)
- R20: (7 SC, DEC) x 6 (48)
- R21: (6 SC, DEC) x 6 (42)
- R22: (5 SC, DEC) x 6 (36)
- R23: (4 SC, DEC) x 6 (30)
- R24: (3 SC, DEC) x 6 (24)
Fasten off, leaving a tail. Stuff the head firmly with fiberfill before closing the hole completely. We want the head to stay sturdy!
The Muzzle
Switch to white yarn to create the cute snout:
- R1: 6 SC in a MR (6)
- R2: 6 INC (12)
- R3: (1 SC, INC) x 6 (18)
- R4: (2 SC, INC) x 6 (24)
- R5: (3 SC, INC) x 6 (30)
- R6-7: 30 SC (2 rounds)
Fasten off, leaving a long tail for sewing. You will stuff this piece slightly as you sew it onto the face.
The Nose
Using black yarn, we will make a tiny nose:
- In a MR: 1 SC, 1 HDC, 5 DC, 1 HDC, 1 SC, then SL ST into the first stitch.
Pull the magic ring very tight to create a small, rounded shape. Fasten off and leave a long tail for sewing.
The Body and Tail
This part is unique! You will first crochet two separate pieces for the tail/base using gray yarn. Do not stuff the tail portion.
Tail/Base Pieces (Make 2):
- R1: 6 SC in a MR (6)
- R2: (1 SC, INC) x 3 (9)
- R3: 9 SC
- R4: (2 SC, INC) x 3 (12)
- R5: (1 SC, INC) x 6 (18)
- R6: 18 SC
- R7: (2 SC, INC) x 6 (24)
- R8-12: 24 SC (5 rounds)
- R13: (2 SC, DEC) x 6 (18)
- R14: 18 SC
- R15: (1 SC, DEC) x 6 (12)
- R16: 12 SC
- R17: 6 DEC (6)
Fasten off the first piece. For the second piece, do not fasten off! Instead, we will join the two pieces together to form the body.
Joining and Body:
- R18: Work 6 SC into the first piece, then join the second piece and work 6 SC into it (12 total).
- R19: 12 SC
- R20: (1 SC, INC) x 6 (18)
- R21: (2 SC, INC) x 6 (24)
- R22-23: 24 SC (2 rounds)
- R24: (3 SC, INC) x 6 (30)
- R25-26: 30 SC (2 rounds)
- R27: (4 SC, INC) x 6 (36)
- R28-29: 36 SC (2 rounds)
- R30: (5 SC, INC) x 6 (42)
- R31: (6 SC, INC) x 6 (48)
- R32-36: 48 SC (5 rounds)
Now, switch to your stripe colors. To get the look in the photo, alternate 2 rounds of white and 2 rounds of dark blue.
- R37-46: 48 SC (10 rounds of stripes)
- R47: (6 SC, DEC) x 6 (42)
- R48-49: 42 SC (2 rounds)
- R50: (5 SC, DEC) x 6 (36)
- R51-52: 36 SC (2 rounds)
- R53: (4 SC, DEC) x 6 (30)
- R54-55: 30 SC (2 rounds)
- R56: (3 SC, DEC) x 6 (24)
- R57-58: 24 SC (2 rounds)
Fasten off, leaving a long tail for sewing. Stuff the body firmly.
The Flippers
Make two flippers using gray yarn:
- R1: 6 SC in a MR (6)
- R2: (1 SC, INC) x 3 (9)
- R3: 9 SC
- R4: (2 SC, INC) x 3 (12)
- R5: 12 SC
- R6: (1 SC, INC) x 6 (18)
- R7: 18 SC
- R8: (2 SC, INC) x 6 (24)
- R9-18: 24 SC (10 rounds)
- R19: (2 SC, DEC) x 6 (18)
- R20: 18 SC
- R21: (1 SC, DEC) x 6 (12)
- R22: 12 SC
- R23: (2 SC, DEC) x 3 (9)
- R24: 9 SC
To flatten them, fold the edges together and single crochet through both layers to close the shape. Fasten off, leaving a tail for sewing.
The Hat and Scarf
The Cozy Red Hat: Use red yarn.
- Chain 66 and join to the first chain with a SL ST to form a ring.
- R1: 66 DC, SL ST to 3rd CH (66)
- R2-3: 66 DC in the BLO (Back Loops Only), SL ST (66)
- R4-6: 66 DC, SL ST (66)
- R7: (9 DC, DEC) x 6 (60)
- R8: (8 DC, DEC) x 6 (54)
- R9: (7 DC, DEC) x 6 (48)
- R10: (6 DC, DEC) x 6 (42)
- R11: (5 DC, DEC) x 6 (36)
Fasten off and use a needle to pull the stitches closed. Finish the look by making a small white pompom and sewing it to the top of the hat.
The Striped Scarf: Use yellow yarn.
Chain 120. Work multiple rows of SC into the BLO (Back Loops Only). This creates a beautiful ribbed texture that looks just like knitted fabric!
The Cheeks
Using pink yarn, make two small circles:
- MR: 6 SC, SL ST.
Fasten off, leaving a long tail.
Finishing
Now comes the most exciting part—bringing your seal to life! Assembly requires a bit of patience, so take your time.
Assembly Steps
- The Head and Body: Use sewing pins to position the head on top of the body. Use a tapestry needle and a “invisible stitch” (or mattress stitch) to sew them together. Once the seam is mostly closed, leave a small gap and stuff the neck area very firmly with extra fiberfill to ensure the head doesn’t flop over. Then, finish sewing the gap shut.
- The Flippers: Pin the flippers to the sides of the body between rows 55 and 56. Sew them on securely so they don’t wiggle too much.
- The Face: Pin the muzzle to the lower center of the head. As you sew it on, add a little more stuffing to the muzzle. Once secure, sew the tiny black nose to the very top center of the muzzle.
- The Eyes: Determine the eye placement first. A good guide is to place them between rounds 13 and 14 of the head, approximately 9 to 10 stitches apart. Use a double strand of sewing thread to sew the safety eyes or beads into place.
- Details: Use your black embroidery floss to stitch the whiskers and small dots on the muzzle. Finally, sew the pink cheeks just below the eyes for that perfect “blushing” look.
- Accessories: Wrap the yellow scarf around the neck and sew it in place. Place the red hat on the head and secure it.
Tips
To make your amigurumi look professional, keep these tips in mind:
- Tension is Key: Try to maintain consistent tension throughout your project. If your stitches are too loose, the stuffing will peek through.
- Tight Stuffing: When stuffing the neck area, be extra generous. A firm neck is the secret to a seal that can sit up or stand upright without drooping.
- Invisible Stitch: When sewing pieces together, look up tutorials for the “invisible stitch.” It makes the seams look seamless and much more polished.
- Safety First: If you are making this for a very young child, avoid using plastic safety eyes. Instead, embroider the eyes with black yarn to ensure there are no small parts that could be a choking hazard.