Crochet Dinosaur Rattle Pattern: An Easy Amigurumi Tutorial for Baby Toys
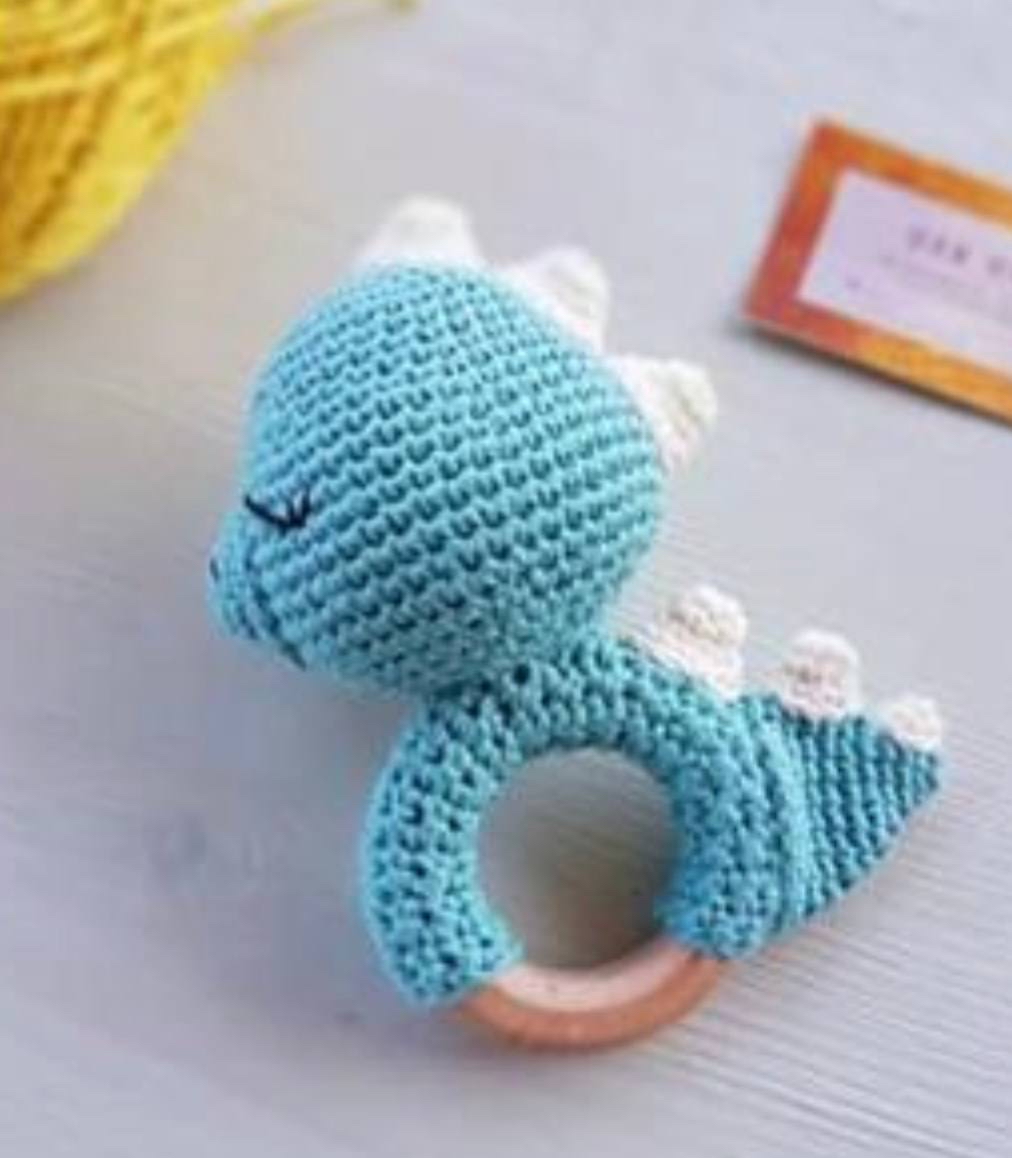
Are you looking for the perfect, handmade gift for a baby shower or a new arrival? There is nothing quite as charming as a custom-made amigurumi toy. Today, I am thrilled to share this adorable DIY Crochet Dinosaur Rattle pattern! This little dino is not only incredibly cute with its friendly face and colorful spikes, but it also serves a functional purpose as a sensory rattle for infants.
This pattern is designed with beginners in mind. If you know the basics of working in the round and making single crochet stitches, you are well on your way to creating this prehistoric pal. The project is quick enough for a weekend craft session but detailed enough to look professional and high-end. Let’s dive into the details and get hooking!
Materials & Abbreviations
Before you begin, gather all your supplies. Using high-quality, soft yarn is essential for baby toys to ensure they are gentle on little hands.
Materials Needed:
- Yarn: Medium weight (worsted) cotton or soft acrylic yarn in light blue and cream/milk color.
- Wooden Ring: A smooth, natural wooden teething ring.
- Stuffing: High-quality polyester fiberfill (polyfill).
- Rattle: A small plastic rattle insert (ensure it is securely enclosed).
- Crochet Hook: A hook size appropriate for your yarn (typically 3.25mm to 4.0mm to ensure tight stitches).
- Embroidery Thread: Black for the eyes and nose, and light blue for the eyebrows.
- Tapestry Needle: For sewing pieces together and weaving in ends.
- Scissors
Abbreviations (US Terms):
- MR: Magic Ring
- sc: Single crochet
- inc: Increase (2 sc in the same stitch)
- dec: Decrease (sc 2 stitches together)
- ch: Chain
- sl st: Slip stitch
- st(s): Stitch(es)
Note: All measurements are provided in inches.
Step-by-Step Instructions
The Dinosaur Head
Using the light blue yarn, begin by creating the head. This will be a rounded shape that holds the rattle.
- R1: 6 sc in MR (6)
- R2: 6 inc (12)
- R3: (1 sc, 1 inc) x 6 (18)
- R4: (2 sc, 1 inc) x 6 (24)
- R5: (3 sc, 1 inc) x 6 (30)
- R6-8: 30 sc (30)
- R9: (4 sc, 1 inc) x 6 (36)
- R10: 36 sc (36)
- R11: (5 sc, 1 inc) x 6 (42)
- R12: 42 sc (42)
- R13: (6 sc, 1 inc) x 6 (48)
- R14-18: 48 sc (48)
- R19: (6 sc, 1 dec) x 6 (42)
- R20: 42 sc (42)
- R21: (5 sc, 1 dec) x 6 (36)
- R22: (4 sc, 1 dec) x 6 (30)
Stop here to stuff! Fill the head firmly with polyester fiberfill and ensure the rattle insert is placed securely in the center of the stuffing.
- R23: (3 sc, 1 dec) x 6 (24)
- R24: (2 sc, 1 dec) x 6 (18)
- R25: (1 sc, 1 dec) x 6 (12)
Fasten off, leaving a tail of approximately 8 inches for sewing.
The Muzzle
Using the light blue yarn, create the little snout for your dinosaur.
- R1: 6 sc in MR (6)
- R2: 6 inc (12)
- R3: (1 sc, 1 inc) x 6 (18)
- R4: 18 sc (18)
Fasten off, leaving a tail of approximately 6 inches for sewing. Stuff the muzzle lightly before attaching.
The Tail
Using the light blue yarn, follow these steps to create the long tail.
- R1: 6 sc in MR (6)
- R2: 6 sc (6)
- R3: (1 sc, 1 inc) x 3 (9)
- R4: (2 sc, 1 inc) x 4 (12)
- R5: (3 sc, 1 inc) x 5 (15)
- R6: 15 sc (15)
- R7: (4 sc, 1 inc) x 3 (18)
- R8: 18 sc (18)
- R9: (5 sc, 1 inc) x 3 (21)
- R10: 21 sc (21)
Fasten off, leaving an 8-inch tail. Note: Do not stuff the tail.
The Spikes (Crests)
You will create different sized spikes using the cream/milk colored yarn.
Large Spikes (Make 4)
- R1: 6 sc in MR (6)
- R2: 6 sc (6)
- R3: (1 sc, 1 inc) x 3 (9)
- R4: (2 sc, 1 inc) x 4 (12)
Fasten off, leaving a 4-inch tail. Do not stuff.
Medium Spike (Make 1)
- R1: 6 sc in MR (6)
- R2: 6 sc (6)
- R3: (1 sc, 1 inc) x 3 (9)
Fasten off, leaving a 4-inch tail. Do not stuff.
Small Spike (Make 1)
- R1: 4 sc in MR (4)
- R2: 4 sc (4)
- R3: (1 sc, 1 inc) x 3 (6)
Fasten off, leaving a 4-inch tail. Do not stuff.
The Ring Holder Strap
This is the piece that wraps around the wooden ring to hold the dinosaur. Use the light blue yarn.
Chain 10. (Note: Adjust the starting chain count based on the thickness of your wooden ring and yarn weight. After completing 3 or 4 rows, try it on the ring. The fit should be very snug!)
- Row 1: Turn your work. Starting in the 2nd chain from the hook, work 9 sc.
- Row 2: Ch 1, turn, work 9 sc in the opposite direction.
Continue working in rows until you reach your desired length (the designer used 32 rows). Fasten off, leaving a tail for sewing.
Finishing
Assembly Instructions
This is where the magic happens! Follow these steps carefully to bring your dinosaur to life.
- The Face: Stuff the muzzle and sew it onto the front center of the head.
- The Crests: Take 3 of your large spikes. Sew them to the back of the head, starting from the center and working downwards. Do not stuff these spikes.
- Details: Using black embroidery thread, stitch the eyes and a small nose onto the face. Use light blue thread to stitch two simple eyebrows above the eyes.
- The Ring: Sew the ring holder strap to the wooden ring. Be sure to turn the seam so that it sits inside the ring for a clean look.
- The Body: Sew the dinosaur head onto the ring/strap assembly.
- The Tail: Sew the tail onto the ring/strap assembly. Ensure it is securely attached, but remember not to stuff the tail itself.
- Final Decoration: Sew the medium spike onto the strap and the small spike onto the tail.
Tips
- Tension is Key: When making amigurumi, try to keep your stitches tight. This prevents the polyester stuffing from peeking through the holes.
- Safety First: Since this is a baby toy, always double-check that the rattle is securely inside the head and that all embroidery is tight. If you are making this for a child, it is a good idea to ensure no small parts can be easily pulled off.
- Customization: Don’t be afraid to play with colors! A purple dino or a green dino can look just as amazing as the blue version.
- Ring Fit: If your strap feels loose on the wooden ring, simply add more rows or increase your initial chain count.