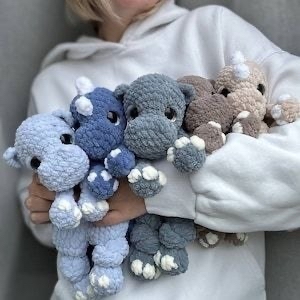
Adorable Crochet Plushie Trio: Dino, Dragon, and Hippo Pattern Tutorial
Are you looking for your next cozy crochet project? There is nothing quite as satisfying as creating a collection of squishy, huggable friends! In this detailed tutorial, I will walk you through the process of crocheting an adorable trio of plushies: a cute Dinosaur, a magical Dragon, and a chunky little Hippo. These “huggy” toys are designed to be extra tactile and soft, making them the perfect companions for kids or a sweet addition to any nursery decor.
Whether you are a seasoned amigurumi artist or a beginner looking for a fun challenge, this pattern is designed to be accessible and rewarding. By the end of this tutorial, you will have a set of three charming characters, each roughly 11 inches tall, ready for endless snuggles!
Materials & Abbreviations
To achieve the super-soft, “velvet” look seen in the photos, I highly recommend using a plush or chenille-style yarn. This type of yarn makes the stitches look seamless and gives the toys that signature marshmallow feel.
What You Will Need
- Plush Yarn: Approximately 1.5 skeins of your main color (Alize Velluto or Alize Softy Mega are excellent choices). You will also need small amounts of an accent color for claws, spikes, or horns.
- Crochet Hooks: A 5.5 mm (K) hook for the main body work, and a smaller 4 mm or 4.5 mm hook for detailed work like bobbles or spikes to ensure they stay tight and neat.
- Safety Eyes: 20 mm trapezoid-shaped safety eyes.
- Stuffing: High-quality polyester fiberfill (polyfill).
- Notions: A large-eye tapestry needle, scissors, and stitch markers.
- Optional: Cotton thread in a matching color for facial embroidery.
US Crochet Abbreviations
Please note that all terms used are in US terminology:
- MR: Magic Ring
- ch: Chain
- sc: Single crochet
- hdc: Half double crochet
- dc: Double crochet
- inc: Increase (two stitches in one stitch)
- dec: Decrease (sc two stitches together)
- sl st: Slip stitch
- bobble: A decorative stitch (for this pattern, work 3 hdc into one stitch, then pull the loop through all of them to create a single peak).
Step-by-Step Instructions
Because these characters share similar construction techniques, I have organized this guide by body part to help you navigate the patterns more easily. You can choose to make one, two, or the full trio!
The Heads
Dino & Dragon Head
The Dino and Dragon share a similar base. Start with your main color.
- Row 1: 6 sc in a MR (6)
- Row 2: 6 inc (12)
- Row 3: (1 sc, inc) * 6 (18)
- Row 4 (Nostrils): Using your accent color, work the bobble stitch. 7 sc, bobble, 3 sc, bobble, 6 sc (18).
- Row 5: 18 sc (18)
- Row 6: 6 sc, 7 inc in the front loops only, 5 sc in the back loops (25)
- Row 7: 8 sc, (1 sc, inc) * 5, 7 sc (30)
- Rows 8-10: 30 sc (30)
For the Dino: Continue with 30 sc for Row 11.
For the Dragon: In Row 11, work the horns using the accent color: 12 sc, bobble, 6 sc, bobble, 10 sc (30). Ensure your horns are placed symmetrically relative to the nostrils.
Eye Placement: Insert safety eyes between Rows 7 and 8. Aim for approximately 14 stitches between the eye bases for a balanced look. Once satisfied, snap the backings into place.
- Row 12: (3 sc, dec) * 6 (24)
- Row 13: 24 sc (24)
- Begin stuffing the head firmly, starting from the muzzle and working toward the back.
- Row 14: (2 sc, dec) * 6 (18)
- Row 15: (1 sc, dec) * 6 (12)
- Row 16: 6 sc. Fasten off and weave in ends.
Hippo Head
The Hippo has a slightly different shape to accommodate its wider snout. Start with a chain of 8 ch.
- Row 1: 6 sc from the 2nd ch from hook, 3 sc in the last ch, 5 sc, inc (16)
- Row 2: inc, 5 sc, 3 inc, 5 sc, 2 inc (22)
- Row 3 (Nostrils): 2 sc, bobble, 3 sc, bobble, 15 sc (22)
- Row 4: 15 sc, dec, 5 sc (21)
- Row 5: (dec, 5 sc) * 3 (18)
- Row 6: 7 inc, 5 sc, dec, 4 sc (24)
- Row 7: (1 sc, inc) * 7, 5 sc, dec, 3 sc (30)
- Rows 8-11: 30 sc (30)
Row 12 (Ear Integration): During this row, you will work the ears directly into the head. Follow the specific stitch counts for the ears as noted in the pattern diagrams to ensure they sit naturally on the sides.
- Rows 13-17: Follow the decreases (dec) as listed in the pattern to close the head. Stuff the head very firmly to maintain its round shape.
Limbs & Tails
Upper Arms and Legs
All three characters use a similar method for their upper limbs. The main difference lies in the number of rows to adjust for height.
General Construction: Most limbs begin with a magic ring and increase for a few rows, followed by a section of straight sc, and then decreases to taper the limb. For the Dino and Dragon, remember to add the “claws” using the bobble stitch in the third row using your accent color. For the Hippo, the lower limbs/body are often worked as one continuous piece to create a more stable base for sitting.
Dino Spikes & Dragon Wings
- Dino Spikes: You will make 10 individual spikes. Use a smaller hook (4 mm) to keep them tight. Work them in a magic ring and sew them onto the back of the Dino.
- Dragon Wings: These are worked in rows using a foundation chain. Start with a 7 ch foundation and work back and forth, decreasing slightly to create the wing shape. Sew these onto the back, slightly angled for a more dynamic look.
Finishing
Assembly is where your character truly comes to life! Follow these steps for a professional finish:
Stuffing Technique
When stuffing, don’t just shove the fiberfill in. Work in small clumps. Start with the snout or muzzle to define the face, then work your way around the perimeter of the head to ensure there are no lumps. For the body, ensure the stuffing is packed tightly so the toy holds its shape when hugged.
The “Facial Sculpting” Trick
To give your characters more expression (especially the Hippo), use a cotton thread that matches your main color. Insert the needle at the base of the nose (Point 1), pull through to the other side, and repeat this across the snout area. By pulling the thread tight, you create a slight indentation that defines the muzzle and gives the eyes a more “set-in” look.
Attaching Parts
- Body to Head: Sew the head to the body with a slight downward tilt. This prevents the character from looking like it’s staring straight up and gives it a more natural, “curious” expression.
- Limbs: For the Dino and Dragon, attach the arms to the sides of the body. For the Hippo, ensure the legs are positioned to allow the toy to sit upright.
- Details: Sew the spikes onto the Dino’s back and the wings onto the Dragon’s sides. For the Hippo, sew the ears onto the top corners of the head.
Tips for Success
- Watch Your Tension: When working with plush yarn, it is very easy to accidentally skip stitches or create gaps. Use stitch markers religiously!
- Smaller Hooks for Details: As mentioned, using a smaller hook for bobbles, spikes, and horns prevents the “holes” that can sometimes appear when working with bulky yarns.
- Symmetry is Key: Before you sew anything permanently, hold the pieces against the body to check for symmetry. It is much easier to adjust the placement of eyes or ears before you’ve sewn them in!
- Hide Your Ends: When finishing, always weave your yarn tails deep into the stuffing and through several stitches to ensure they don’t pop out later.