How to Crochet a Cute Plush Crocodile: A Complete Amigurumi Tutorial
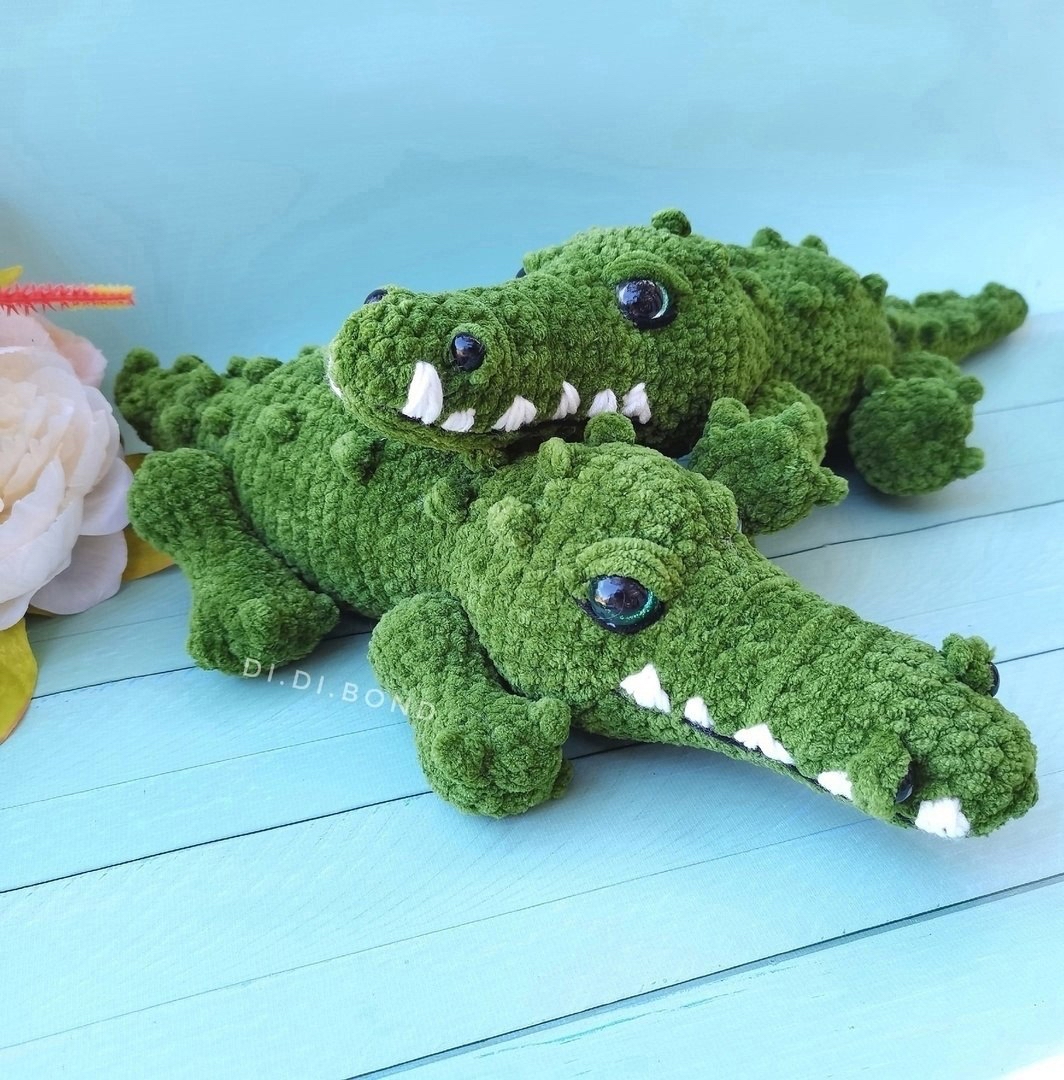
Are you looking for your next adorable crochet project? This plush crocodile is the perfect addition to your amigurumi collection! Whether you are making a nursery decoration or a soft companion for a little one, this crocodile is incredibly huggable thanks to its soft, velvety texture. In this tutorial, we will walk through every step, from crafting the long, tapered snout to adding those tiny, charming claws.
This pattern is designed to be beginner-friendly, though you should be comfortable with basic stitches like the single crochet and working in the round. Grab your favorite plush yarn, and let’s dive into making your very own green crocodile friend!
Materials & Abbreviations
To ensure your crocodile turns out just like the photos, it is helpful to have the right supplies on hand. Using plush (chenille-style) yarn will give it that premium, soft feel.
Required Materials
- Crochet Hooks: 4mm and 3mm hooks (a small extra hook without a handle is helpful for weaving in ends).
- Yarn:
- Plush yarn in green (approx. 1.5 skeins).
- Acrylic yarn in black and white (for the mouth and teeth).
- Cotton yarn in black (for facial details).
- Eyes: 0.8-inch (2cm) safety eyes with washers.
- Nose Details: Two small black tips (approx. 0.4 inches/1cm each) and black glue.
- Stuffing: Polyfill or any soft fiberfill.
- Tools: Scissors, stitch markers, sewing needle, two long needles (to help with limb assembly), a plastic needle, and pins.
Abbreviations (US Terms)
- MR: Magic Ring
- sc: Single crochet
- inc: Increase (2 sc in one stitch)
- dec: Decrease (sc two stitches together)
- st(s): Stitch(es)
- [ ] x n: Repeat the instructions inside the brackets n times
Step-by-Step Instructions
The Tail, Body, and Head (One Continuous Piece)
This piece is worked in one long continuous strand to create the entire length of the crocodile. We will start at the tail and work our way up toward the snout.
Phase 1: The Tail and Base
R1: 6 sc in a MR (6)
R2-4: 6 sc (6)
R5: (1 sc, inc) x 3 (9)
R6-8: 9 sc (9)
R9: (2 sc, inc) x 3 (12)
R10-13: 12 sc (12)
R14: (3 sc, inc) x 3 (15)
R15-17: 15 sc (15)
R18: (4 sc, inc) x 3 (18)
R19-22: 18 sc (18)
R23: (5 sc, inc) x 3 (21)
R24-25: 21 sc (21)
R26: (3 sc, inc) x 5, 1 sc (26)
R27: (3 sc, inc) x 6, 2 sc (32)
R28: 32 sc (32)
R29: (4 sc, inc) x 6, 2 sc (38)
R30-37: 38 sc (38)
Stop here to begin stuffing the body firmly.
Phase 2: Transitioning the Shape
R38: (5 sc, dec) x 4, 3 sc (33)
R39-40: 33 sc (33)
R41: (4 sc, dec) x 5, 3 sc (28)
R42: 28 sc (28)
R43-45: 23 sc (23)
R46: (4 sc, inc) x 4, 3 sc (27)
R47-48: 27 sc (27)
R49: (5 sc, inc) x 4, 3 sc (31)
R50: (4 sc, inc) x 6, 1 sc (37)
R51: (3 sc, inc) x 9, 1 sc (46)
R52-53: 46 sc (46)
Phase 3: Forming the Snout
R54: (4 sc, dec) x 7, 4 sc (39)
R55: (3 sc, dec) x 7, 4 sc (32)
R56: (4 sc, dec) x 5, 2 sc (27)
R57: (3 sc, dec) x 6, 2 sc (22)
R58-59: 22 sc (22)
R60: (5 sc, dec) x 3, 1 sc (19)
R61-67: 19 sc (19)
Insert safety eyes before continuing. Stuff the snout firmly.
R68: (4 sc, dec) x 3, 1 sc (15)
R69: 15 sc (15)
R70: (3 sc, dec) x 2, 2 sc (12)
R71: (2 sc, dec) x 3 (9)
R72: 2 dec (0)
The Paws (Make 4)
Note: Use a 3mm hook for the front paws and a 4mm hook for the back paws to maintain consistency.
R1: 6 sc in a MR (6)
R2: 6 inc (12)
R3: (1 sc, inc) x 6 (18)
R4-6: 18 sc (18)
R7: 6 sc, 3 dec, 6 sc (15)
R8: 4 sc, 3 dec, 5 sc (12)
R9-11: 12 sc (12)
R12: (3 sc, inc) x 3 (15)
R13: (2 sc, inc) x 5 (20)
R14-15: 20 sc (20)
R16: (2 sc, dec) x 6 (15)
R17: (1 sc, dec) x 5 (10)
R18: 4 dec (0)
Creating the Tiny Claws
To give the paws character, we will add little “bumps” that look like claws. Using your plush green yarn and a needle, insert the needle into the center of the paw. Pull the yarn through, make a yarn over, and insert the hook back into the same original spot. Pull the yarn through all three loops on your hook. Repeat this two more times in the same spot to create a small “bobble” or bump. Repeat this for two other locations on the paw, spacing them 2-3 stitches apart from the center claw.
Finishing
Facial Details & Expressions
The face is what brings your crocodile to life! Follow these steps carefully to get that perfect, wide-eyed look.
Nostrils
First, glue your small black nose tips onto the snout. To add detail, take your black cotton yarn and create a tiny bobble (similar to the claw technique) right at the center of each nostril to give them depth.
Eyes & Eyelids
After inserting your safety eyes, we want to sculpt the face. Take a single strand of black cotton yarn. Insert the needle under the snout and bring it up through the top edge of the left eye. Work a small bobble there to create an eyelid, then bring the thread back down to the starting point. To create the “heavy” eyelid look, you can repeat this on the bottom of the eye using two strands of black acrylic yarn.
The Mouth and Teeth
Use pins to mark a long, slightly curved line for the mouth. Using black acrylic yarn and a plastic needle, use a “running stitch” or “whip stitch” to follow the line you marked. Once the mouth line is complete, use white acrylic yarn to embroider small, triangular teeth along the line. This gives him that friendly, toothy grin!
Back Spikes
To add texture to the crocodile’s back, we will create rows of bumps. Use pins to mark where you want the spikes to go. Insert your hook into a stitch on the back, yarn over, pull through, and work a small bobble (the same way you did for the claws). Do this for three rows along the spine to create a rugged, reptilian look.
Tips for Success
Assembly & Tensioning
When sewing the limbs to the body, use a long needle and black cotton yarn for strength. To make the paws look more realistic, perform “tensioning” (also known as sculpting). Insert the needle into the center of the paw from the inside, pass it between two of the little claw bumps, and pull the thread tight. This creates natural-looking indentations between the toes. Don’t pull so hard that you deform the limb, but enough to create that definition!
Working with Plush Yarn
Plush yarn can be tricky because the stitches can “hide” in the fluff. Always use stitch markers so you don’t lose your place. If you find it difficult to see your stitches, try using a slightly larger hook or using a light-colored yarn for practice before moving to the dark green plush yarn.
Enjoy your beautiful, handmade crochet crocodile!