Adorable Crochet Pig in a Bun Amigurumi Pattern: Step-by-Step Tutorial
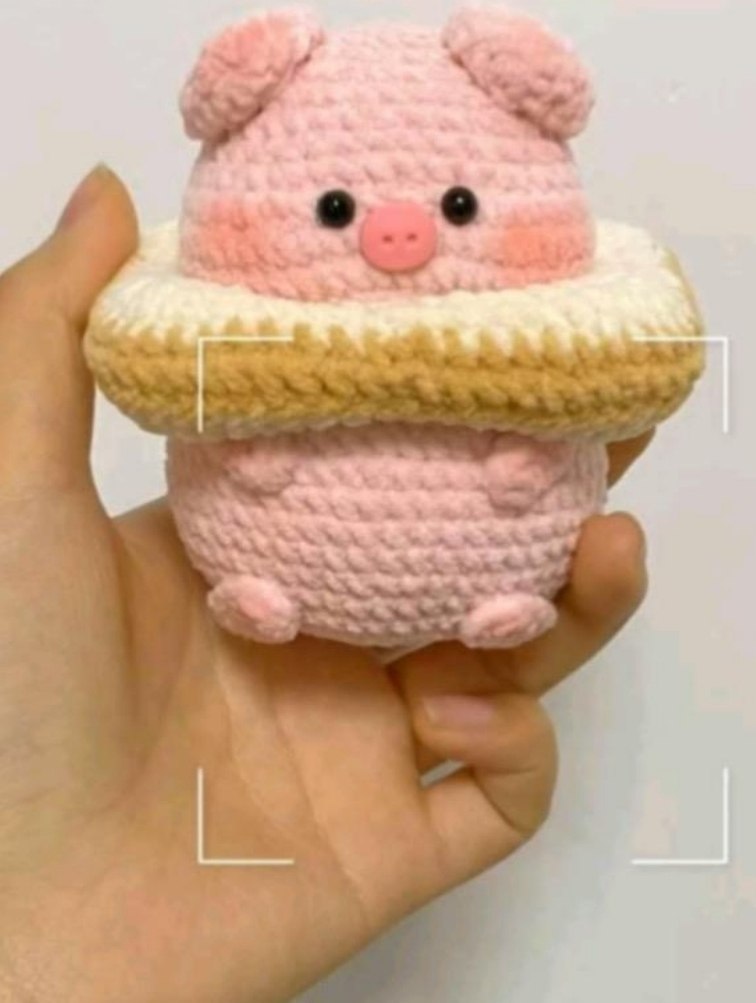
Looking for a project that is equal parts cute and quirky? This crochet pig in a bun amigurumi is the perfect addition to your collection. With its chubby cheeks and cozy little sandwich “bed,” this plushie is a delight to make and even more delightful to gift. Whether you are a seasoned pro or a beginner looking for a rewarding project, this detailed guide will walk you through every stitch to create your own tiny, bread-loving piggy.
Materials & Abbreviations
To get that squishy, professional look seen in the photos, we recommend using a plush chenille or velvet yarn. However, this pattern works with any medium-weight yarn.
Materials Needed
- Yarn: Plush chenille yarn in Light Pink (for the pig), Beige (for the bun), and Brown (for the crust). You will need approximately 100-150 yards of each.
- Crochet Hook: 3.5mm or 4.0mm (depending on your yarn weight and tension).
- Safety Eyes: 8mm or 10mm black safety eyes.
- Stuffing: High-quality polyester fiberfill.
- Other Tools: Yarn needle, stitch markers, and scissors.
- Optional: A small piece of pink felt or extra yarn for the snout, and pink blush for the cheeks.
Abbreviations (US Terms)
- ch: chain
- mr: magic ring
- sc: single crochet
- inc: increase (2 sc in one stitch)
- dec: decrease (sc 2 together)
- dc: double crochet
- tr: treble crochet
- sl st: slip stitch
- dc-inc: 2 dc in one stitch
- tr-inc: 2 tr in one stitch
- 3sc: 3 single crochet in one stitch
- 3dc: 3 double crochet in one stitch
- 3tr: 3 treble crochet in one stitch
Step-by-Step Instructions
The Pig Body
The body is worked in continuous rounds. Use a stitch marker to keep track of the start of each row.
- Round 1: 8 sc in mr (8)
- Round 2: 8 inc (16)
- Round 3: (sc, inc) repeat 8 times (24)
- Round 4: (sc, inc, sc) repeat 8 times (32)
- Round 5: (7 sc, inc) repeat 4 times (36)
- Rounds 6-8: sc in each stitch around (36)
- Round 9: 11 sc, 4 inc, 6 sc, 4 inc, 11 sc (44)
- Round 10: 13 sc, 6 inc, 1 sc, 2 dec, 1 sc, 6 inc, 13 sc (54)
- Rounds 11-12: sc in each stitch around (54)
- Round 13: 13 sc, 6 dec, 4 sc, 6 dec, 13 sc (42)
- Round 14: 12 sc, 3(dec, sc), 3(sc, dec), 12 sc (36)
- Round 15: 10 sc, dec, 1 sc, dec, 6 sc, dec, 1 sc, dec, 10 sc (32)
- Round 16: 8 sc, 8(sc, inc), 8 sc (40)
- Round 17: sc in each stitch around (40)
- Round 18: 8 sc, 8(sc, inc, sc), 8 sc (48)
- Rounds 19-21: sc in each stitch around (48)
- Round 22: 3 sc, 6 inc, 32 sc, 6 inc, 1 sc (54)
- Rounds 23-26: sc in each stitch around (60)
Creating the Sandwich Gap
To allow the pig to sit inside the bun, we need to create a specific opening. Follow these steps carefully:
Complete Round 26 and finish with a slip stitch. Remove your hook and move it back 2 stitches. Re-insert the hook. Skip the first 4 stitches of Round 26 (this means you are utilizing the last 2 stitches of the round and the first 4 of the next to create the gap). Work a slip stitch, then chain 1 to begin the next section.
Closing the Body
- Round 27: 5 dec, 2 sc, 5(2 sc, dec, 2 sc), 2 sc, 5 dec (30)
- Round 28: 7(3 sc, dec), 4 sc (25)
- Round 29: 8(sc, dec, sc) (17)
- Round 30: 8(sc, dec) (9)
- Round 31: 8 dec. Fasten off and weave in ends.
The Pig’s Features
Arms (Make 2)
Chain 8. Starting in the 3rd chain from the hook, work 6 treble crochets (tr). Fasten off, leaving a tail for sewing.
Legs (Make 2)
Chain 8. Starting in the 3rd chain from the hook, work 6 double crochets (dc). Fasten off, leaving a tail for sewing.
Tail
Chain 6. In the 2nd chain from hook, work 2 slip stitches, followed by 3 single crochets. Fasten off.
Ears (Make 2)
- Round 1: 6 sc in mr (6)
- Round 2: (sc, inc) repeat 3 times (9)
- Round 3: (sc, inc, sc) repeat 3 times (12)
- Round 4: (3 sc, inc) repeat 3 times (15)
- Round 5: (sc, dec) repeat 3 times (12). Fasten off.
The Sandwich Bun
The bun is worked in two mirrored halves to create a 3D effect. Use beige yarn for the bread and brown for the crust.
Top Side of Bun
- Round 1: Ch 48, join in a ring, work 48 sc along one side of the chain.
- Round 2: 4 sc, 2 tr, 3tr in 1, 2 tr, 5 sc, 1 tr, 2 tr-inc, 3tr in 1, 2 tr-inc, 1 tr, 6 sc, 1 tr, 2 tr-inc, 3tr in 1, 2 tr-inc, 1 tr, 5 sc, 2 tr, 3tr in 1, 2 tr, 4 sc.
- Round 3: 5 sc, 1 tr, tr-inc, 3tr in 1, tr-inc, 1 tr, 7 sc, 2 tr, 2 dc, dc-inc, 3dc in 1, dc-inc, 1 dc, 14 tr, 1 dc, dc-inc, 3dc in 1, dc-inc, 2 dc, 2 tr, 7 sc, 1 tr, tr-inc, 3tr in 1, tr-inc, 1 tr, 5 sc. Fasten off.
Bottom Side of Bun
- Round 1: Work 48 sc along the opposite side of the original foundation chain.
- Round 2: Repeat Round 2 of the top side.
- Round 3: Repeat Round 3 of the top side.
The Bun Crust
Switch to brown yarn. Work 80 sc around the entire outer edge of the bun for 2 rounds (Rounds 4-5). Fasten off, leaving a long tail for sewing.
Finishing
Now it’s time to bring your piggy to life!
- Stuffing: Stuff the body, ears, and bun firmly with fiberfill.
- Face: Insert safety eyes between rounds 7 and 8, spaced about 5-6 stitches apart. Crochet a small oval or use a scrap of pink yarn to create the snout. Sew the snout centered between the eyes.
- Assembly: Sew the ears to the top of the head, the arms to the sides, and the legs to the bottom. Attach the curly tail to the back.
- The Bun: Wrap the bun around the middle of the pig, aligning it with the gap created in Round 26. Use your tapestry needle to sew the bun securely to the pig’s body.
- Final Touch: Use a bit of pink blush or fabric marker to add rosy cheeks just below the eyes for extra cuteness.
Tips for Success
- Tension is Key: Because this project uses several different stitch heights (sc, dc, tr), keep your tension consistent to ensure the bun maintains its square-ish shape.
- Working with Chenille: If your plush yarn splits, try using a slightly larger hook or a locking hook to keep the yarn in place.
- The Gap: If you find the “Sandwich Gap” transition confusing, remember that the goal is simply to leave a space where the bun can sit snugly. Don’t be afraid to use a stitch marker to mark exactly where you stopped in Round 26.
- Customization: Want a different treat? Change the brown yarn to a lighter gold for a brioche bun or use a different colored yarn for a “strawberry” pig!