Free Crochet Doll Pattern: How to Make a Sweet Rosie Amigurumi Doll
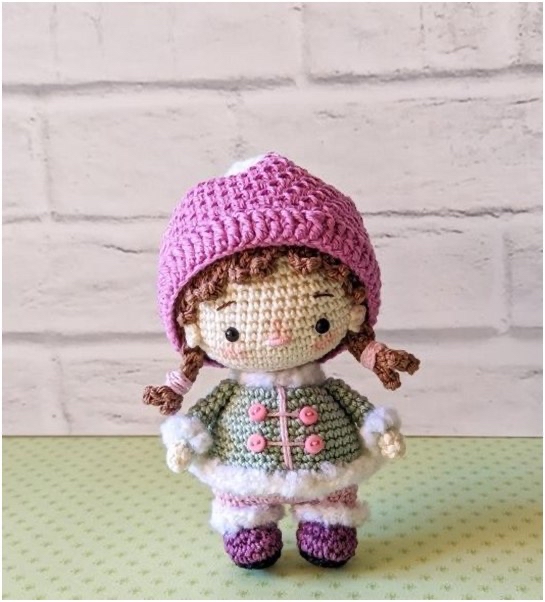
If you love creating adorable handmade toys, this free crochet doll pattern is the perfect next project for you! Meet Rosie, a delightful sweet amigurumi doll bundled up in her cozy winter coat, complete with a fluffy collar, sweet little boots, braided pigtails, and a textured pink beanie. Standing at approximately 4.7 inches (12 cm) tall, she makes a wonderful keepsake, a cute stocking stuffer, or a precious gift for a loved one.
This beginner-friendly to intermediate tutorial breaks down every single step clearly using US crochet terminology. Grab your yarn and hooks, and let’s bring Rosie to life!
Materials & Abbreviations
Materials Needed
- Yarn: Sport weight (Category 2) cotton yarn (approx. 135 yards per 50g) in the following colors:
- Color A: Cream / Skin Tone
- Color B: Deep Plum / Purple
- Color C: Soft Light Pink
- Color D: Sage Green
- Color E: Medium Brown (for the hair)
- Color F: Rose Pink (for the hat)
- Color H: Dark Plum / Black (for the soles of the shoes)
- Fluffy Accent Yarn: Color G: Fluffy White bouclé yarn or eyelash yarn (for the coat trim, collar, and pom-pom).
- Crochet Hooks: Size US B-1 / C-2 (2.50 mm) and US D-3 (3.00 mm).
- Safety Eyes: 5 mm safety eyes.
- Notions: Fiberfill stuffing, yarn needle, sewing needle, scissors, stitch markers, and four tiny 6 mm pink buttons.
Abbreviations (US Terms)
- MR: Magic Ring (Magic Circle)
- ch: Chain
- sl st: Slip stitch
- sc: Single crochet
- hdc: Half double crochet
- dc: Double crochet
- FPdc: Front Post double crochet
- inc: Increase (work 2 single crochets into the same stitch)
- dec: Decrease (invisible single crochet decrease recommended)
- BLO: Back Loop Only
- FLO: Front Loop Only
- st(s): Stitch(es)
- *…* x times: Repeat the instructions inside the asterisks the indicated number of times.
Step-by-Step Instructions
The Legs & Boots
Stuff the legs firmly as you progress. Start with Color H and a 2.50 mm hook to make the shoe soles.
Sole (Make 2)
Ch 5.
- Round 1: Start in the second chain from your hook: 3 sc, 1 inc in the last chain. Turn to work along the opposite side of the chain: 3 sc, 1 inc = 10 sc.
- Round 2: 3 sc, 3 inc, 3 sc, 1 inc = 14 sc.
- Fasten off with a sl st and weave in the ends.
Boot Base & Socks
- Round 3: Attach Color B to the center of the back of the sole. Working in BLO: 4 sc, *1 inc, 1 sc* 2 times, 1 inc, 5 sc = 17 sc.
- Round 4: Working through both loops: 1 sc in each stitch around = 17 sc.
- Round 5: 6 sc, 3 dec, 5 sc = 14 sc.
- Round 6: 6 sc, 2 dec, 4 sc, 1 sl st = 12 sc. Change to Color C (socks/pants) in the final slip stitch.
- Round 7: Working in BLO: 1 sc in each stitch around = 12 sc.
For the Left Leg: Fasten off with a sl st and weave in your ends.
For the Right Leg: Repeat rounds 1–7, but do not cut the yarn. Crochet a few extra single crochets until you reach the center-inner side of the right leg. This ensures the legs align properly when joined.
Joining the Legs & Making the Body
Position the legs so the back of the doll is facing you. Still using your 2.50 mm hook and Color C:
- Round 8: Ch 3, join to the marked inner stitch of the left leg with a sc. Crochet 12 sc around the left leg, 3 sc along one side of the ch-3 bridge, 12 sc around the right leg, and 3 sc along the opposite side of the ch-3 bridge = 30 sc.
- Round 9: *12 sc, 1 inc, 1 sc, 1 inc* 2 times = 34 sc.
- Round 10: *12 sc, 1 inc, 3 sc, 1 inc* 2 times = 38 sc.
- Round 11: *12 sc, 1 inc, 5 sc, 1 inc* 2 times = 42 sc.
- Rounds 12–14: 1 sc in each stitch around = 42 sc.
- Round 15: Crochet scs until you reach the center-back of the doll. Place your stitch marker here; this is your new round transition point. In the last stitch of this round, switch to Color D (Sage Green) for the coat.
- Round 16: 1 sl st, 4 sc, 1 dec, *5 sc, 1 dec* 5 times = 36 sc.
- Round 17: 1 sc in each stitch around = 36 sc.
- Round 18: *4 sc, 1 dec* 6 times = 30 sc.
- Round 19: 1 sc in each stitch around = 30 sc.
- Round 20: *3 sc, 1 dec* 6 times = 24 sc.
- Round 21: 1 sc in each stitch around = 24 sc.
- Round 22: *2 sc, 1 dec* 6 times = 18 sc. Crochet extra scs if needed to reach the center-back of the body. Place your marker. Switch to Color A (Skin Tone) in the last stitch.
- Round 23: Working in BLO: 1 sc in each stitch around = 18 sc.
- Round 24: Working in BLO: *1 sc, skip 1 stitch, 1 sc* 6 times = 12 sc.
- Rounds 25–26: Working through both loops: 1 sc in each stitch around = 12 sc.
Note: Do not cut the thread. Stuff the body and the neck firmly. If desired, insert a plastic support rod or two cotton swabs inside the neck to keep the head stable and prevent it from wobbling.
The Coat Skirt, Collar, and Cuffs
Coat Skirt
Turn the doll upside down. Using Color D and a 2.50 mm hook, attach your yarn to the remaining front loops of Round 23 on the back of the body.
- Round 1: *2 sc, 1 inc* 6 times = 24 sc.
- Round 2: Working through both loops: *3 sc, 1 inc* 6 times = 30 sc.
- Round 3: *4 sc, 1 inc* 6 times = 36 sc.
- Round 4: 1 sc in each stitch around = 36 sc.
- Round 5: *5 sc, 1 inc* 6 times = 42 sc.
- Rounds 6–10: 1 sc in each stitch around = 42 sc. Change to Color G (Fluffy White) in the last stitch of Round 10.
- Round 11: Switch to a 3.00 mm hook. 1 sc in each stitch around = 42 sc.
- Fasten off and weave in your ends.
Fluffy Collar
Turn the doll upside down. Using Color G and a 3.00 mm hook, attach the fluffy yarn to the front loops of Round 24 at the center-back of the neck.
- Round 1: Working in FLO: 1 sc in each of the 18 front loops.
- Fasten off with a sl st and hide the yarn tails inside the body.
Boot Cuffs
Turn the doll upside down. Using Color G and a 3.00 mm hook, attach the fluffy yarn to the front loops of Round 7 on the back of the boots.
- Round 1: Working in FLO: 1 sc in each of the 12 front loops around.
- Fasten off with a sl st and weave in the ends.
The Head & Face
Continuing directly from the neck (Round 26) with Color A and your 2.50 mm hook:
- Round 1: *1 inc* 12 times = 24 sc.
- Round 2: *3 sc, 1 inc* 6 times = 30 sc.
- Round 3: 2 sc, 1 inc, *4 sc, 1 inc* 5 times, 2 sc = 36 sc.
- Round 4: *5 sc, 1 inc* 6 times = 42 sc.
- Round 5: 3 sc, 1 inc, *6 sc, 1 inc* 5 times, 3 sc = 48 sc.
- Rounds 6–16: 1 sc in each stitch around = 48 sc.
If using safety eyes, insert them between Rounds 8 and 9 of the head, leaving a space of 7 stitches between them.
- Round 17: *1 dec, 6 sc* 6 times = 42 sc.
- Round 18: *1 dec, 5 sc* 6 times = 36 sc.
- Round 19: *1 dec, 4 sc* 6 times = 30 sc.
- Round 20: *1 dec, 3 sc* 6 times = 24 sc.
- Round 21: *1 dec, 2 sc* 6 times = 18 sc. Stuff the head firmly with fiberfill.
- Round 22: *1 dec, 1 sc* 6 times = 12 sc.
- Round 23: *1 dec* 6 times = 6 sc.
Cut your yarn, leaving a short tail. Thread the tail through the front loops of the remaining 6 stitches, pull tight to close the opening, knot securely, and hide the thread inside the head.
Ears (Make 2)
Using Color A and a 2.50 mm hook:
- Ch 2. In the second chain from your hook, work: 4 sc, 1 sl st.
- Fasten off, leaving a long tail for sewing.
The Arms (Make 2)
Do not stuff the arms. Start with Color A and a 2.50 mm hook.
- Round 1: 7 sc in a MR.
- Round 2: 1 sc in each stitch around = 7 sc. Switch to Color D (Sage Green) in the last stitch.
- Round 3: 1 sc in each stitch around = 7 sc.
- Round 4: Working in BLO: 1 sc in each stitch around = 7 sc.
- Rounds 5–10: Working through both loops: 1 sc in each stitch around = 7 sc.
- Fasten off, leaving a long yarn tail for assembly.
Arm Cuffs
Turn the arm upside down. Using Color G and a 3.00 mm hook, attach the fluffy yarn to the remaining front loops of Round 4.
- Round 1: Working in FLO: 1 sc in each of the 7 front loops.
- Fasten off with a sl st and weave in your ends.
The Hair Wig & Braids
Using Color E and your 2.50 mm hook:
- Round 1: 6 sc in a MR.
- Round 2: *1 inc* 6 times = 12 sc.
- Round 3: *1 sc, 1 inc* 6 times = 18 sc.
- Round 4: *2 sc, 1 inc* 6 times = 24 sc.
- Round 5: *3 sc, 1 inc* 6 times = 30 sc.
- Round 6: *4 sc, 1 inc* 6 times = 36 sc.
- Round 7: *5 sc, 1 inc* 6 times = 42 sc.
- Round 8: *6 sc, 1 inc* 6 times = 48 sc.
- Round 9: *23 sc, 1 inc* 2 times = 50 sc.
- Rounds 10–19: 1 sc in each stitch around = 50 sc.
- Round 20 (Wig Strands & Bangs): Work 8 sc. Then make the first braid section:
- Strands 1–3: *1 sl st in the next stitch of the wig cap, ch 10, start in the second chain from the hook: 9 sc back down* 3 times.
- Work 1 sl st in the next stitch of the cap, then 5 sc.
- Bangs: 1 sl st in the next stitch, ch 6, start in the second chain from the hook: 4 sc, 1 inc (6 sts), skip 1 stitch of the cap, sl st in the next stitch.
- Ch 5, start in the second chain from the hook: 3 sc, 1 inc (5 sts), skip 1 stitch, sl st in the next.
- Ch 6, start in the second chain from the hook: 4 sc, 1 inc (6 sts), skip 1 stitch.
- *1 sl st in the next, ch 5, start in the second chain from the hook: 3 sc, 1 inc (5 sts), skip 1 stitch* 2 times.
- *1 sl st in the next, ch 5, start in the second chain from the hook: 4 sc, skip 1 stitch* 2 times.
- 1 sl st in the next, ch 6, start in the second chain from the hook: 5 sc, skip 1 stitch.
- Work 1 sl st in the next cap stitch, then 5 sc.
- Strands 13–15 (Second Braid): *1 sl st in the next cap stitch, ch 10, start in the second chain from the hook: 9 sc back down* 3 times.
- Work 8 sc on the remaining stitches of the cap.
- Fasten off, leaving an extra-long tail to sew the wig to the head.
The Textured Winter Beanie
Using Color F and a 2.50 mm hook:
Ch 56.
- Round 1: Start in the third chain from your hook: 1 dc in each chain. Join to the first dc with a sl st = 54 dc.
- Round 2: Ch 3, 1 FPdc in each stitch around, join with a sl st = 54 FPdc.
- Round 3: Ch 2, *[1 hdc, 1 sc] in the next stitch, skip 1 stitch* 28 times, join with a sl st = 54 sts.
- Rounds 4–11: Ch 2, *[1 hdc, 1 sc]* in each skipped stitch space around, join with a sl st = 54 sts.
- Round 12: Ch 2, *[1 hdc, 1 sc], skip 1 stitch, 1 hdc, skip 1 stitch* 14 times, join with a sl st = 42 sts.
- Round 13: Ch 2, *[1 hdc, 1 sc] in the next stitch, skip 1 stitch* 21 times, skip the final stitch, join with a sl st = 42 sts.
- Round 14: Ch 2, *[1 hdc, 1 sc], skip 1 stitch, 1 hdc, skip 1 stitch* 10 times, then [1 hdc, 1 sc] in the remaining stitch, join with a sl st = 32 sts.
- Round 15: Ch 2, *[1 hdc, 1 sc] in the next stitch, skip 1 stitch* 16 times, join with a sl st = 32 sts.
- Round 16: Ch 2, *[1 hdc, 1 sc], skip 1 stitch, 1 hdc, skip 1 stitch* 8 times, join with a sl st = 24 sts.
- Round 17: Ch 2, *[1 hdc, 1 sc] in the next stitch, skip 1 stitch* 12 times, join with a sl st = 24 sts.
- Round 18: Ch 2, *[1 hdc, 1 sc], skip 1 stitch, 1 hdc, skip 1 stitch* 6 times, join with a sl st = 18 sts.
Cut your yarn, leaving a tail. Turn the hat inside out, weave your yarn needle through the front loops of the remaining stitches, pull tight to close the top of the hat, and tie a secure knot. Using fluffy Color G yarn, make a small fluffy pom-pom and sew it to the top of the beanie.
Finishing & Assembly
Facial Details
- With a thin strand of brown yarn, embroider small horizontal lines 1 stitch wide above the safety eyes to form the eyebrows.
- With Color A (Skin Tone), embroider a small nose between the eyes across Rounds 7 and 8 of the head.
- Sew the ears onto Round 7 of the head, approximately 4 stitches away from each eye.
Attaching the Hair
- Place the wig cap on the head, aligning the bangs nicely at the front. Sew the cap securely to the head around the edges.
- Gather the three long strands on the left side of the wig and braid them together. Secure the end with a small piece of Color C yarn wrapped around as a hair tie. Repeat this process with the three strands on the right side.
Assembling the Doll
- Sew the arms to the sides of the body on Round 22 (just below the collar).
- Using Color C, embroider two decorative double horizontal bars across the center of the green coat to represent button fasteners (see photos for placement).
- Sew the four tiny pink buttons onto the coat over the embroidered bars.
- Put the finished winter beanie on Rosie's head. For extra security, you can tack it down with a few hidden stitches.
- Apply a tiny dab of real makeup blush to her cheeks using a cotton swab to give her a sweet, rosy winter glow.
Pro Tips for Amigurumi Success
- Keep Your Tension Tight: Use a slightly smaller hook than your yarn label recommends to ensure your stitches are tight enough that the polyester stuffing won't show through.
- Perfect Color Changes: When switching colors, pull the new color through the very last loop of the previous stitch to keep your stripes and sections looking clean and crisp.
- Safe for Small Children: If you are making this doll for an infant or toddler, replace the plastic safety eyes and buttons with embroidered eyes and sewn-on yarn details to avoid choking hazards.
Congratulations! Your sweet little winter Rosie doll is complete and ready to bring a touch of cozy handmade charm to your home.