Free Amigurumi Teddy Bear Crochet Pattern: Craft Sema the Jointed Bear
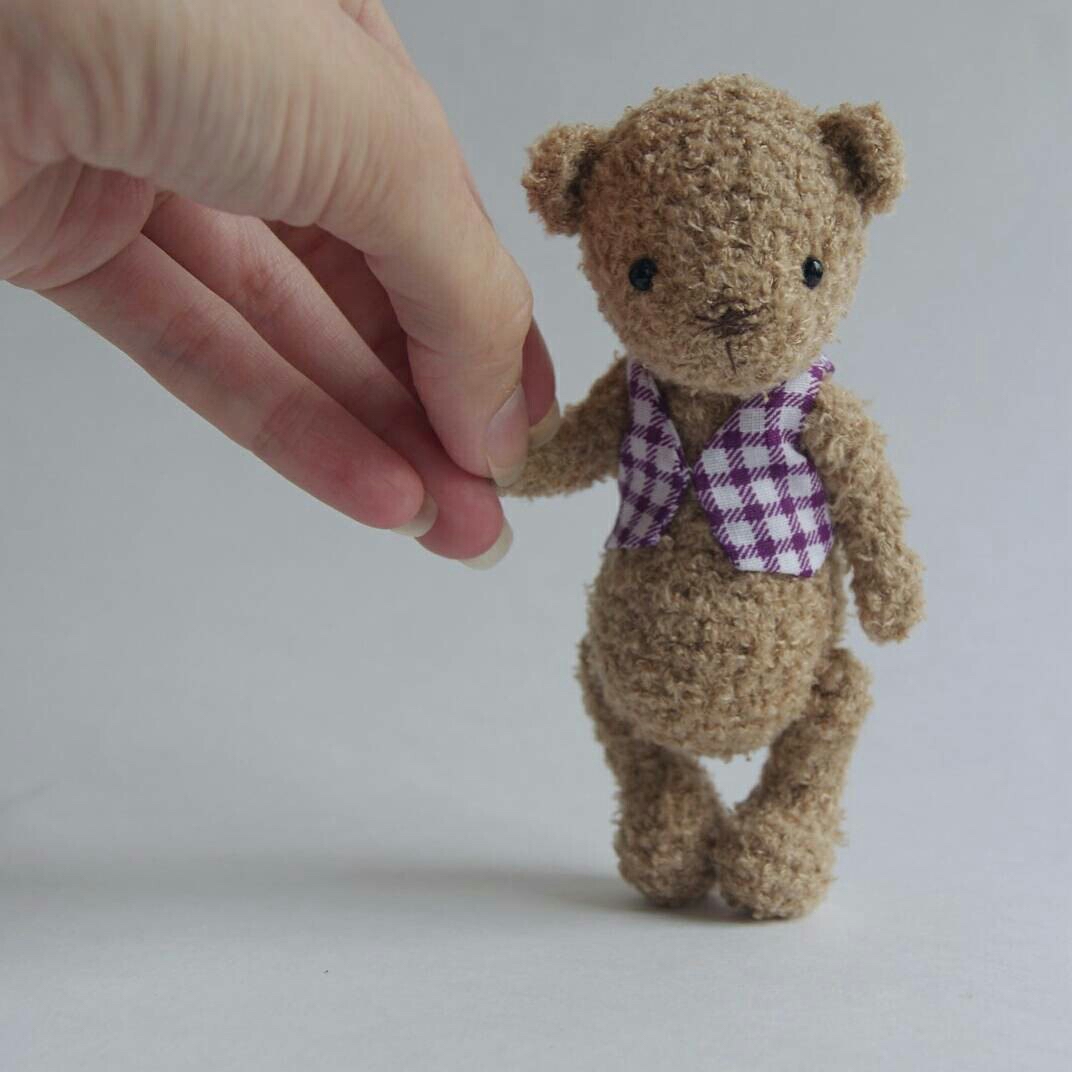
If you love the vintage charm of miniature teddy bears, you are in for a treat! This free amigurumi teddy bear crochet pattern will guide you step-by-step through creating “Sema,” a pocket-sized, jointed teddy bear. Standing at approximately 4 inches tall (depending on your yarn choice), this classic little bear features a rotating neck joint, poseable wire arms, and a soft, rustic look.
This project is perfect for intermediate crocheters or adventurous beginners who want to learn how to add jointing, wire armatures, and facial sculpting to their amigurumi toolkit. Read on to gather your supplies and start crafting your new heirloom miniature bear!
Materials & Abbreviations
Supplies Needed
- Yarn: Drops Flora (65% Wool, 35% Alpaca; Fingering / Sport weight, approx. 80–100 yards) in a classic light brown, camel, or taupe shade. Any fuzzy, sport-weight yarn will work beautifully.
- Crochet Hook: US Size B-1 (2.0mm) or C-2 (2.5mm) crochet hook (choose a hook size that gives you tight, dense stitches).
- Joints: One cotter pin joint set with two 20mm (approx. 0.75-inch) fiberboard discs.
- Eyes: 4mm glass or loop-back safety eyes.
- Wire: Thin craft wire (about 20–22 gauge) for poseable arms.
- Tape: Medical adhesive tape or painters tape to wrap wire ends.
- Thread: Strong nylon or upholstery thread for eye sculpting and attaching limbs.
- Embroidery Floss: Dark brown or black embroidery floss for the nose.
- Stuffing: Premium polyester fiberfill.
- Tools: Tapestry needle, scissors, pins, and pliers (to bend the cotter pin).
Crochet Abbreviations (US Terms)
- ch: chain
- MR: magic ring
- sc: single crochet
- inc: increase (work 2 single crochets into the same stitch)
- dec: decrease (invisible single crochet decrease recommended)
- st(s): stitch(es)
- Rnd(s): round(s)
- Row(s): flat rows (worked back and forth)
Step-by-Step Instructions
The Head
To give Sema a unique classic look, the head begins with an oval shape by working around a foundation chain.
- Rnd 1: Ch 4. Work inc in 2nd ch from hook, sc 1, work 3 sc in the last ch. Working along the opposite side of the foundation chain: sc 1, sc 1 in the starting chain space (where your first inc was made). [8 sts]
- Rnd 2: [Inc] twice, sc 1, [inc] 3 times, sc 1, inc. [14 sts]
- Rnd 3: Sc in each stitch around. [14 sts]
- Rnd 4: (Sc 1, inc) twice, sc 1, (inc, sc 1) twice, sc 5. [18 sts]
- Rnd 5: (Sc 2, inc) twice, sc 1, (inc, sc 2) twice, sc 5. [22 sts]
- Rnd 6: Sc 4, [inc] twice, sc 7, [inc] twice, sc 7. [26 sts]
- Rnd 7: Sc 5, [inc] twice, sc 9, [inc] twice, sc 8. [30 sts]
- Rnds 8–11: Sc in each stitch around. [30 sts for 4 rounds]
- Rnd 12: (Sc 3, dec) 6 times. [24 sts]
Installing the Neck Joint: Take your cotter pin and slide on one of the 20mm fiberboard discs. From inside the head, push the legs of the cotter pin outward through the fabric between Rounds 7 and 8. This pin will hang down from the bottom of the head and later connect it to the body.
- Rnd 13: (Sc 2, dec) 6 times. [18 sts]
Stuff the head firmly with fiberfill around the joint disc, ensuring it remains centered and flat against the bottom of the head.
- Rnd 14: (Sc 1, dec) 6 times. [12 sts]
- Rnd 15: 6 dec. [6 sts]
Cut your yarn, leaving a short tail. Thread the tail through the front loops of the remaining 6 stitches, pull tight to close the head, and weave in the end securely.
The Ears (Make 2)
Do not stuff the ears.
- Rnd 1: Work 6 sc in a Magic Ring. [6 sts]
- Rnd 2: (Sc 1, inc) 3 times. [9 sts]
Fasten off, leaving a long tail for sewing.
The Arms (Make 2)
- Rnd 1: Work 6 sc in a Magic Ring. [6 sts]
- Rnds 2–4: Sc in each stitch around. [6 sts for 3 rounds]
- Rnd 5: Sc 1, inc, sc 4. [7 sts]
- Rnds 6–8: Sc in each stitch around. [7 sts for 3 rounds]
- Rnd 9: Sc 3, inc, sc 3. [8 sts]
- Rnds 10–11: Sc in each stitch around. [8 sts for 2 rounds]
Inserting the Wire Frame: Cut a piece of thin craft wire slightly less than twice the length of the arm. Fold the wire in half to form a loop at one end. Wrap the sharp cut ends tightly with adhesive tape to ensure they cannot poke through the stitches. Insert the wire armature into the arm, lightly stuff around it, and use a sewing needle with the yarn tail to sew the top opening flat and closed.
The Legs (Make 2)
- Rnd 1: Ch 4. Work inc in 2nd ch from hook, sc 1, work 3 sc in the last ch. Working along the opposite side of the foundation chain: sc 1, sc 1 in the starting chain space. [8 sts]
- Rnd 2: [Inc] twice, sc 1, [inc] 3 times, sc 1, inc. [14 sts]
- Rnds 3–4: Sc in each stitch around. [14 sts for 2 rounds]
- Rnd 5: Sc 5, 4 dec, sc 1. [10 sts]
- Rnd 6: Sc 5, 2 dec, sc 1. [8 sts]
Stuff the foot section firmly at this stage.
- Rnds 7–12: Sc in each stitch around. [8 sts for 6 rounds]
Fasten off, leaving a tail. Use your tapestry needle to run the yarn through the front loops of the stitches and pull tight to close the leg opening. Weave in the end.
The Body
- Rnd 1: Work 6 sc in a Magic Ring. [6 sts]
- Rnd 2: 6 inc. [12 sts]
- Rnd 3: (Sc 1, inc) 6 times. [18 sts]
- Rnd 4: (Sc 2, inc) 6 times. [24 sts]
- Rnd 5: (Sc 3, inc) 6 times. [30 sts]
- Rnds 6–9: Sc in each stitch around. [30 sts for 4 rounds]
- Rnd 10: Sc 4, (dec, sc 2) 5 times, dec, sc 4. [24 sts]
- Rnd 11: Sc in each stitch around. [24 sts]
Note: To make it easy to install the neck joint from inside, we will now work back and forth in flat rows to create a temporary opening slit at the back of the body.
- Rows 12–15: Ch 1, turn. Sc 24. [24 sts for 4 rows]
- Row 16: Ch 1, turn. (Sc 2, dec) 6 times. [18 sts]
- Row 17: Ch 1, turn. Sc 18. [18 sts]
Now, we will resume working in continuous rounds to close the top neck area.
- Rnds 18–19: Working in the round again without turning, sc in each stitch around. [18 sts for 2 rounds]
- Rnd 20: (Sc 1, dec) 6 times. [12 sts]
- Rnd 21: 6 dec. [6 sts]
Fasten off, weaving in the yarn tail at the neck hole.
Finishing & Assembly
1. Attaching the Head to the Body
Insert the cotter pin sticking out from the bottom of the head directly through the closed top of the body (Rnd 21). Go inside the back slit of the body and place your second 20mm fiberboard disc over the cotter pin legs. Use a pair of pliers to curl and bend the cotter pin legs tightly outward and down against the disc. The head should sit snug against the body but still turn easily.
2. Stuffing and Sealing the Body
Pack the body firmly with polyester fiberfill through the back slit. Once stuffed to your liking, sew the back slit closed using a neat mattress stitch and your main yarn.
3. Facial Sculpting and Eyes
Pin your 4mm loop-back eyes in place to check the expression before attaching. To attach and sculpt:
- Thread a long piece of strong nylon or upholstery thread onto your needle.
- Insert the needle from the back of the head (right next to the neck joint) and bring it out at your first marked eye position.
- Pass the needle through the loop on the back of the eye.
- Insert the needle back into the head at the exact spot it exited, and bring it out at the starting point near the neck joint at the back of the head.
- Pull both ends of the thread firmly to sink the eye into the face, creating a sweet, deep eye socket. Knot the threads securely at the back of the head.
- Repeat this exact process for the second eye. Tie all loose thread ends together into a secure knot at the back of the head, cut them, and bury the knot inside the head using your needle.
4. Attaching the Ears
Pin the ears symmetrically to the top sides of the head. Sew them securely in place using your yarn tails, ensuring you curve them slightly for a natural look.
5. Thread-Jointing the Limbs
To make Sema’s arms and legs moveable, attach them using a strong thread-jointing method:
- Pin the arms and legs to the sides of the body to find a balanced standing/sitting pose.
- Thread a long strand of strong nylon thread on your needle. Insert the needle through the inner side of one arm, pass it straight through the body, and thread it through the inner side of the opposite arm.
- Pass the needle back through the body to the starting side, pull tight so the limbs hug the body snugly, and knot securely.
- Repeat this step for the legs. Hide all thread ends deep inside the body.
6. Embroidering the Nose
With dark brown or black embroidery floss, stitch a small, neat horizontal triangle at the front tip of the muzzle. Make a few vertical stitches downwards from the nose to form a sweet little mouth line.
Top Tips for the Perfect Amigurumi Bear
- Consistent Tension: Always crochet your pairs (ears, arms, and legs) in the same sitting if possible. Your natural tension can change based on your mood or time of day, and working them together ensures your bear’s limbs are symmetrical.
- Tight Stitches: If you see stuffing peeking through your stitches, your hook is too large! Downsize your hook by 0.5mm to achieve a solid, professional-looking fabric.
- Get Creative with Outfits: Once Sema is finished, personalize your new friend! Sew a tiny gingham vest, crochet a miniature scarf, or craft a little dress to give your bear its own unique personality.