How to Crochet a Cute Amigurumi Elephant: A Step-by-Step Pattern
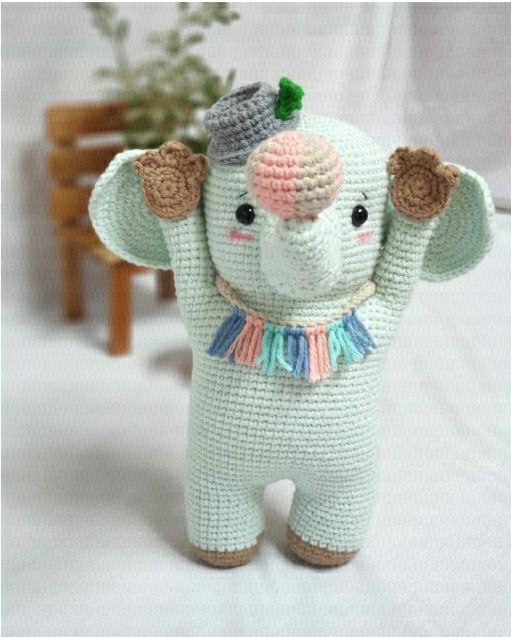
Are you looking for your next adorable amigurumi project? This cute, minty elephant is the perfect addition to any nursery, a wonderful gift for a baby shower, or a charming companion for a child’s toy collection. With its tiny gray hat, colorful tassel necklace, and soft, rounded features, this elephant is as sweet as it looks!
This pattern is designed to be beginner-friendly, guiding you through the process of creating individual limbs and a body, which you will then connect and assemble. While it requires some shaping techniques like increases and decreases, the repetitive nature of the stitches makes it a relaxing and rewarding project. Once finished, you will have a soft, squishy elephant approximately 6 to 8 inches tall, depending on your tension and yarn choice.
Materials & Abbreviations
Before you pick up your hook, gather all your supplies. Using a cotton-blend yarn will give your elephant excellent stitch definition, which is important for amigurumi to ensure the stuffing doesn’t peek through.
Materials Needed
- Yarn: Lightweight (Category 2 or 3) cotton or mixed yarn in the following colors:
- Light Mint (Main body color)
- Brown (Feet and palms)
- Beige (Nose ball and necklace base)
- Coral Pink (Nose ball and necklace tassels)
- Gray (Hat)
- Green (Hat leaf)
- Blue (Necklace tassels)
- Crochet Hook: 2.5mm or 3.0mm (use a smaller hook than recommended for the yarn weight to keep stitches tight).
- Safety Eyes: 10mm black safety eyes.
- Stuffing: Polyfiberfill or similar toy stuffing.
- Tools: Tapestry needle, stitch marker, and scissors.
Abbreviations (US Terms)
- MR: Magic Ring
- ch: Chain
- slst: Slip stitch
- sc: Single crochet
- inc: Increase (2 single crochet in one stitch)
- dec: Decrease (Use the invisible decrease method for a cleaner look)
- Rnd: Round
- dc: Double crochet
- hdc: Half double crochet
- dc2tog: 2 double crochet together
- dc-inc: 2 double crochet in one stitch
- BPsc: Back post single crochet
- Popcorn: 5 treble crochet popcorn stitch
- 3dc in 1st: 3 double crochet in the first stitch
Step-by-Step Instructions
The Legs
Use brown yarn to start.
Rnd 1: 6 sc in a magic ring (6)
Rnd 2: (inc) x 6 (12)
Rnd 3: (inc, 1 sc) x 6 (18)
Rnd 4: (inc, 2 sc) x 6 (24)
Rnd 5-6: 24 sc (2 rounds) (24)
Change color to light mint.
Rnd 7-14: 24 sc (8 rounds) (24)
Note for Leg 1: Break the yarn and weave in the ends. For the second leg, do not cut the yarn at the end; you will use this continuous thread to connect it to the first leg to form the body.
The Body
Use light mint yarn.
Rnd 15: Starting from the second leg, make a chain of 5. Working into the first leg, work 24 sc on the next 24 stitches. Then, work 5 sc into the chains you just made. Finally, work 24 sc into the 24 stitches of the second leg (53 total stitches).
Rnd 16: Work 4 increases on one side of the chain (inc, 1 sc, inc, 1 sc, inc, 1 sc, inc, 1 sc) and 4 increases on the other side of the chain to create the connection. (61)
Rnd 17-21: 61 sc (5 rounds) (61)
Rnd 22: 35 sc, 1 popcorn stitch, 25 sc (61)
Rnd 23-43: 61 sc (21 rounds) (61)
Rnd 44: 60 sc, 1 inc (62)
Stop here and prepare to divide the body for the arms and head.
The Arms
Use light mint yarn.
Rnd 1-14: 12 sc (14 rounds) (12)
Rnd 15: (dec, 2 sc) x 3 (9)
Rnd 16: (dec, 1 sc) x 3 (6)
Fasten off, leave a long tail for sewing, and stuff the arms lightly with fiberfill before closing.
The Head
Use light mint yarn. Connect the thread from the back of the head.
Rnd 1: 19 sc, inc, 17 sc, inc (40)
Rnd 2: 20 sc, inc, 17 sc, inc, 1 sc (42)
Rnd 3: (inc, 1 sc) x 21 (63)
Rnd 4-17: 63 sc (14 rounds) (63)
Rnd 18: 62 sc, 1 inc (64)
Stuff the head and body firmly with fiberfill.
Rnd 19: (dec, 6 sc) x 8 (56)
Rnd 20: 56 sc (56)
Rnd 21: (2 sc, dec) x 1, (5 sc, dec) x 7, 3 sc (48)
Rnd 22: (4 sc, dec) x 8 (40)
Rnd 23: (1 sc, dec) x 1, (3 sc, dec) x 7, 2 sc (32)
Rnd 24: (2 sc, dec) x 8 (24)
Rnd 25: (dec, 1 sc) x 8 (16)
Rnd 26: (dec) x 8 (8)
Fasten off, weave in ends, and ensure the head is stuffed enough to hold its shape.
The Nose and Nose Ball
The Nose (Light Mint):
Rnd 1: 6 sc in MR (6)
Rnd 2: (inc) x 6 (12)
Rnd 3-7: 12 sc (5 rounds) (12)
Rnd 8: (inc, 1 sc) x 3, 1 sc, (dec) x 2, 1 sc (13)
Rnd 9: (inc, 1 sc) x 3, 7 sc (16)
Rnd 10: 16 sc (16)
Rnd 11: (inc, 3 sc) x 3, 1 sc, dec, 1 sc (18)
Rnd 12: 4 dc, 10 sc, 4 dc (18)
Rnd 13: 4 dc, 3 sc, (inc) x 4, 3 sc, 4 dc (22)
Rnd 14: 4 dc, 3 sc, (inc, 1 sc) x 4, 3 sc, 4 dc (26)
Rnd 15: 4 dc, 18 sc, 4 dc (26)
Rnd 16-17: 26 sc (2 rounds) (26)
Stuff the nose lightly with fiberfill.
The Ball (Beige & Coral Pink):
Rnd 1: 6 sc in MR (6)
Rnd 2: (inc) x 6 (12)
Rnd 3: (inc, 1 sc) x 6 (18)
Rnd 4: (2 ch, dc2tog, 2 ch, slst) x 3 (18)
Stuff the ball with fiberfill and sew it onto the tip of the nose.
The Ears
Use light mint yarn. Work two ears.
Rnd 1: 6 sc in MR (6)
Rnd 2: (inc) x 6 (12)
Rnd 3: (inc, 1 sc) x 6 (18)
Rnd 4: (inc, 2 sc) x 6 (24)
Rnd 5: (inc, 3 sc) x 6 (30)
Rnd 6: (inc, 4 sc) x 6 (36)
Rnd 7: (inc, 5 sc) x 6 (42)
Rnd 8 (First Ear): 14 sc, 2 hdc, 2 dc, 3 dc in 1st, 2 dc, 2 hdc, 19 sc (44)
Rnd 8 (Second Ear): 24 sc, 2 hdc, 2 dc, 3 dc in 1st, 2 dc, 2 hdc, 9 sc (44)
The Hat and Leaf
Use gray yarn for the hat.
Rnd 1: 6 sc in MR (6)
Rnd 2: (inc) x 6 (12)
Rnd 3: (inc, 1 sc) x 6 (18)
Rnd 4: (inc, 2 sc) x 6 (24)
Rnd 5: 24 BPsc (24)
Rnd 6-8: 24 sc (3 rounds) (24)
Rnd 9: (inc, 1 sc) x 12 (36)
Rnd 10: 36 sc (36)
For the leaf (Green yarn): Make a chain of 5. On the second chain from the hook, work 1 sc. Then work 2 dc into the next stitch, and 1 sc in the following stitch. Sew this onto the hat.
The Necklace
Use beige yarn to make a string approximately 10.5 to 12 inches long. Cut threads of blue, mint, and coral pink (roughly 4-6 inches each). Tie these colorful threads onto the beige string to create a tassel effect. Tie the finished necklace around the elephant’s neck.
Finishing
Assembly is where your elephant really comes to life! Follow these placement tips for a perfect look:
- Eyes: Sew the 10mm safety eyes between rounds 11 and 12, spaced about 18 stitches apart.
- Ears: Sew the ears onto the head between rounds 7 and 14.
- Nose: Sew the finished nose onto the face, centered below the eyes.
- Arms & Legs: Sew the arms to the sides of the body where you divided the stitches, and sew the legs to the bottom of the body.
- Details: Use white thread to embroider small details around the eyes if desired.
Tips
To ensure your amigurumi looks professional, keep these tips in mind:
- Tension is Key: Try to keep your stitches tight. If you see the stuffing through the gaps, go down a hook size.
- The Magic Ring: If you struggle with the magic ring, you can alternatively chain 2 and work your first round of stitches into the second chain from the hook.
- Invisible Decreases: When decreasing, work your single crochet through the front loops only of the next two stitches. This prevents the “holes” often seen in standard decreases.
- Stitch Markers: Always use a stitch marker at the beginning of your rounds to avoid losing count, especially when working complex rounds.