No-Sew Crochet Mini Plush Cat Pattern: Quick and Easy Pocket Kitten Tutorial
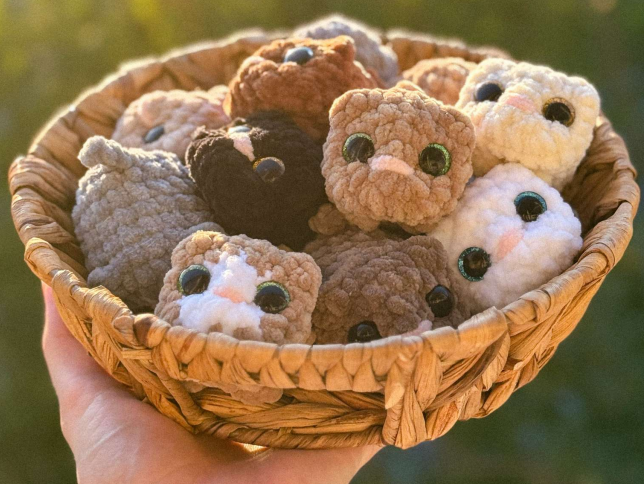
Are you looking for a super fast, incredibly cute crochet project that you can whip up in under an hour? Look no further! This no-sew crochet mini plush cat pattern is the ultimate project for market prep, quick handmade gifts, or adorable keychains. These tiny pocket kittens measure just about 2 to 2.5 inches when complete, making them the perfect palm-sized companions.
The best part? This pattern is completely seamless. The ears, paws, and tail are crocheted directly into the body as you go, which means zero tedious sewing at the end. Grab your favorite super bulky plush yarn, a hook, and let’s get crocheting!
Materials & Abbreviations
Materials Needed
- Yarn: Super Bulky (Weight 6) plush/chenille yarn (such as Premier Parfait Chunky, YarnArt Dolce, or Wolans Bunny Baby). You will need less than 15 yards of your main body color. If you want a contrast muzzle, you will also need a tiny amount of white plush yarn.
- Hook: Size G/6 (4.00 mm) crochet hook.
- Safety Eyes: 12 mm safety eyes (glitter or painted eyes work beautifully here!).
- Stuffing: Premium polyester fiberfill.
- Sculpting Thread: A strong, thin yarn (like sport weight cotton or embroidery floss) in a matching color for face sculpting, and a tiny bit of pink or peach yarn for embroidering the nose.
- Tools: Yarn needle with a large eye, sharp scissors, and a stitch marker.
Crochet Terms & Abbreviations (US Terms)
- MR: Magic Ring (or Magic Circle)
- ch: Chain
- sc: Single Crochet
- hdc: Half Double Crochet
- dc: Double Crochet
- inc: Increase (work 2 single crochet stitches into the same stitch)
- dec: Decrease (use the invisible decrease method for the neatest look)
- sl st: Slip Stitch
- FLO: Front Loops Only
- BLO: Back Loops Only
- st(s): Stitch(es)
- Bobble: 3-dc Bobble Paw Stitch (Yarn over, insert hook into stitch, pull up a loop, yarn over, pull through 2 loops. Repeat this 2 more times in the same stitch. You should have 4 loops on your hook. Yarn over and pull through all 4 loops).
Step-by-Step Instructions
If you want your kitten to have a cute contrast muzzle, start with your white yarn. If you prefer a solid-colored kitten, simply work the entire pattern in your main body color.
Crocheting the Head and Body
Round 1: Using your muzzle color (white) or main body color, work 8 sc into a Magic Ring. Pull tight to close. [8 sts]
Round 2: Work 1 inc in each of the 8 stitches around. [16 sts]
Color Change Note: If you started with white for the muzzle, switch to your main body color in the final loop of the last stitch of Round 2.
Round 3: 1 sc, 2 inc, 10 sc, 2 inc, 1 sc. [20 sts]
Round 4 (Working the Ears): 7 sc, work the first Ear in the Front Loop Only (FLO) of the next stitch: (hdc, ch 1, hdc) all in that single front loop. Next, work 4 sc, work the second Ear in the FLO of the next stitch: (hdc, ch 1, hdc) in that front loop. Complete the round with 7 sc. [20 sts]
Note: By working the ears only in the front loops, you leave the back loops of those stitches unworked. We will work into those back loops in the next round to lock the ears forward.
Round 5 (Working the Front Paws): 2 sc, 1 dec, 3 sc, work 1 sc into the unworked back loop of the ear stitch from Round 4, work 4 sc, work 1 sc into the unworked back loop of the second ear stitch from Round 4, 3 sc, 1 dec, work 1 Paw (3-dc Bobble stitch), 1 sc. [18 sts]
Adding the Safety Eyes: This is the perfect time to insert your 12 mm safety eyes. Position them just below the ears, on either side of the white muzzle area (around Round 3 or 4), keeping them spaced about 4 to 5 stitches apart. Snap the washers securely onto the backs of the eyes.
Round 6 (Working the Second Front Paw): 1 sc, work 1 Paw (3-dc Bobble stitch), 16 sc. [18 sts]
Round 7: Work 18 sc around. [18 sts]
Round 8 (Working the Back Paw): 16 sc, work 1 Paw (3-dc Bobble stitch), 1 sc. [18 sts]
Round 9 (Working the Second Back Paw and Tail): 1 sc, work 1 Paw (3-dc Bobble stitch), 7 sc, work the Tail (ch 4, start in the second chain from your hook and work 3 sl st back down the chain), 9 sc. [18 sts]
Round 10: (1 sc, 1 dec) repeated 6 times around. [12 sts]
Stuffing: Pause here and stuff your mini kitten firmly with polyester fiberfill. Make sure the stuffing is distributed evenly so the kitten has a plump, rounded shape and the tiny bobble paws pop outward.
Round 11: Work 6 dec. [6 sts]
Fasten off, leaving a 6-inch yarn tail. Thread your yarn needle through the front loops of the remaining 6 stitches, pull the yarn tightly to close the opening, tie a secure knot, and hide the yarn tail inside the kitten’s body.
Finishing & Face Sculpting
Face sculpting (also known as soft sculpting) is the secret to giving your crochet amigurumi that highly professional, expressive look. We will use a single long piece of cotton thread or sport weight yarn to sculpt both eyes at once.
Step 1: Sculpting the Left Eye
- Thread your needle with a long strand of strong cotton thread. Insert the needle at the bottom center of the kitten’s body (directly between the front paws) and bring it out at the outer corner of the left eye. Leave a long tail of thread hanging out at the bottom.
- Insert the needle into the inner corner of the left eye and bring it back down to the bottom center of the body, exiting just one stitch away from your starting thread.
- Gently pull both threads. You will see the left eye pull inward slightly, creating a cute, sunken socket. Tie the two thread ends in a secure double knot at the bottom to hold this shape. Do not cut the thread yet!
Step 2: Sculpting the Right Eye
- Take one of the remaining long thread ends and insert the needle back into the bottom of the body. Bring it out at the outer corner of the right eye.
- Insert the needle into the inner corner of the right eye and bring it back down to the bottom center.
- Pull this thread gently to sink the right eye to match the depth of the left eye. Tie all the thread ends together in a final, tight knot at the bottom of the kitten. Snipping the ends, use your crochet hook to push the knot and tails inside the body to hide them completely.
Step 3: Embroidering the Nose
Thread your needle with a small amount of pink or peach yarn. Embroider a tiny, horizontal bar nose right between the safety eyes (covering about 1 to 2 stitches). Pass the needle back and forth 2 or 3 times to make it defined. Secure your ends and hide them deep inside the head.
Tips for Success
- Perfecting the Magic Ring with Chenille Yarn: Chenille yarn is prone to snapping when pulled tight in a magic ring. If you find your yarn breaking, try chaining 2 and working your first round of 8 single crochets directly into the second chain from your hook instead.
- Use Stitch Markers: It can be very difficult to see individual stitches when working with fluffy plush yarns. Always place a stitch marker in the first stitch of each round to keep your count accurate.
- Adjust Your Tension: Because this is a plush toy, aim for a tight, even tension so your fiberfill stuffing doesn’t peek through the stitches. If your stitches look too loose, try dropping down to a 3.5 mm hook.
- Customize Your Cats: Use self-striping yarn to make tabby cats, use black yarn for a spooky Halloween kitten, or add a metal split ring to the top of the head to turn your mini cat into an adorable backpack keychain!