Crochet Snail Amigurumi Pattern: A Cute and Easy Tutorial
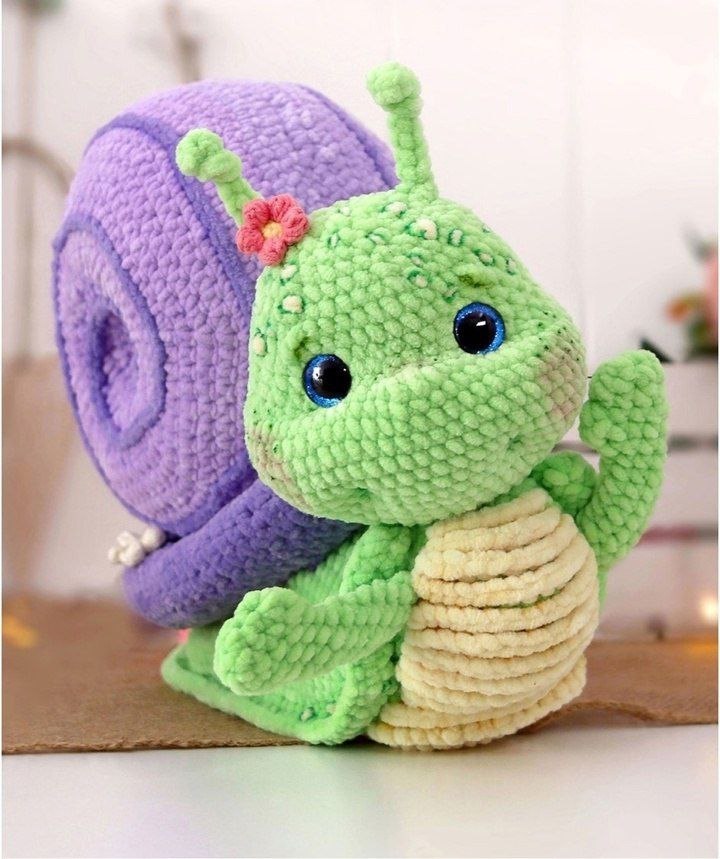
Welcome, crochet lovers! If you are looking for a project that is as adorable as it is cozy, you have come to the right place. Today, we are diving into the creation of a charming, chunky crochet snail. This little garden friend is perfect for nursery decor, a unique gift for children, or simply a sweet addition to your amigurumi collection.
This pattern is designed to be beginner-friendly, especially if you enjoy working with plush or chenille-style yarns. The thick texture of the yarn makes the stitches easy to see and gives the snail a wonderful, huggable feel. Because we are using chunky yarn, this project works up relatively quickly, providing that instant gratification we all love in crochet!
Materials and Abbreviations
Before you pick up your hook, let’s make sure you have everything you need. Because this snail uses several different colors, I recommend gathering your yarn in advance to avoid any mid-project trips to the craft store.
Yarn Requirements
For the best results, use a soft, bulky chenille yarn (like Himalaya Dolphin Baby). The size of your finished snail will depend on your yarn weight and hook size.
- Green Yarn: Approximately 7 ounces (200g) for the head, body, neck, and arms.
- Purple Yarn: Approximately 6 ounces (170g) for the main shell.
- Dark Purple Yarn: Approximately 1.7 ounces (50g) for the shell spiral detail.
- Yellow Yarn: Approximately 2.1 ounces (60g) for the belly/bottom and decorative spots.
Tools and Notions
- Crochet Hook: 4 mm (standard for this yarn weight).
- Safety Eyes: 20 mm diameter.
- Stuffing: High-quality polyester fiberfill.
- Safety Joints: A set of eye pins with discs (40 mm discs for the head and 45 mm discs for the neck).
- Sewing Needle: A large tapestry needle for assembly.
- Fabric Markers: Waterproof markers in dark green (for freckles and eyebrows) and pink (for blushing cheeks).
- Plier: To tighten the safety joints.
Abbreviations (US Terms)
Please ensure you are using US crochet terminology to follow this pattern accurately:
- MR: Magic Ring
- ch: Chain
- sc: Single Crochet
- inc: Increase (2 sc in one stitch)
- dec: Decrease (sc 2 together)
- sl st: Slip Stitch
- dc: Double Crochet
- FLO: Front Loop Only
Step-by-Step Instructions
The Head
Using green yarn, start with a magic ring and work in continuous rounds.
- 6 sc in MR (6)
- 6 inc (12)
- (1 sc, 1 inc) x 6 (18)
- (2 sc, 1 inc) x 6 (24)
- (3 sc, 1 inc) x 6 (30)
- (4 sc, 1 inc) x 6 (36)
- (5 sc, 1 inc) x 6 (42)
- (6 sc, 1 inc) x 6 (48)
- 8 sc, (1 inc, 1 sc) x 5, 1 sc, place Marker 1, 10 sc, place Marker 2, 1 sc, (1 sc, 1 inc) x 5, 8 sc (58)
- Rounds 10–15: 58 sc
- 10 sc, 6 dec, 1 sc, place Marker 3, 4 sc, 4 dc worked into the same stitch to create a small snout, 4 sc, place Marker 4, 1 sc, 6 dec, 10 sc (43)
- 41 sc, 1 dec (42)
- Rounds 18–21: 42 sc
- (5 sc, 1 dec) x 6 (36)
- (4 sc, 1 dec) x 6 (30)
Note: Before finishing the head, prepare your safety joint. Slide the metal pin through the head, add the 40 mm metal disc, then the 40 mm wooden disc. Ensure the pin remains on the outside of the head.
- (3 sc, 1 dec) x 6 (24). Stuff the head firmly.
- 24 sc. Do not close the head yet; we need to work on the face indentation.
Creating the Face and Eyes
To give your snail that expressive, “kawaii” look, we need to create indentations for the eyes and the smile.
Find your markers from Rounds 9 and 16. Insert your tapestry needle into Round 9 at Marker 1 and pull it through to Round 16 at Marker 3. Count 3 stitches to the right, insert the needle, and bring it back to Round 9 near Marker 1, but offset by one stitch to the right. Do not pull the thread too tight. Repeat this process for the second eye: insert at Round 9 (Marker 2), pull through Round 16 (Marker 4), count 3 stitches to the left, and return to Round 9 near Marker 2, offset by one stitch to the left. Tie off and hide the ends. This creates the perfect sockets for the eyes and the corners of the mouth.
Now, move up one row above the eye indentations to securely place and fasten your 20 mm safety eyes.
The Antennae
Using green yarn, make two antennae:
- Chain 16. Starting from the 2nd chain from the hook, work 15 sc.
- Attach these to the head and tie a knot at the top. Hide the yarn tails inside the head.
The Neck
Using green yarn, start with a magic ring.
- 6 sc in MR (6)
- 6 inc (12)
- (1 sc, 1 inc) x 6 (18)
- (2 sc, 1 inc) x 6 (24)
- (3 sc, 1 inc) x 6 (30)
- (4 sc, 1 inc) x 6 (36)
- (5 sc, 1 inc) x 6 (42)
- Rounds 8–9: 42 sc
- 10. 16 sc, 26 sc in FLO (42)
- Rounds 11–13: 42 sc
- 14. Work 16 sc into the back loops of Round 10. Fasten off, leaving a long tail for sewing.
Assembly Tip: Attach the head to the neck. To make the head sit securely, insert the safety pin/disc assembly through the neck area as shown in your reference photos, then use pliers to tighten the pin.
The Body
Using green yarn, start with a foundation chain of 22.
- Starting from the 2nd ch from the hook: 20 sc, 3 sc in the last ch, then work 20 sc along the other side of the chain, and 3 sc in the last ch (46)
- 20 sc, 3 inc, 20 sc, 3 inc (52)
- 20 sc, (1 inc, 1 sc) x 3, 20 sc, (1 sc, 1 inc) x 3 (58)
- 20 sc, (1 inc, 2 sc) x 3, 20 sc, (2 sc, 1 inc) x 3 (64)
- 20 sc, (1 inc, 3 sc) x 3, 20 sc, (3 sc, 1 inc) x 3 (70)
Find the center of the body and place a marker. This helps distribute increases evenly.
- 11 sc, (1 inc, 3 sc) x 3, 1 inc, 22 sc, (1 inc, 3 sc) x 3, 1 inc, 11 sc (78)
- 11 sc, (1 inc, 4 sc) x 3, 1 inc, 23 sc, (1 inc, 4 sc) x 3, 1 inc, 12 sc (86)
- 11 sc, (1 inc, 5 sc) x 3, 1 inc, 24 sc, (1 inc, 5 sc) x 3, 1 inc, 13 sc (94)
- Rounds 9–12: 94 sc
- 60 sc, (1 inc, 2 sc) x 7, 13 sc (101)
- 60 sc, (1 inc, 3 sc) x 7, 13 sc (108)
Fasten off, leaving a long tail for sewing.
The Bottom (Belly)
Using yellow yarn, start with a foundation chain of 28.
- Starting from the 2nd ch from the hook: 26 sc, 3 sc in the last ch, then work 26 sc along the other side, and 3 sc in the last ch (58)
- 26 sc, 3 inc, 26 sc, 3 inc (64)
- 26 sc, (1 inc, 1 sc) x 3, 26 sc, (1 inc, 1 sc) x 3 (70)
- 26 sc, (1 inc, 2 sc) x 3, 26 sc, (1 inc, 2 sc) x 3 (76)
- 26 sc, (1 inc, 3 sc) x 3, 26 sc, (1 inc, 3 sc) x 3 (82)
- 26 sc, (1 inc, 4 sc) x 3, 26 sc, (1 inc, 4 sc) x 3 (88)
- 26 sc, (1 inc, 5 sc) x 3, 26 sc, place Marker 1, (1 inc, 5 sc) x 3, place Marker 2 (94)
Sew the two pieces of the body together using only the back loops of the body. Sew from Marker 1 to Marker 2, leaving a small “tail” or flap of the yellow part visible for a cute effect.
The Shell
The shell is made of two flat pieces worked in purple yarn.
- 6 sc in MR (6)
- 6 inc (12)
- (1 sc, 1 inc) x 6 (18)
- (2 sc, 1 inc) x 6 (24)
- (3 sc, 1 inc) x 6 (30)
- (4 sc, 1 inc) x 6 (36)
- (5 sc, 1 inc) x 6 (42)
- (6 sc, 1 inc) x 6 (48)
- (7 sc, 1 inc) x 6 (54)
- (8 sc, 1 inc) x 6 (60)
- (9 sc, 1 inc) x 6 (66)
- (10 sc, 1 inc) x 6 (72)
- (11 sc, 1 inc) x 6 (78)
- (12 sc, 1 inc) x 6 (84)
- (13 sc, 1 inc) x 6 (90)
- (14 sc, 1 inc) x 6 (96)
- (15 sc, 1 inc) x 6 (102)
- (16 sc, 1 inc) x 6 (108). Fasten off.
Shell Detail: Take your dark purple yarn and work spiral circles using slip stitches (sl st) on the surface of the shell to create a beautiful swirling pattern. Once finished, fold the two shell pieces together and join them around the edges using single crochet. Stuff the shell firmly as you sew.
The Arms
Using green yarn, make two small arms:
- Chain 4. Starting from the 2nd ch from the hook: 2 sc, 2 sc in one stitch, then 2 sc on the other side of the chain, and 2 sc in the last stitch (8)
- 8 sc
- 7 sc, 3 sc in one stitch (10)
- 7 sc, 3 sc together (8)
- 8 sc
- 1 dec, 6 sc (7)
- Rounds 7–14: 7 sc
Fold the arms in half and join them with a slip stitch on both sides to make them flat. Sew them to the sides of the body.
Finishing
Now comes the most fun part—the personality! This is where your snail truly comes to life.
- The Face: Use a waterproof dark green fabric marker to draw the eyebrows and the corners of the smile. For a cute touch, add tiny freckles to the nose and cheeks.
- Blushing: To give the snail rosy cheeks, use pink dry chalk. Rub some chalk onto a piece of paper, pick up the powder with a brush, and gently dab it onto the snail’s cheeks.
- Body Decor: You can embroider small spots onto the head and body using yellow yarn, then outline them with a dark green marker for a “painted” look. Alternatively, you can simply use a fabric marker to draw these spots.
Tips
- Tension: When working with chenille yarn, try to maintain a consistent tension. If you pull too tight, it can be difficult to insert your hook; if it’s too loose, the stuffing might show through.
- Stuffing: Don’t be afraid to stuff the head and body firmly. A well-stuffed amigurumi holds its shape much better.
- Safety First: If this toy is intended for a very young child, consider embroidering the eyes instead of using plastic safety eyes to prevent any choking hazards.