Adorable Mini Crochet Sheep Doll Pattern: A Step-by-Step Amigurumi Tutorial
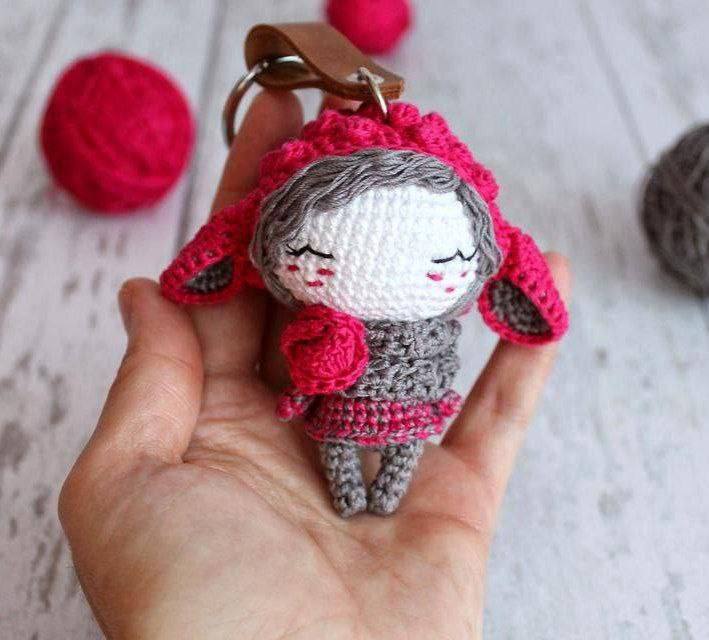
If you are looking for a project that is as sweet as it is satisfying, look no further than this mini crochet sheep doll. This tiny amigurumi companion is perfect for beginners and experienced crocheters alike. With its fluffy texture and cute accessories, it makes a wonderful handmade gift, a unique cake topper, or a charming addition to your own crochet collection.
In this tutorial, we will guide you through creating every part of this little sheep, from its textured “wool” hood to its tiny rose accessory. We will be using US crochet terms and imperial measurements to ensure a smooth crafting experience. Let’s grab our hooks and get started!
Materials & Abbreviations
To achieve the dainty, miniature look of this doll, we use a very fine yarn and a small hook. If you prefer a larger doll, feel free to scale up your yarn and hook size accordingly.
Materials Needed
- Yarn: Fine weight cotton or crochet thread (approximately 570 yards per 100g).
- Color A: White
- Color B: Pink
- Color AB: White and Pink strands held together
- Crochet Hook: 1.0mm (or the size recommended for your chosen yarn)
- Stuffing: High-quality polyester fiberfill
- Tools: Scissors, a large tapestry needle for sewing, and stitch markers
- Optional: Embroidery floss for the face or small safety eyes
Abbreviations (US Terms)
- MR: Magic Ring
- ch: Chain
- sc: Single Crochet
- inc: Increase (two single crochets in one stitch)
- dec: Decrease (two single crochets joined into one)
- dc: Double Crochet
- tr: Treble Crochet
- sl st: Slip Stitch
- Bobble: 5 treble crochets worked into one stitch, then closed together into one top loop
Step-by-Step Instructions
This pattern is worked in continuous spirals. I highly recommend using a stitch marker at the beginning of each round to keep track of your progress.
The Head
Using Color A (White), we will create a simple sphere for the head.
- Round 1: 6 sc in MR (6)
- Round 2: inc in each st around (12)
- Round 3: (sc, inc) repeat 6 times (18)
- Round 4: (2 sc, inc) repeat 6 times (24)
- Round 5: (3 sc, inc) repeat 6 times (30)
- Round 6: (4 sc, inc) repeat 6 times (36)
- Round 7: (5 sc, inc) repeat 6 times (42)
- Round 8: (6 sc, inc) repeat 6 times (48)
- Rounds 9-15: sc in each st around (48)
- Round 16: (6 sc, dec) repeat 6 times (42)
- Round 17: (5 sc, dec) repeat 6 times (36)
- Round 18: (4 sc, dec) repeat 6 times (30)
- Round 19: (3 sc, dec) repeat 6 times (24)
- Round 20: (2 sc, dec) repeat 6 times (18)
- Round 21: (sc, dec) repeat 6 times (12)
Fasten off and leave a tail for sewing. Stuff the head firmly with fiberfill.
The Fluffy Hood
Using Color A, we will create the “wool” texture using bobble stitches. To make a bobble: work a treble crochet, but do not finish it. Repeat this 4 more times in the same stitch. You will have 6 loops on your hook; crochet them all together into one single stitch.
- Round 1: 10 sc in MR (10)
- Round 2: (bobble, sc) repeat 5 times (15)
- Round 3: (inc in next st, 2 sc) repeat 5 times (20)
- Round 4: (sc, bobble) repeat 10 times (30)
- Round 5: (inc, 2 sc) repeat 10 times (40)
- Round 6: (3 sc, bobble) repeat 10 times (40)
- Round 7: sc in each st around (40)
- Round 8: (3 sc, bobble) repeat 9 times, end with 4 sc (40)
- Round 9: sc in each st around (40)
- Round 10: (3 sc, bobble) repeat 10 times (40)
- Round 11: sc in each st around (40)
- Round 12: (3 sc, bobble) repeat 10 times (40)
- Round 13: sc in each st around (40)
- Round 14: (6 sc, dec) repeat 5 times (35)
The Ears
You will make two ears, each consisting of an inner and outer part.
Inner Ear (Color B – Pink):
R1: 6 sc in MR. R2: 6 inc (12). R3: (sc, inc) x 6 (18). R4: (2 sc, inc) x 6 (24). Fasten off.
Outer Ear (Color A – White):
Repeat the same steps as the inner ear (R1-R4). Fasten off.
Assembly: Place the inner and outer pieces together. Single crochet around the edge to join them. Fold the top slightly and work 4 slip stitches to create a pointed corner.
The Legs and Body
Legs (Color B – Pink): Make two.
R1: 5 sc in MR. R2: 5 sc. R3: (1 sc, inc, 3 sc) = 6 sc. R4: 6 sc. R5: (2 sc, inc, 3 sc) = 7 sc. Fasten off the first leg; do not fasten off the second.
Body:
Round 6: Ch 2, work 7 sc around the first leg, 2 sc in the chain, 7 sc around the second leg, and 2 sc in the closing chain (18 sc).
Round 7: (2 inc, 12 sc, 2 inc, 2 sc) = 22 sc.
Round 8: (1 sc, inc, 16 sc, inc, 3 sc) = 24 sc.
Round 9: 24 sc.
Round 10: (3 dec, 10 sc, 3 dec, 2 sc) = 18 sc.
Rounds 11-14: 18 sc around.
Fasten off and stuff the legs and body firmly.
The Dress, Arms, and Accessories
The Dress (Color AB): Attach yarn to the body. Work 18 sc around the body for 3 rounds. Then, work an increase round: (inc, sc) around. Next 3 rounds: follow a gradual increase pattern (2 sc, inc; 3 sc, inc; 4 sc, inc) to flare the dress out to fit your doll’s size.
The Arms (Color AB): Make two.
R1: 5 sc in MR. R2: 5 sc. R3: (1 sc, inc, 3 sc) = 6 sc. R4-5: 6 sc. Leave a long tail for sewing.
The Scarf (Color B): Ch 3. In the 2nd ch from hook, work 2 dc. Repeat this for the desired length of the scarf.
The Rose: Using Color A, ch 18. Work 17 sc. In the next row, work 2 dc in the 3rd loop from the hook and sc to the end (30 sts). Switch to Color B: (sc, skip 1, 5-tr bobble, skip 1, sc) repeat 6 times. Roll the strip into a spiral and sew the base.
Finishing
Now comes the magic of assembly! Using your tapestry needle, sew the head to the body. Slide the hood over the head and sew it securely into place. Attach the ears to the hood and sew the arms to the sides of the body.
For the hair, cut small strands of white yarn, attach them to the top of the head under the hood, and sew them down. To make the hair curly, you can braid the strands into tiny plaits or crochet them into curls and let them sit overnight before releasing.
Finally, embroider the eyes between rounds 9 and 10 of the head. Use pink thread to add tiny freckles on the cheeks for extra cuteness. Attach the scarf and the rose to complete your little sheep!
Tips for Success
- Tension: Because this is a small project, keep your tension consistent. If the stuffing is showing through, try a smaller hook.
- Stuffing: Use a toothpick or a small crochet hook to push the stuffing into the legs and arms to ensure they are plump and symmetrical.
- Customization: You can change the color of the dress or the rose to create a different personality for your sheep!
- Seamless Joins: When joining the head to the body, use a “whip stitch” and pull tight to ensure the neck is stable and doesn’t wobble.