Crochet Christmas Lamb Amigurumi Pattern: A Cute Holiday Tutorial
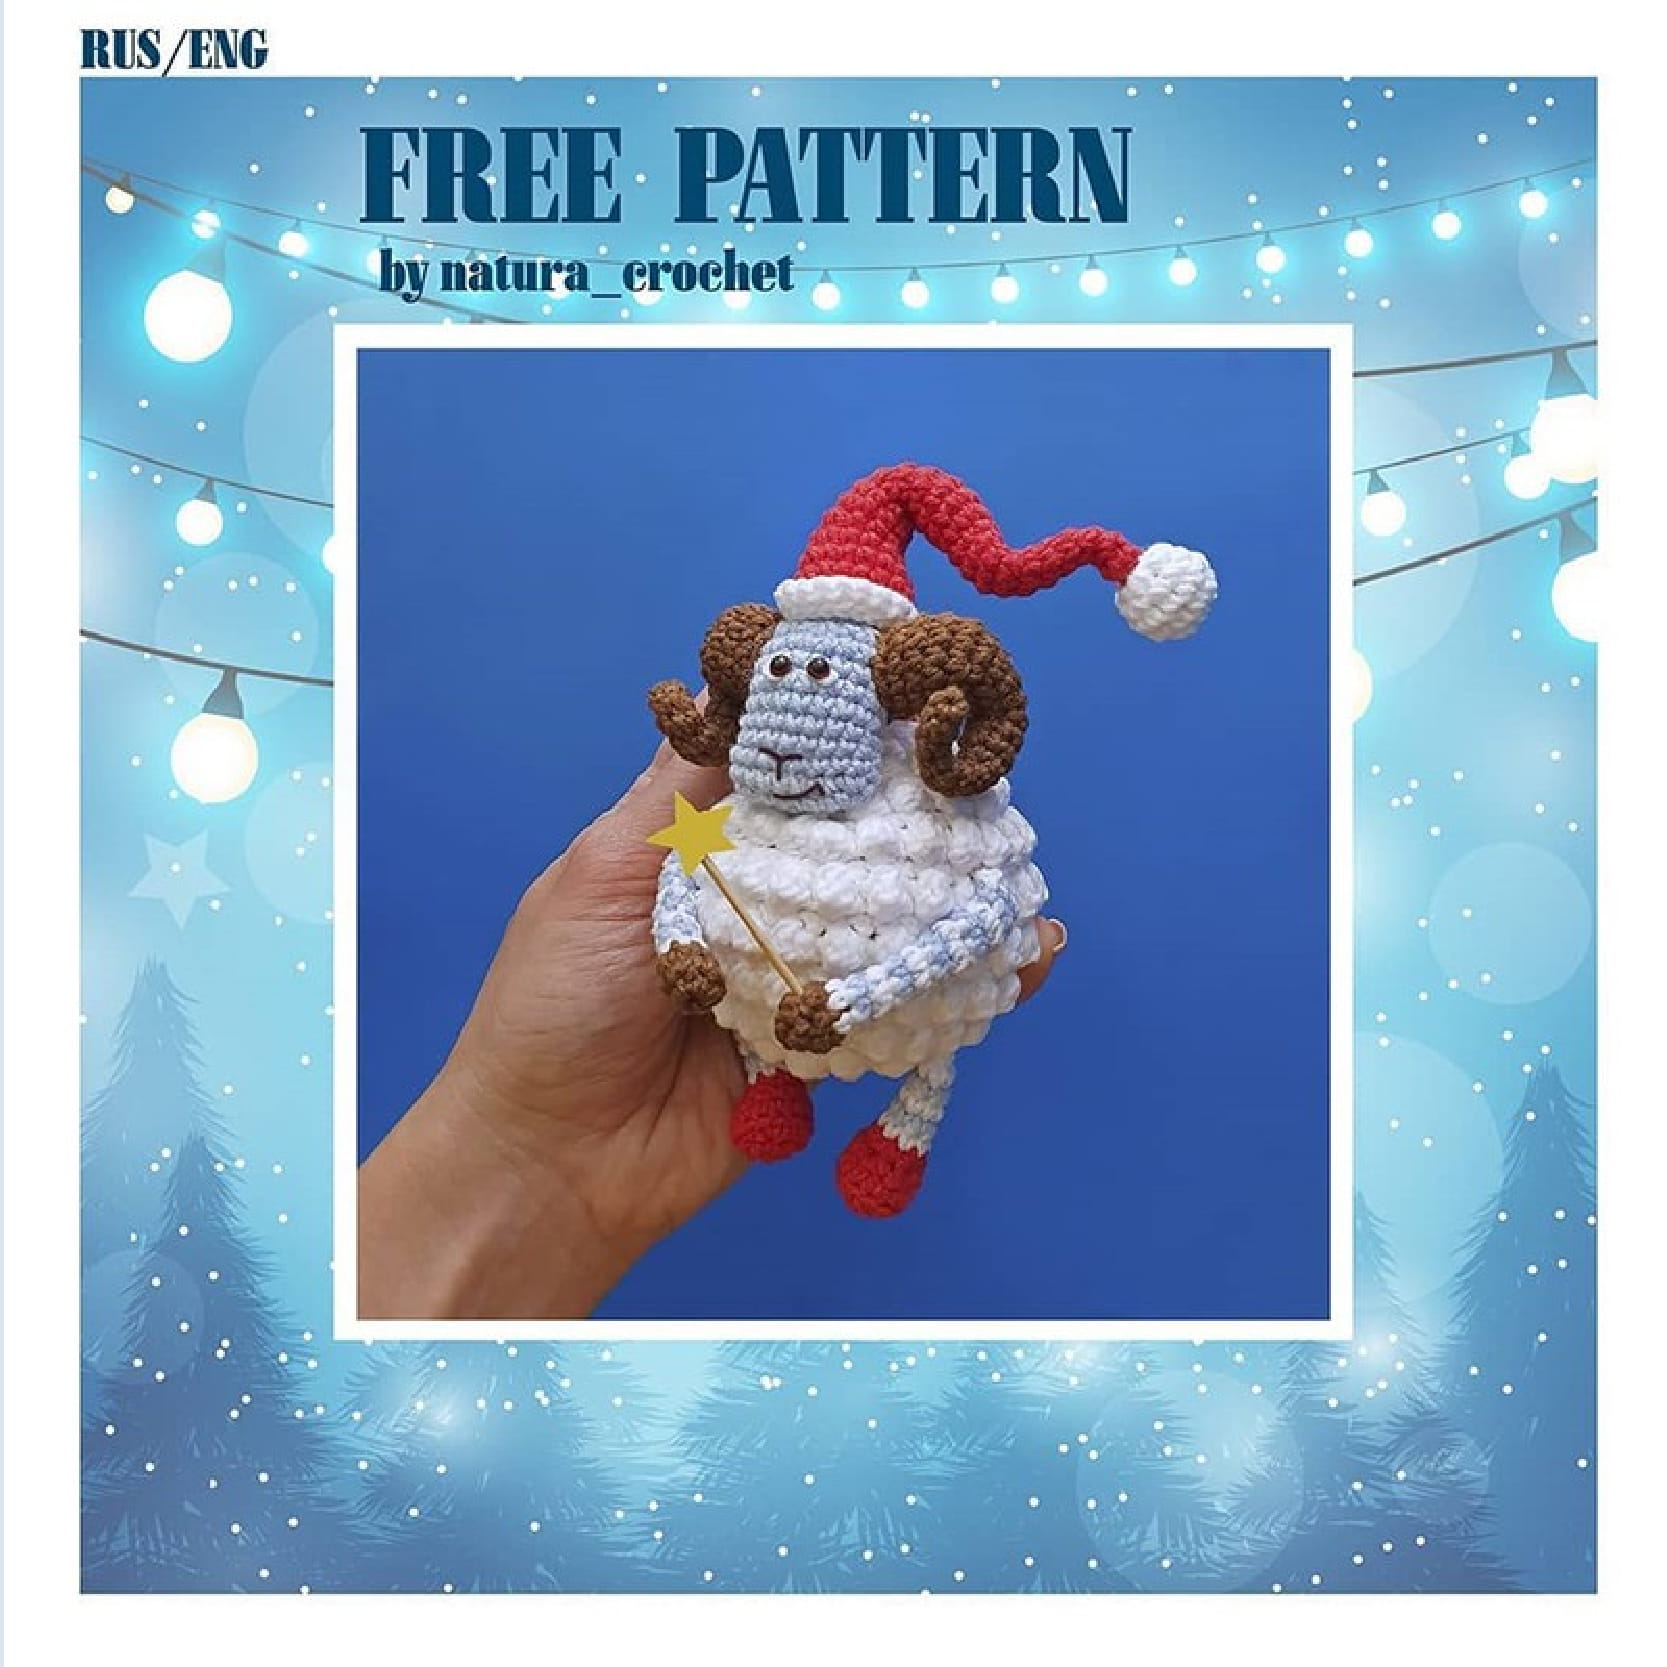
Looking for the perfect festive project to brighten up your holiday season? This adorable Christmas Lamb is the ultimate cozy companion! Whether you are looking to create a unique handmade ornament for your tree or a sweet gift for a loved one, this little lamb is a joy to make. With its fluffy bobble-stitch body and whimsical Santa hat, it brings a touch of magic to any winter decor.
This pattern is designed to be beginner-friendly, utilizing basic amigurumi techniques. We will be working mostly in continuous spirals, so you won’t need to worry about joining rounds unless specifically mentioned. Let’s dive in and create your own magical holiday sheep!
Materials & Abbreviations
To get started, gather the following materials. For the best results, we recommend a tight-tension yarn to ensure the fiberfill doesn’t peek through the stitches.
Materials Needed
- Yarn: Medium weight yarn in four colors: White, Light Blue, Red, and Brown.
- Crochet Hook: 2mm hook (or the size that works best for your yarn to keep stitches tight).
- Eyes: 3mm safety eyes.
- Embroidery Thread: Brown thread for the nose and mouth.
- Stuffing: High-quality fiberfill.
- Structure: Thin floral or craft wire (for the horns and hat).
- Extras: A piece of decorative ribbon or cord for hanging, and a small star or bead for the magic wand.
- Tools: Yarn needle, scissors, and stitch markers.
Abbreviations (US Terms)
- ch: chain
- st: stitch
- sc: single crochet
- inc: increase (two single crochets in one stitch)
- dec: decrease (single crochet two stitches together)
- sl st: slip stitch
- bobble st: bobble stitch (a cluster of 4 double crochet stitches worked into one stitch and joined together at the top)
- MR: magic ring
- BLO: back loop only
Step-by-Step Instructions
The Santa Hat
Start with the Red yarn. The hat is worked as a long, slender cone.
- Rnd 1: 4 sc into MR (4 st)
- Rnd 2-4: sc in each st around (4 st)
- Rnd 5: (1 sc, inc) repeat 2 times (6 st)
- Rnd 6-8: sc in each st around (6 st)
- Rnd 9: (2 sc, inc) repeat 2 times (8 st)
- Rnd 10-12: sc in each st around (8 st)
- Rnd 13: (3 sc, inc) repeat 2 times (10 st)
- Rnd 14-16: sc in each st around (10 st)
- Rnd 17: (4 sc, inc) repeat 2 times (12 st)
- Rnd 18-20: sc in each st around (12 st)
- Rnd 21: (5 sc, inc) repeat 2 times (14 st)
- Rnd 22: (6 sc, inc) repeat 2 times (16 st)
- Rnd 23: (7 sc, inc) repeat 2 times (18 st)
- Rnd 24: (8 sc, inc) repeat 2 times (20 st)
Switch to White yarn for the trim:
- Rnd 25: sc in each st around (20 st)
- Rnd 26: sl st in each st around (20 st)
- Rnd 27: sc in the BLO of each st around (20 st)
Fasten off, leaving a long tail for sewing. Insert a piece of wire into the cone to make it bendy, then stuff lightly with fiberfill.
The Pompon
Use White yarn. Stuff firmly as you go.
- Rnd 1: 6 sc into MR (6 st)
- Rnd 2: inc in each st around (12 st)
- Rnd 3: (1 sc, inc) repeat 6 times (18 st)
- Rnd 4: sc in each st around (18 st)
- Rnd 5: (1 sc, dec) repeat 6 times (12 st)
- Rnd 6: dec repeat 6 times (6 st)
Fasten off and sew to the tip of the hat.
The Tail
Use White yarn. Stuff firmly.
- Rnd 1: 6 sc into MR (6 st)
- Rnd 2: (1 sc, inc) repeat 3 times (9 st)
- Rnd 3: sc in each st around (9 st)
- Rnd 4: (1 sc, dec) repeat 3 times (6 st)
Fasten off and leave a long tail for sewing.
The Body
Use White yarn. This part uses a texture technique where we alternate between plain single crochet rounds and bobble rounds to create a “woolly” look.
Pro Tip: In the first two rounds, attach your hanging ribbon/cord so it is securely embedded in the body.
- Rnd 1: 6 sc into MR (6 st)
- Rnd 2: (bobble st, 1 sc in one stitch) repeat 6 times (12 st)
- Rnd 3: (1 sc, inc) repeat 6 times (18 st)
- Rnd 4: (bobble st, 1 sc, inc) repeat 6 times (24 st)
- Rnd 5: (3 sc, inc) repeat 6 times (30 st)
- Rnd 6: (bobble st, 1 sc, bobble st, 1 sc, inc) repeat 6 times (36 st)
- Rnd 7: (5 sc, inc) repeat 6 times (42 st)
- Rnd 8: (bobble st, 1 sc, bobble st, 1 sc, bobble st, 1 sc, inc) repeat 6 times (48 st)
- Rnd 9: sc in each st around (48 st)
- Rnd 10: (bobble st, 1 sc) repeat 24 times (48 st)
- Rnd 11: sc in each st around (48 st)
- Rnd 12: (bobble st, 1 sc) repeat 24 times (48 st)
- Rnd 13: sc in each st around (48 st)
- Rnd 14: (bobble st, 1 sc) repeat 24 times (48 st)
- Rnd 15: (6 sc, dec) repeat 6 times (42 st)
- Rnd 16: (bobble st, 1 sc, bobble st, 1 sc, bobble st, dec) repeat 6 times (36 st)
- Rnd 17: (4 sc, dec) repeat 6 times (30 st)
- Rnd 18: (bobble st, 1 sc, bobble st, dec) repeat 6 times (24 st)
- Rnd 19: (2 sc, dec) repeat 6 times (18 st)
- Rnd 20: (bobble st, dec) repeat 6 times (12 st)
- Rnd 21: dec repeat 6 times (6 st)
Fasten off, weave in the ends, and you have a woolly ball!
The Legs (Make 2)
Start with Red yarn for the boots.
- Foundation: ch 4.
- Rnd 1: Starting from 2nd ch from hook: 2 sc, 3 inc in the last ch. Working down the other side of the chain: 1 sc, inc (8 st)
- Rnd 2: inc, 1 sc, inc, inc, inc, 2 sc, inc (13 st)
- Rnd 3: sc in each st around in BLO (13 st)
- Rnd 4: 4 sc, dec, dec, dec, 3 sc (10 st)
- Rnd 5: 3 sc, dec, dec, 3 sc (8 st)
Switch to alternating White and Light Blue yarn:
- Rnd 6-10: sc in each st around (8 st)
Fold the leg in half and sc 4 stitches across the opening to close. Leave a long tail for sewing.
The Arms (Make 2)
Start with Brown yarn for the hooves.
- Rnd 1: 6 sc into MR (6 st)
- Rnd 2: (1 sc, inc) repeat 3 times (9 st)
- Rnd 3: (1 sc, dec) repeat 3 times (6 st)
Switch to alternating White and Light Blue yarn:
- Rnd 4-13: sc in each st around (6 st)
Fold the arm in half and sc 3 stitches across the opening to close. Leave a long tail for sewing.
The Horns (Make 2)
Use Brown yarn.
- Rnd 1: 4 sc into MR (4 st)
- Rnd 2-4: sc in each st around (4 st)
- Rnd 5: (1 sc, inc) repeat 2 times (6 st)
- Rnd 6-8: sc in each st around (6 st)
- Rnd 9: (2 sc, inc) repeat 2 times (8 st)
- Rnd 10-12: sc in each st around (8 st)
- Rnd 13: (3 sc, inc) repeat 2 times (10 st)
- Rnd 14-16: sc in each st around (10 st)
- Rnd 17: (4 sc, inc) repeat 2 times (12 st)
- Rnd 18-20: sc in each st around (12 st)
Fasten off. Insert a wire into each horn and stuff lightly. Bend the horns into a curl shape.
The Head
Use Light Blue yarn.
- Foundation: ch 8.
- Rnd 1: Starting from 2nd ch from hook: inc, 5 sc, 2 inc in last ch. Working down the other side: 5 sc, inc (18 st)
- Rnd 2: inc, 8 sc, inc, 8 sc (20 st)
- Rnd 3-5: sc in each st around (20 st)
- Rnd 6: dec, 8 sc, dec, 8 sc (18 st)
- Rnd 7-9: sc in each st around (18 st)
- Rnd 10: (1 sc, dec) repeat 6 times (12 st)
- Rnd 11: dec repeat 6 times (6 st)
Fasten off and leave a long tail for sewing.
Finishing & Assembly
Now comes the fun part—bringing your lamb to life!
- The Body: Sew the head to the top of the woolly body. Attach the arms to the sides and the legs to the bottom. Don’t forget to sew the small tail to the back.
- The Head: Sew the Santa hat to the top of the head. Attach the curled horns to the sides of the head.
- The Face: Insert the 3mm safety eyes between rounds 4 and 6 of the head. Using your brown embroidery thread, stitch a small inverted “V” for the nose and a gentle curved line for a smile. You can also add tiny eyelids if you’d like a sleepier look.
- The Magic Touch: Give your lamb a magic wand! Use a toothpick or a piece of wire topped with a small yellow crochet star or a bead. Sew it securely into one of the hooves.
Tips for Success
- Keep Your Tension Tight: Amigurumi looks best when the stitches are tight so the filling doesn’t show. If you see holes, try dropping down a hook size.
- Stuffing is Key: Stuff your pieces firmly, especially the body and head, to ensure the lamb keeps its round, cute shape over time.
- Color Changes: When switching from red to white on the hat, or blue to white on the limbs, do the color change on the last pull-through of the previous stitch for a seamless look.
- Wire Safety: When using wire in the horns or hat, make sure the ends are tucked away safely and not poking through the crochet fabric.