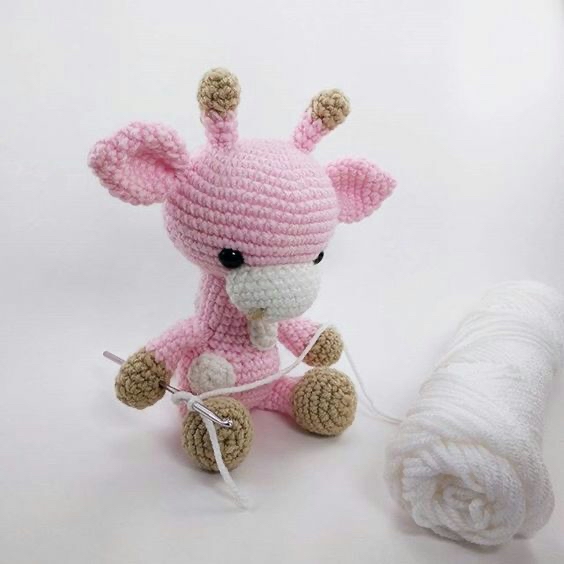
Adorable Amigurumi Giraffe Crochet Pattern: A Step-by-Step Tutorial
Welcome to your next favorite crochet project! If you are looking for a way to create a sweet, cuddly companion, this baby giraffe is the perfect project. Whether you are a seasoned pro or a beginner looking to practice your amigurumi skills, this tutorial will guide you through every stitch. This little giraffe is designed to be soft, huggable, and absolutely charming, making it a wonderful gift for a baby shower or a cute addition to a nursery.
In this guide, we will walk through the creation of each piece—from the sweet little muzzle to the tiny spots—and then show you how to assemble them into a finished toy. Grab your hooks, pick out your favorite yarn colors, and let’s get started!
Materials & Abbreviations
To ensure your giraffe turns out just right, gather the following materials. While the original pattern suggests specific colors, feel free to customize your giraffe with any palette you love!
Materials Needed
- Yarn: Medium weight (worsted) yarn in three colors:
- Main Color (Tan or Beige)
- Contrast Color (Brown)
- Accent Color (White)
- Crochet Hook: 2.5mm or 3.0mm (use a size that prevents stuffing from showing through).
- Safety Eyes: Two 12mm safety eyes.
- Stuffing: High-quality polyester fiberfill.
- Tools: Yarn needle, scissors, and stitch markers.
Abbreviations (US Terms)
- ch: chain
- sc: single crochet
- inc: increase (two single crochet in the same stitch)
- dec: decrease (invisible decrease preferred)
- MR: magic ring
- st(s): stitch(es)
- rep: repeat
Step-by-Step Instructions
We will be working in continuous spirals for most of this project. I highly recommend using a stitch marker in the first stitch of every round to keep your place.
The Head
Use your main tan/beige yarn for the head.
- Round 1: Create a MR and work 6 sc into the ring (6).
- Round 2: inc in each st around (12).
- Round 3: (1 sc, inc) rep 6 times (18).
- Round 4: (2 sc, inc) rep 6 times (24).
- Round 5: (3 sc, inc) rep 6 times (30).
- Round 6: (4 sc, inc) rep 6 times (36).
- Round 7: (5 sc, inc) rep 6 times (42).
- Round 8: (6 sc, inc) rep 6 times (48).
- Rounds 9-14: sc in each st around for 6 rounds (48).
- Round 15: (6 sc, dec) rep 6 times (42).
- Round 16: (5 sc, dec) rep 6 times (36).
- Round 17: (4 sc, dec) rep 6 times (30).
- Round 18: (3 sc, dec) rep 6 times (24).
- Round 19: (2 sc, dec) rep 6 times (18).
- Round 20: (1 sc, dec) rep 6 times (12).
Note: Before closing the head, place the 12mm safety eyes between rounds 14 and 15, approximately 8 stitches apart. Do not fully secure the washers yet; we will do that after the muzzle is attached to ensure perfect alignment.
The Muzzle
Switch to white yarn for the muzzle.
- Round 1: ch 7. Starting in the second ch from the hook, work 6 sc. Now, working around the other side of the foundation chain (creating an oval): inc, 5 sc, inc, 7 sc, inc, 6 sc, inc, 7 sc, inc, 8 sc, inc, 8 sc, inc (20).
- Rounds 2-3: sc in each st around for 2 rounds (20).
Fasten off, leaving a long tail for sewing. Stuff the muzzle lightly.
The Horns (Make 2)
Start with brown yarn.
- Round 1: MR, 6 sc (6).
- Round 2: (1 sc, inc) rep 3 times (9).
- Round 3: sc in each st around (9).
- Round 4: (1 sc, dec) rep 3 times (6).
Switch to the main tan/beige yarn:
- Rounds 5-7: sc in each st around for 3 rounds (6).
Fasten off, leaving a long tail. Stuff lightly.
The Ears (Make 2)
Use the main tan/beige yarn.
- Round 1: MR, 4 sc (4).
- Round 2: (1 sc, inc) rep 2 times (6).
- Round 3: (1 sc, inc) rep 3 times (9).
- Round 4: (2 sc, inc) rep 3 times (12).
- Round 5: (1 sc, inc) rep 6 times (18).
- Rounds 6-9: sc in each st around for 4 rounds (18).
- Round 10: 12 dec (6).
Fasten off, leaving a long tail. Do not stuff the ears; instead, flatten them into a wedge shape and sew a few stitches across the opening to keep them flat.
The Body
Use the main tan/beige yarn.
- Round 1: MR, 6 sc (6).
- Round 2: inc in each st around (12).
- Round 3: (1 sc, inc) rep 6 times (18).
- Round 4: (2 sc, inc) rep 6 times (24).
- Round 5: (3 sc, inc) rep 6 times (30).
- Rounds 6-9: sc in each st around for 4 rounds (30).
- Round 10: (3 sc, dec) rep 6 times (24).
- Round 11: (2 sc, dec) rep 6 times (18).
- Rounds 12-18: sc in each st around for 7 rounds (18).
Fasten off, leaving a long tail. Stuff the body firmly.
The Arms (Make 2)
Start with brown yarn.
- Round 1: MR, 6 sc (6).
- Round 2: inc in each st around (12).
- Rounds 3-4: sc in each st around for 2 rounds (12).
- Round 5: (1 sc, dec) rep 3 times (9).
Switch to the main tan/beige yarn:
- Rounds 6-11: sc in each st around for 6 rounds (9).
Fasten off, leaving a long tail. Stuff lightly.
The Legs (Make 2)
Start with brown yarn.
- Round 1: MR, 6 sc (6).
- Round 2: inc in each st around (12).
- Round 3: (1 sc, inc) rep 6 times (18).
- Rounds 4-6: sc in each st around for 3 rounds (18).
- Round 7: (1 sc, dec) rep 6 times (12).
- Round 8: (1 sc, dec) rep 3 times (9).
Begin stuffing the leg, then switch to the main tan/beige yarn:
- Rounds 9-15: sc in each st around for 7 rounds (9).
Fasten off, leaving a long tail. Finish stuffing firmly.
The Tail
Start with brown yarn.
- Round 1: MR, 6 sc (6).
- Round 2: (1 sc, inc) rep 3 times (9).
- Round 3: sc in each st around (9).
- Round 4: (1 sc, dec) rep 3 times (6).
Switch to the main tan/beige yarn:
- Rounds 5-9: sc in each st around for 5 rounds (6).
Fasten off, leaving a long tail. Stuff lightly.
The Spots (Make 4)
Use brown yarn.
- Round 1: MR, 6 sc (6).
- Round 2: inc in each st around (12).
Fasten off, leaving a long tail for sewing.
Finishing & Assembly
Now comes the magic part: bringing your giraffe to life! Assembly is key to getting that cute expression.
Assembling the Head
- Muzzle: Sew the muzzle to the bottom of the head, slightly below the eyes. Before finishing the last few stitches, ensure the muzzle is stuffed well.
- Eyes: Once the muzzle is centered, check the eye placement. Secure the safety eye washers on the inside of the head.
- Nostrils: Using a yarn needle and your tan yarn, embroider two small stitches on the muzzle to create nostrils.
- Closing the Head: Now, return to the head. Work 6 decreases in the final round (Round 21) to close the opening. Add more stuffing if needed and sew the hole closed.
- Horns & Ears: Sew the horns symmetrically to the top of the head. Sew the ears about two rows below the horns.
Assembling the Body
- Head to Body: Sew the head securely to the top of the body.
- Arms: Sew the arms to the sides of the body where the neck begins to widen into the chest.
- Legs: Sew the legs to the bottom of the body, on either side of the starting magic ring.
- Tail: Sew the tail to the center of the lower back.
- Spots: Scatter the four brown spots across the neck and body to give your giraffe its signature look.
Tips for Success
To make your amigurumi giraffe look professional, keep these tips in mind:
- Invisible Decrease: To avoid gaps in your work, use the invisible decrease method. Instead of inserting your hook through both stitches, insert it only into the front loops of the next two stitches before completing the decrease.
- Tension is Key: Keep your tension consistent and tight. If you see holes where the stuffing is peaking through, try dropping down a hook size.
- Strategic Stuffing: Stuff the head and body firmly so they hold their shape, but leave the arms and legs slightly softer for a more natural, “floppy” feel.
- Weaving Ends: Use your yarn needle to weave in all remaining tails deeply into the stuffing to ensure they don’t pop out over time.