Crochet Goat Amigurumi Pattern: How to Make a Cute Little Goat
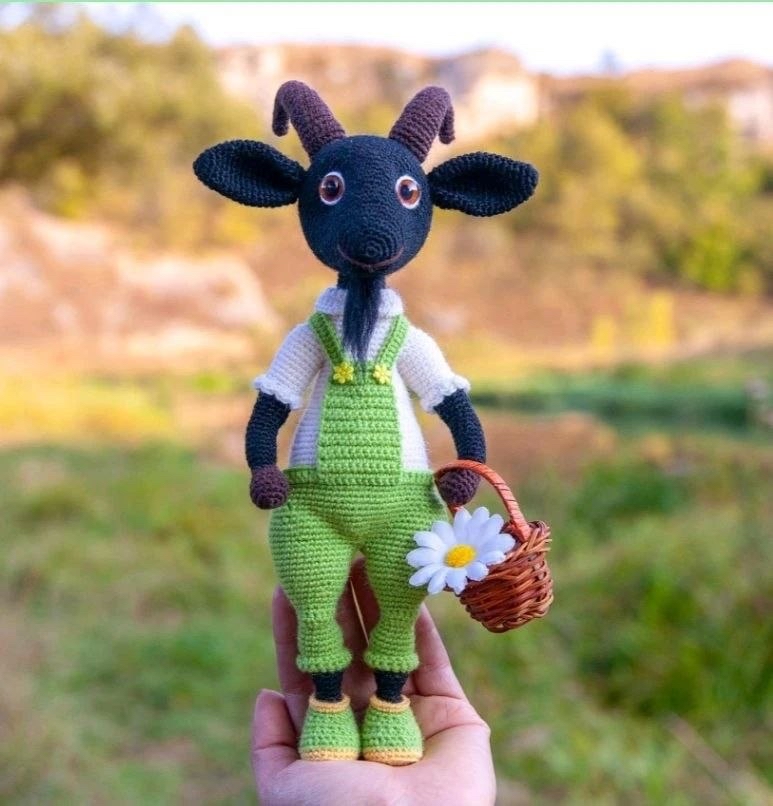
Are you looking for your next adorable amigurumi project? Look no further! This little goat, featuring a charming pair of green overalls and a tiny basket, is the perfect addition to any nursery decor or a thoughtful handmade gift. Whether you are an intermediate crocheter or a beginner looking to level up your skills, this detailed tutorial will guide you through every stitch to create a whimsical, poseable character that is bursting with personality.
This goat stands approximately 10 inches tall, making it the perfect size for display on a shelf or for little hands to hold. Get your hook ready—it is time to bring this sweet little goat to life!
Materials & Abbreviations
Materials Needed
To ensure your goat turns out perfectly, I recommend using a consistent yarn weight. For this pattern, we are working with a medium weight yarn that provides great stitch definition.
- Main Yarn: You will need three main colors (Black, White, and Green). Approximately 437 yards of each color is recommended.
- Accent Yarn: Yellow yarn for the booties and Brown yarn for the horns and hands.
- Eye Yarn: A thicker white yarn (about 8 inches) for the eye details.
- Crochet Hook: 1.25 mm (or a hook appropriate for your chosen yarn weight).
- Wire: 1.5 mm (approx. 1/16 inch) aluminum wire, about 8 feet long. This will make your goat poseable!
- Safety Eyes: 10 mm (approx. 3/8 inch) eyes.
- Buttons: 4 small buttons for the overalls.
- Stuffing: Polyfill or fiberfill.
- Miscellaneous: Medical tape (to wrap the wire), a sewing needle, a felting needle, and some cardboard (to help shape the feet).
- Felting Wool: A small amount of black wool roving for the beard.
Abbreviations (US Terms)
Please ensure you are using US crochet terms for this pattern:
- MR: Magic Ring
- ch: Chain
- sc: Single crochet
- hdc: Half double crochet
- dc: Double crochet
- inc: Increase (2 sc in one stitch)
- dec: Decrease (sc 2 together)
- 3 sc in next st: Three single crochets in one stitch
- sl st: Slip stitch
- [st, inc] * 6: Repeat the sequence inside the brackets 6 times
Step-by-Step Instructions
Arms (Make 2)
Begin with brown yarn. Stuff with polyfill as you go.
Round 1: 6 sc in MR (6)
Round 2: [inc] * 6 (12)
Round 3: [1 sc, inc] * 6 (18)
Round 4: [4 sc, dec] * 3 (15)
Round 5: 15 sc (15)
Round 6: [3 sc, dec] * 3 (12)
Round 7: 12 sc (12)
Round 8: [2 sc, dec] * 3 (9)
Take a 6-inch piece of wire, bend the tip, and wrap it with medical tape. Insert the wire into the arm and continue stuffing.
Switch to black yarn:
Round 9: 9 sc (9)
Round 10: [2 sc, inc] * 3 (12)
Rounds 11-18: 12 sc (12)
Round 19: 11 sc, inc (13)
Round 20: 13 sc (13)
Round 21: 6 sc, inc, 6 sc (14)
Round 22: 14 sc (14)
Round 23: 13 sc, inc (15)
Round 24: 15 sc (15)
Switch to white yarn:
Round 25: 7 sc, inc, 7 sc (16)
Round 26: Sc in back loops only (16)
Round 27: 15 sc, inc (17)
Round 28: 17 sc (17)
Round 29: 8 sc, inc, 8 sc (18)
Round 30: 18 sc (18)
Round 31: 17 sc, inc (19)
Round 32: 19 sc (19)
Round 33: 9 sc, inc, 9 sc (20)
Round 34: 20 sc (20)
Fasten off, leaving a tail for sewing. To finish the cuff, join white yarn to the front loops of Round 26 and work around the edge: (1 sc, inc from dc) * 8. Fasten off and weave in ends.
Legs (Make 2)
Start with yellow yarn. Work in a continuous spiral. Use a marker to keep track of the first stitch.
Round 1: Ch 10. In 2nd ch from hook: inc, 7 sc, 3 sc in next st, 8 sc (20)
Round 2: 2 inc, 7 sc, 3 inc, 7 sc, inc (26)
Round 3: [1 sc, inc] * 2, 8 sc, [inc, 1 sc, inc, 1 sc, inc], 8 sc, inc (32)
Round 4: [2 sc, inc] * 2, 9 sc, [inc, 2 sc, inc, 2 sc, inc], 9 sc, inc + 3 sc for offset (38)
Round 5: 38 sc in back loops only (38)
Prepare a small piece of cardboard to insert into the foot for shape. Switch to light green yarn:
Round 6: 38 sc (38)
Round 7: 6 sc, [2 sc, dec] * 6, 8 sc (32)
Insert the cardboard. Round 8: 32 sc (32)
Round 9: 10 sc, 7 dec, 8 sc (25)
Round 10: 25 sc (25)
Round 11: 7 sc, 6 dec, 6 sc (19)
Round 12: 19 sc + 1 sc for offset (20)
Take a 27.5-inch piece of wire, create a loop at the end, and insert it into the leg. Stuff with polyfill. Switch to black yarn:
Round 13: Sc in back loops only: 3 sc, 6 dec, 4 sc (13)
Round 14: 2 sc, 4 dec, 3 sc (9)
Go back to Round 13 and work 19 sc in yellow yarn clockwise around the black section. Continue in black:
Rounds 15-16: 9 sc (9)
Round 17: 2 sc, inc, 4 sc, inc, 1 sc (17)
Round 18: 3 sc in next st, 10 sc (13)
Round 19: 13 sc (13)
Round 20: 3 sc in next st, 1 sc, 3 sc in next st, 10 sc (17)
Switch to light green yarn:
Round 21: 17 sc in back loops only (17)
Round 22: 2 sc, inc, 1 sc, inc, 1 sc, inc, 10 sc (20)
Rounds 23-24: 20 sc (20)
Round 25: 20 sc + 3 sc for offset (23)
Now, we will work the “pant leg” part using turning rows (working back and forth) to create the cuff. Using light green:
Row 1: (Worked on front loops) 8 sc, inc, 7 sc, inc (19)
Row 2: 19 sc (19)
Row 3: 19 sc (19)
Fasten off and weave in ends.
Body
We will now join the two legs together. Round 42: Work 16 sc down the left leg, join to the 8th stitch of the right leg, work 42 sc down the right leg, and finish with 26 sc up the left leg. (If a small gap appears between the legs, use a needle and yarn to stitch it shut).
Round 43: 15 sc, 2 inc, 67 sc (86)
Round 44: 7 sc, inc, 18 sc, inc, 59 sc = 88 + 1 sc offset (89)
Round 45: 16 sc, inc, 2 sc, inc, 68 sc (90)
Round 46: 42 sc, [dec, 3 sc] * 4, 4 sc, [3 sc, dec] * 4, 4 sc (82)
Round 47: 5 sc, dec, 24 sc, dec, 23 sc, dec, 4 sc, dec, 18 sc = 78 + 1 sc offset (79)
Round 48: 78 sc (78)
Round 49: 6 sc, dec, 20 sc, dec, 6 sc, [2 sc, dec] * 10, 2 sc (66)
Round 50: 47 sc, dec, 2 sc, dec, 13 sc = 66 + 1 sc offset (67)
Round 51: dec, 30 sc, dec, 30 sc (62)
Round 52: 62 sc (62)
Round 53: 2 sc, dec, 24 sc, dec, 32 sc = 60 + 1 sc offset (61)
Round 54: 54 sc in back loops only (54)
Switch to white yarn:
Rounds 55-60: 54 sc (54)
Round 61: [7 sc, dec] * 6 (48)
Rounds 62-64: 48 sc (48)
Round 65: [6 sc, dec] * 6 (42)
Rounds 66-67: 42 sc (42)
Round 68: [5 sc, dec] * 6 (36)
Rounds 69-70: 36 sc (36)
Round 71: [4 sc, dec] * 6 (30)
Rounds 72-74: 30 sc (30)
Round 75: 26 sc (26)
Attaching the Arms and Shaping the Neck
Round 76: Work around the body and arms: 5 sc on the back, 6 sc joining the body to the left arm, 9 sc on the chest, 6 sc joining the body to the right arm, and 4 sc on the back (30)
Round 77:
Back: (4 sc, inc)
Left Arm: (inc, 3 sc, dec, 2 sc, dec, 3 sc, inc)
Chest: (inc, 7 sc, inc)
Right Arm: (inc, 3 sc, dec, 2 sc, dec, 3 sc, inc)
Back: (inc, 3 sc)
Connect the arm wires to the leg wires and wrap them together with medical tape. This creates a sturdy, poseable skeleton.
Round 78: 5 sc, dec, 12 sc, dec, 9 sc, dec, 12 sc, dec, 4 sc (46)
Round 79: 8 sc, 4 dec, 15 sc, 4 dec, 7 sc = 38 + 1 sc offset (39)
Round 80: 3 sc, dec, 9 sc, dec, 6 sc, dec, 9 sc, dec, 3 sc (34)
Round 81: 5 sc, 4 dec, 9 sc, 4 dec, 4 sc (26)
Round 82: 26 sc (26)
Round 83: 6 sc, dec, 11 sc, dec, 5 sc (24)
Round 84: 24 sc (24)
Round 85: 6 sc, dec, 10 sc, dec, 4 sc (22)
Round 86: 22 sc (22)
Switch to black yarn:
Round 87: Sc in back loops only: 5 sc, dec, 9 sc, dec, 4 sc (20)
Rounds 88-91: 20 sc (20)
Fasten off, leaving a long tail for sewing the head.
The Head
Switch to black yarn:
Round 1: 6 sc in MR (6)
Round 2: [inc] * 6 (12)
Round 3: [1 sc, inc] * 6 (18)
Round 4: [2 sc, inc] * 6 (24)
Rounds 5-6: 24 sc (24)
Round 7: [3 sc, inc] * 6 (30)
Rounds 8-9: 30 sc (30)
Round 10: [4 sc, inc] * 6 (36)
Rounds 11-12: 36 sc (36)
Round 13: [5 sc, inc] * 6 (42)
Rounds 14-15: 42 sc (42)
Round 16: [6 sc, inc] * 6 (48)
Rounds 17-18: 48 sc (48)
Round 19: [7 sc, inc] * 6 (54)
Rounds 20-21: 54 sc (54)
Round 22: [8 sc, inc] * 6 (60)
Rounds 23-25: 60 sc (60)
Round 26: 18 sc, 3 ch, skip 3 stitches, 39 sc (60) — *this creates the hole for the wire!*
Rounds 27-29: 60 sc (60)
Round 30: [8 sc, dec] * 6 (54)
Round 31: 54 sc (54)
Round 32: [7 sc, dec] * 6 (48)
Round 33: 48 sc (48)
Round 34: [6 sc, dec] * 6 (42)
Round 35: [5 sc, dec] * 6 (36)
Round 36: 36 sc (36)
Round 37: [4 sc, dec] * 6 (30)
Round 38: [3 sc, dec] * 6 (24)
Round 39: [2 sc, dec] * 6 (18)
Round 40: [1 sc, dec] * 6 (12)
Round 41: 6 dec (6)
Pull the opening tight, fasten off, and weave in the ends. Slide the head onto the wire coming from the body, bending the tip forward toward the face. Stuff the head firmly with polyfill.
Ears & Horns
Ears (Make 2)
In black yarn:
Round 1: 6 sc in MR (6)
Round 2: [inc] * 6 (12)
Round 3: 12 sc (12)
Round 4: [3 sc, inc] * 3 (15)
Round 5: 15 sc (15)
Round 6: 2 sc, [inc, 4 sc] * 2, inc, 2 sc (18)
Round 7: 18 sc (18)
Round 8: [5 sc, inc] * 3 (21)
Round 9: 3 sc, [inc, 6 sc] * 2, inc, 3 sc (24)
Rounds 10-16: 24 sc (24)
Round 20: 3 sc, [dec, 6 sc] * 2, dec, 3 sc (21)
Round 21: 21 sc (21)
Round 22: (Skipping to final shaping) … 21 sc (21)
Round 23: (Final shaping) … 21 sc (21)
Fold the ear in half and work 10 sc through both sides to flatten it. Do not stuff the ears. Fasten off and leave a tail for sewing.
Horns (Make 2)
In brown yarn:
Round 1: 6 sc in MR (6)
Round 2: 6 sc (6)
Round 3: 5 sc, inc (7)
Round 4: 7 sc (7)
Round 5: 3 sc, inc, 3 sc (8)
Round 6: 8 sc (8)
Round 7: 7 sc, inc (9)
Round 8: 9 sc (9)
Round 9: 4 sc, inc, 4 sc (10)
Round 10: 10 sc (10)
Round 11: 9 sc, inc (11)
Round 12: 11 sc (11)
Round 13: 5 sc, inc, 5 sc (12)
Round 14: 12 sc (12)
Round 15: 11 sc, inc (13)
Round 16: 13 sc (13)
Round 17: 6 sc, inc, 6 sc (14)
Round 18: 14 sc (14)
Round 19: 13 sc, inc (15)
Round 20: 15 sc (15)
Round 21: 7 sc, inc, 7 sc (16)
Round 22: 16 sc (16)
Round 23: 15 sc, inc (17)
Round 24: 17 sc (17)
Round 25: 8 sc, inc, 8 sc (18)
Round 26: 18 sc (18)
Round 27: 17 sc, inc (19)
Round 28: 19 sc (19)
Take a 4-inch piece of wire, wrap the ends with tape, insert into the horn, and stuff with polyfill. Fasten off.
Clothing (Overalls & Collar)
The White Collar
Go back to the front loops of Round 87. Divide the round into two halves of 11 stitches each. On the right half: ch 11, work 3 rows of turning rows, then fasten off. On the left half: ch 11, work 3 rows of turning rows, then fasten off. Join white yarn and work a single crochet border around the entire collar.
The Green Overalls
Return to the front loops of Round 54. Mark the center 12 stitches. Join light green yarn to the front loops of Round 57 and work in turning rows (back and forth). Add 1 ch at the end of each row.
Rounds 1-9: 12 sc (12)
Round 10: 5 sc, dec, 5 sc (11)
Rounds 11-13: 11 sc (11)
Round 14: 5 sc, dec, 4 sc (10)
Rounds 15-17: 10 sc (10)
Round 18: 4 sc, dec, 4 sc (9)
Round 19: 9 sc (9)
Straps: Ch 50, work 48 dc. These should be long enough to go from the front of the overalls, around the back, and attach to the leg openings. Attach the top of the straps to the top of the overalls and the bottom to the leg openings. Finally, sew 2 buttons on the front and 2 on the back.
Finishing
Assembly Guide
- Eyes: Using the safety eyes, position them at the level of Round 19 (about 6 inches apart). If you prefer a “tucked” look, do a small surface slip stitch/tighten between the eyes before attaching. Use white yarn to embroider a ring around the eye for a cute, bright effect.
- Ears: Sew the ears onto the head at the level of Round 27 (just above the eyes).
- Horns: Sew the horns onto the head at the level of Round 30, giving them a slight outward curve.
- Smile: Use brown yarn to embroider a tiny, sweet smile between the eyes.
- Beard: Take a few strands of black wool roving, insert them through the head (about 1 stitch below the mouth), and use a felting needle to secure them so the beard looks natural.
Tips for Success
- Wire Safety: Always wrap the ends of your wire with medical tape or electrical tape to prevent the sharp metal from poking through your crochet stitches.
- Tension Control: Since this pattern uses a very small hook (1.25 mm), keep your tension even to ensure the stuffing doesn’t show through the stitches.
- Marking Stitches: Amigurumi is all about math! Always use a stitch marker, especially when working increases and decreases, to avoid losing your place.
- Stuffing: Stuff the head and body firmly, but be careful not to overstuff the neck area, or the head might sit at an awkward angle.