Miniature Knit Strawberry Pattern: Easy Step-by-Step Tutorial
Introduction
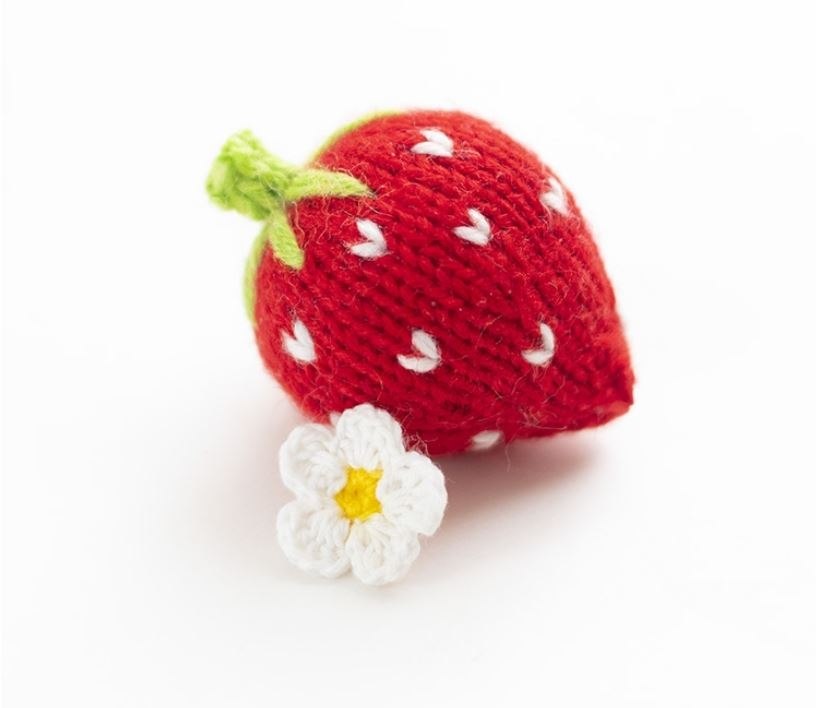
There is nothing quite like adding handcrafted flair to your decor, accessory collection, or play food set! This miniature knit strawberry pattern is a quick, charming project that brings a splash of bright, sweet color to any room. Measuring just about 1.5 inches tall when completed, these tiny strawberries are perfect as keychains, photo props, garland accents, or sweet handmade gifts.
Designed to be beginner-friendly yet full of realistic detail, this project uses basic double-pointed needle (DPN) knitting techniques, seamless round construction, and simple embroidery stitches. Whether you are looking to clear out small yarn scraps from your stash or practice working in the round on a small scale, this step-by-step guide will walk you through every single stitch with ease.
Materials & Abbreviations
Required Materials
- Yarn: Fine / Sport Weight Yarn (Wool or Acrylic blend works best for crisp stitch definition)
- Red (Body): approx. 12–15 yards
- Green (Stem & Calyx): approx. 5 yards
- White (Seeds): tiny scrap (approx. 1 yard)
- Needles: Set of 4 Double-Pointed Needles (DPNs), US Size 000 to 0 (1.5 mm)
- Crochet Hook: Size 1.5 mm (US Steel Hook Size 8) — optional, used as a helper tool for smooth decreases and pulling ends
- Stuffing: Polyester Fiberfill
- Tools: Tapestry needle, sharp scissors, and a wooden skewer or chopstick for stuffing
Measurements & Gauge
- Finished Size: Approximately 1.25 to 1.5 inches tall (excluding stem)
- Gauge: Not critical for this project, but work stitches tightly to prevent fiberfill stuffing from showing through.
Abbreviations (US Terms)
- CO: Cast On
- K: Knit stitch
- Inc: Increase (lifted increase from the row below or M1L)
- Dec: Decrease (K2tog / knit 2 stitches together through front loop)
- DPN: Double-Pointed Needle
- Rnd / Rnds: Round / Rounds
- St / Sts: Stitch / Stitches
Step-by-Step Instructions
Part 1: The Strawberry Body
The strawberry body is worked seamlessly in the round from the base upward using three double-pointed needles to hold the stitches while knitting with a fourth.
Setup: Using red yarn, cast on 18 stitches onto one double-pointed needle.
Round 1: As you knit the first round, evenly distribute the 18 stitches across 3 DPNs (6 stitches per needle). Join in the round, taking care not to twist your stitches.
Round 2: On each of the 3 needles, work: [K2, Inc, K2, Inc, K2]. (8 sts per needle = 24 sts total)
Tip on Increases: Make your increases by lifting the stitch loop from the row below. This creates a tight, gap-free increase that keeps the stuffing hidden inside.
Round 3: Knit all 24 stitches straight across (8 sts per needle).
Round 4: On each needle, work: [K2, Inc, K4, Inc, K2]. (10 sts per needle = 30 sts total)
Rounds 5–10: Knit all 30 stitches straight across for 6 complete rounds (10 sts per needle).
Round 11: On each needle, work: [Dec, K3, Dec, K3]. (9 sts per needle = 24 sts total)
Helper Technique: For rounds with decreases, working K2tog tightly through the front loops ensures a sleek taper. If working on tiny DPNs feels tight, you can catch the two loops with a small 1.5 mm crochet hook to draw the yarn through effortlessly.
Rounds 12–13: Knit all 24 stitches straight across for 2 rounds (9 sts per needle).
Round 14: On each needle, work: [Dec, K2, Dec, K2]. (6 sts per needle = 18 sts total)
Rounds 15–16: Knit all 18 stitches straight across for 2 rounds (6 sts per needle).
Round 17: On each needle, work: [Dec, K1, Dec, K1]. (4 sts per needle = 12 sts total)
Round 18: Knit all 12 stitches straight across (4 sts per needle).
Final Decrease Round: Work [Dec (K2tog)] across all pairs of stitches around. (2 sts per needle = 6 sts total)
Cut the red yarn, leaving a tail of approximately 4 to 5 inches (10–12 cm).
Part 2: Stuffing and Shaping
Carefully transfer the remaining 6 stitches onto a tapestry needle or crochet hook, draw the yarn tail through all 6 loops, and draw them together loosely.
Before closing the top completely, use a chopstick or wooden skewer to gently push polyester fiberfill stuffing into the upper opening of the strawberry body. Fill firmly so the strawberry holds a round, plump shape at the top tapering down to a neat point at the bottom, but do not over-stuff to the point of stretching out the stitches.
Using your tapestry needle, thread the red tail through alternating loops around the opening to cinch the hole closed seamlessly without creating thick puckers. Pass the yarn end into the body, pull gently, and trim excess tail.
Part 3: Green Stem (I-Cord)
The stem is created using a classic 4-stitch I-cord knit with green yarn.
Step 1: Using green yarn, cast on 4 stitches onto one DPN.
Step 2: Do not turn your work. Slide all 4 stitches to the opposite (right) end of your double-pointed needle.
Step 3: Pull the working yarn snugly across the back of the stitches and knit all 4 stitches.
Step 4: Repeat Steps 2 and 3 for 6 to 7 total rows until your stem reaches approximately 0.5 to 0.75 inches in length.
Fasten Off: Transfer the 4 stitches to a tapestry needle or crochet hook, pull the working yarn through all loops to lock them, and leave a long tail (approx. 8–10 inches) for embroidering the leaf calyx.
Finishing
Putting together your strawberry is quick, rewarding, and brings the entire piece to life!
- Attach the Stem: Insert the base of the green I-cord stem directly into the top center opening of the red strawberry body.
- Secure the Base: Use the red yarn tail remaining from your initial cast-on to sew tightly around the stem base, anchoring it securely inside the strawberry. Thread the red end through the center of the body and cut off excess.
- Embroider the Leaf Calyx: Thread the long green yarn tail onto your tapestry needle and pass it through the center base of the stem. Make several straight decorative stitches (approx. 0.25 inches long each) extending outward from the stem onto the red body in a star-burst pattern. This creates realistic green strawberry leaves (calyx). Secure the green tail inside the body.
- Embroider the Seeds: Thread a short length of white yarn onto your needle. Work tiny single-stitch flecks or small “V” shaped seed stitches randomly distributed across the surface of the red berry. Tie off hidden knots inside the body construction.
Tips for Best Results
- Knit Tightly: Maintaining tight, even tension is the secret to beautiful plushies. Tight stitches ensure that white polyester stuffing remains hidden inside your berry.
- Yarn Selection: A smooth wool/acrylic blend works best. Standard cotton yarns lack elasticity, which can leave small gaps around decreases.
- Use a Helper Hook: Working decreases on 1.5 mm needles can sometimes feel slick or stiff. Don’t hesitate to use a fine steel crochet hook to pull decrease loops through easily!
- Versatile Uses: Add a jump ring or key chain loop to the top stem to create a cute bag charm, or make a bunch of 6 to 8 berries to string along twine for a kitchen garland!