DIY Knitted Shark Plushie Pattern: Easy Step-by-Step Tutorial
Looking for a fun, quirky project to brighten up your craft corner? Meet our adorable little shark! This plushie is the perfect blend of “tough” and “cute,” making it a fantastic gift for ocean lovers or a great way to practice your small-scale knitting skills. Whether you are a seasoned pro or a beginner looking for a confidence booster, this guide will walk you through every stitch.
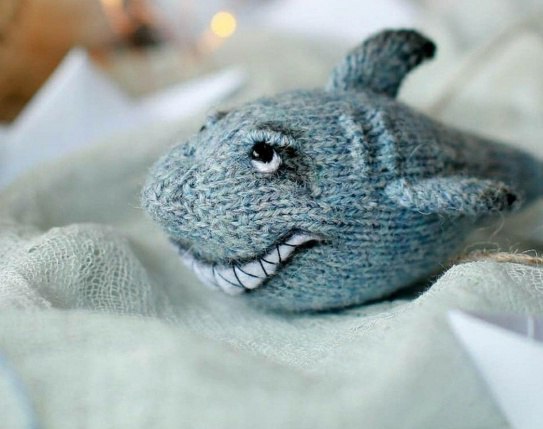
The result is a charming, stylized shark with a wide, toothy grin and a personality all its own. While it looks complex, it is actually made of a few simple shapes that we sculpt into a character during the finishing stages. Let’s dive in!
Materials & Abbreviations
To get started, gather the following supplies. We recommend using a smooth, non-fuzzy yarn to keep the shark’s features crisp and clear.
Materials
- Yarn: Any smooth, medium-to-fine weight yarn in blue or grey. (A merino royal fine or similar fingering weight works perfectly).
- Knitting Needles: Double Pointed Needles (DPNs) in size US 0 or US 00 (approx. 2.0mm). If you want a larger shark, simply use a thicker yarn and matching larger needles.
- Stuffing: High-quality polyester fiberfill.
- Safety Eyes: 3-4mm black safety eyes.
- Felt: A small piece of white felt for the mouth.
- Detailing Tools: Oil pastels, eyeshadow, or fabric acrylics (dark blue or black) for shading.
- Basic Sewing Kit: A tapestry needle, sharp scissors, and strong sewing thread (black and blue).
- Extras: Super glue and a few sewing pins.
Abbreviations (US Terms)
- K: Knit
- P: Purl
- Inc: Increase (Knit Front and Back – KFB)
- Dec: Decrease (Knit 2 together – K2tog)
- Double Dec: Double Decrease (Knit 3 together – K3tog)
- St(s): Stitch(es)
- N1, N2, N3: Needle 1, Needle 2, and Needle 3 (when using DPNs)
Step-by-Step Instructions
Part 1: The Body
The body is worked in the round using three double-pointed needles. We will start at the nose and work our way back toward the tail. Keep your tension tight so the stuffing doesn’t peek through!
The Nose and Head (Increases)
Cast on 9 stitches and distribute them evenly across 3 needles (3 stitches per needle).
- Row 1: K all stitches. (9 sts)
- Row 2: [K1, Inc, K1] repeat on all 3 needles. (12 sts)
- Row 3: K all stitches. (12 sts)
- Row 4: [K1, Inc 2, K1] repeat on all 3 needles. (18 sts)
- Row 5: K all stitches. (18 sts)
- Row 6: [K1, Inc, K2, Inc, K1] repeat on all 3 needles. (24 sts)
- Row 7: K all stitches. (24 sts)
- Row 8:
- N1: K1, Inc, K4, Inc, K1
- N2: K1, Inc, K1, Inc 2, K1, Inc, K1
- N3: K1, Inc, K4, Inc, K1 (32 sts)
- Row 9: K all stitches. (32 sts)
- Row 10:
- N1: K1, Inc, K6, Inc, K1
- N2: K1, Inc, K8, Inc, K1
- N3: K1, Inc, K6, Inc, K1 (38 sts)
- Row 11-12: K all stitches. (38 sts)
- Row 13:
- N1: Inc, K1, Inc, K9
- N2: K1, Inc, K10, Inc, K1
- N3: K9, Inc, K1, Inc (44 sts)
The Mid-Section
- Rows 14-33: K all stitches for 20 rows. (44 sts)
Pro Tip: While knitting the mid-section, mark the area that will be the shark’s back (usually the transition between N1 and N3) with a scrap piece of white thread. This helps you keep track of the orientation when you start stuffing.
The Tail (Decreases)
Now we will use double decreases (K3tog) to create a clean, tapered wedge shape for the tail.
- Row 34:
- N1: K5, Double Dec, K6
- N2: K7, Double Dec, K6
- N3: K6, Double Dec, K5 (38 sts)
- Row 35: K all stitches. (38 sts)
- Row 36:
- N1: K4, Double Dec, K5
- N2: K6, Double Dec, K5
- N3: K5, Double Dec, K4 (32 sts)
- Rows 37-41: K all stitches for 5 rows. (32 sts)
- Row 42:
- N1: K3, Double Dec, K4
- N2: K5, Double Dec, K4
- N3: K4, Double Dec, K3 (26 sts)
- Rows 43-47: K all stitches for 5 rows. (26 sts)
- Row 48:
- N1: K2, Double Dec, K3
- N2: K4, Double Dec, K3
- N3: K3, Double Dec, K2 (20 sts)
- Row 49: N1: K6; N2: K3, Dec, K3; N3: K6. (19 sts)
- Row 50: N1: K6; N2: K2, Dec, K3; N3: K6. (18 sts)
- Rows 51-58: K all stitches for 8 rows. (18 sts)
- Row 59: [K2, Dec, K2] repeat on all 3 needles. (15 sts)
- Rows 60-63: K all stitches for 4 rows. (15 sts)
- Row 64:
- N1: K1, Dec, K2
- N2: K2, Dec, K1
- N3: K2, Dec, K1 (12 sts)
- Row 65: [K1, Dec, K1] repeat on all 3 needles. (9 sts)
- Rows 66-67: K all stitches. (9 sts)
Cut the yarn, leaving a 4-inch tail. Thread the tail through the remaining 9 stitches and pull tight to close the tail end.
Part 2: The Fins
You will need to make 5 identical fin pieces. Three will be used for the dorsal and pectoral fins, and two will be joined to create the tail fin.
- Cast on 10 stitches.
- Knit 10 rows total, alternating between knit and purl rows (Stockinette stitch) to create a small square.
- Important: Purl the very first row to ensure a smooth, flat edge.
- Bind off loosely using a crochet hook to prevent the edge from pulling.
- Shaping: Fold the square in half diagonally to form a triangle. Sew the two side edges together. Pull the thread slightly tighter on one side to create a curved, organic “fin” shape rather than a perfect triangle.
Finishing & Assembly
Assembly
- Stuffing: Before sewing the fins on, stuff the body firmly with fiberfill. Use a chopstick or a blunt tool to push stuffing into the nose and tail for a smooth shape.
- The Nose: To prevent stuffing from popping out, use a needle and thread to sew a circular stitch around the very tip of the nose, pulling it tight to create a small “flower” shape.
- Fin Placement: Use pins to position the dorsal fin on top and the pectoral fins on the sides. Sew them securely into place.
- The Tail Fin: Place two fin triangles side-by-side symmetrically. Sew them together along the center and then attach the combined piece to the end of the tail. Ensure the tail fin stands vertically.
Creating the Face
This is where your shark gets its personality!
The Smile
- Cut a small crescent shape from white felt.
- Place it on the face to find the right width. Pin the center and use a tiny drop of super glue on the corners to secure it.
- Using black sewing thread, embroider “V” shaped zig-zags across the felt to create a row of sharp shark teeth.
The Eyes & Expression
- Safety Eyes: Insert safety eyes at the desired positions.
- The “Pop”: Take a short piece of white yarn and wrap it around the base of the eye, stitching it down. This creates a white highlight that makes the eyes look more expressive.
- The Brows: Embroider a single thick line of thread above each eye. To make it “brutal” and thick, wrap the thread around the main stitch several times (like a French knot or a thick stem stitch).
The Final Touches: Sculpting & Shading
- Sculpting (Utyazhki): To give the shark a more realistic head, use a long needle and matching blue thread. Insert the needle from the back of the head, pull it through the face to create a dimple (e.g., above the eyes or at the bridge of the nose), and pull tight before securing. This “cinches” the fabric to create anatomical depth.
- Shading: Use oil pastels or eyeshadow and a small, stiff brush to add depth. Lightly shade around the eyes, under the brows, and at the very tips of the fins. Blend the colors for a smooth gradient.
Tips for Success
- Tension is Key: If you notice gaps in your knitting, try a smaller needle size. A dense fabric is essential for plushies so the stuffing remains hidden.
- Symmetry: When sewing the pectoral fins, make sure they are mirror images of each other so your shark doesn’t look lopsided.
- Don’t Overstuff: Stuff the body firmly but not so much that the fabric stretches out of shape. Use your fingers to mold the “belly” and “back” for a natural look.