How to Crochet a Cute Mini Bear Keychain: Easy Amigurumi Pattern
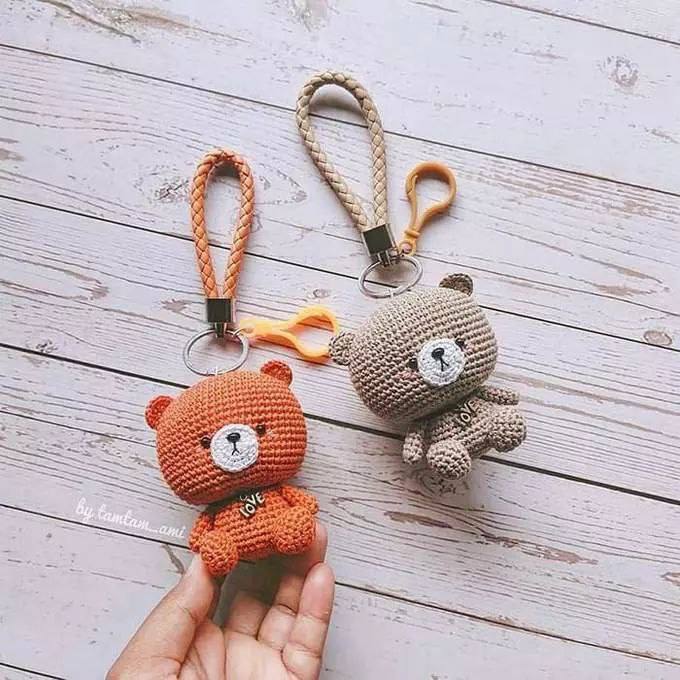
Looking for a quick, adorable project to brighten up your keys or create the perfect handmade gift? This mini amigurumi bear keychain is the ideal project for crocheters of all levels. Whether you are looking to stock up your Etsy shop or just want a tiny companion to hang from your bag, this little bear is sure to bring a smile to anyone’s face.
Miniatures can be a bit challenging because of the tight stitches, but with a little patience and the right tools, you’ll have a professional-looking plushie in no time. In this tutorial, we will walk through every step of creating this chubby little bear, from the oval-shaped head to the tiny paws. Let’s dive in!
Materials & Abbreviations
To get the best results for a small amigurumi project, it is important to use a hook that is smaller than what the yarn label suggests. This ensures your stitches are tight so the stuffing doesn’t peek through.
Supplies You’ll Need
- Yarn: A small amount of cotton or mohair yarn in your choice of color (brown, cream, or orange work great!). You will only need a few yards per bear.
- Crochet Hook: 1.25mm hook (you can use a 1.0mm or 1.5mm depending on your tension).
- Eyes: 4mm-6mm black safety eyes or small black beads.
- Nose: A small plastic safety nose or black embroidery thread.
- Embroidery Thread: Black thread for the mouth and pink thread for the cheeks.
- Stuffing: Polyester fiberfill.
- Tools: Yarn needle, scissors, and stitch markers.
- Hardware: A keychain ring and clasp.
US Crochet Terms & Abbreviations
- MR: Magic Ring
- ch: Chain
- sc: Single crochet
- inc: Increase (two single crochets in one stitch)
- dec: Decrease (single crochet two stitches together)
- sl st: Slip stitch
- st(s): Stitch(es)
- (…) * n: Repeat the instructions inside the parentheses “n” times.
Step-by-Step Instructions
The Head
Unlike many amigurumi heads that start with a magic ring, this bear has a slightly oval shape created by starting with a foundation chain. This gives the bear a cuter, more rounded look.
Foundation: Chain 12. Working around both sides of the chain starting from the 2nd chain from the hook:
- Round 1: 10 sc, 3 sc in the last chain. Turn to work on the opposite side of the chain: 9 sc, inc (24 sts)
- Round 2: inc, 9 sc, 3 inc, 9 sc, 2 inc (30 sts)
- Round 3: inc, 10 sc, inc, (1 sc, inc) * 2, 10 sc, inc, 1 sc, inc, 1 sc (36 sts)
- Round 4: 2 sc, inc, 11 sc, inc, (2 sc, inc) * 2, 11 sc, inc, 2 sc, inc (42 sts)
- Round 5: 1 sc, inc, 12 sc, inc, (3 sc, inc) * 2, 12 sc, inc, 3 sc, inc, 2 sc (48 sts)
- Round 6: 3 sc, inc, 13 sc, inc, (4 sc, inc) * 2, 13 sc, inc, 4 sc, inc, 1 sc (54 sts)
- Round 7: sc in each st around (54 sts)
- Round 8: 2 sc, inc, 14 sc, inc, (5 sc, inc) * 2, 14 sc, inc, 5 sc, inc, 3 sc (60 sts)
- Rounds 9-21: sc in each st around for 13 rounds (60 sts)
- Round 22: 2 sc, dec, 14 sc, dec, (5 sc, dec) * 2, 14 sc, dec, 5 sc, dec, 3 sc (54 sts)
- Round 23: (7 sc, dec) * 6 (48 sts)
- Round 24: 24 dec (24 sts)
Fasten off, leaving a long tail for sewing. Stuff the head firmly with fiberfill.
The Body
- Round 1: 6 sc in MR (6 sts)
- Round 2: 6 inc (12 sts)
- Round 3: (1 sc, inc) * 6 (18 sts)
- Round 4: (2 sc, inc) * 6 (24 sts)
- Round 5: (3 sc, inc) * 6 (30 sts)
- Round 6: (4 sc, inc) * 6 (36 sts)
- Rounds 7-12: sc in each st around for 6 rounds (36 sts)
- Round 13: (4 sc, dec) * 6 (30 sts)
- Round 14: sc in each st around (30 sts)
- Round 15: (3 sc, dec) * 6 (24 sts)
- Round 16: sc in each st around, sl st to join (24 sts)
Fasten off and stuff the body firmly.
The Arms (Make 2)
- Round 1: 7 sc in MR (7 sts)
- Rounds 2-6: sc in each st around for 5 rounds (7 sts)
Fasten off, leaving a tail for sewing. These do not need stuffing.
The Legs (Make 2)
The legs are worked similarly to the head, starting with a small chain to create a flat foot.
Foundation: Chain 5. Working around both sides of the chain starting from the 2nd chain from the hook:
- Round 1: 3 sc, 3 sc in the last chain. Turn to work on the opposite side: 2 sc, inc (10 sts)
- Round 2: inc, 2 sc, 3 inc, 2 sc, 2 inc (16 sts)
- Rounds 3-4: sc in each st around for 2 rounds (16 sts)
- Round 5: 4 sc, 3 dec, 4 sc, dec (12 sts)
Fasten off, leaving a tail for sewing. Stuff the feet lightly.
The Ears (Make 2)
- Round 1: 5 sc in MR, turn (5 sts)
- Round 2: 5 inc, sl st to join (10 sts)
Fasten off, leaving a tail for sewing.
The Muzzle
- Round 1: 6 sc in MR (6 sts)
- Round 2: 6 inc (12 sts)
- Round 3: (1 sc, inc) * 6, sl st to join (18 sts)
Fasten off, leaving a tail for sewing.
The Tail
- Round 1: 6 sc in MR (6 sts)
- Round 2: 6 inc (12 sts)
- Round 3: (1 sc, dec) * 4, sl st to join (8 sts)
Fasten off, leaving a tail for sewing.
Finishing
Now comes the magic part—assembly! This is where your bear truly comes to life.
Facial Details
First, attach the muzzle to the center of the head. Before sewing the muzzle completely, place your safety eyes just above the top edge of the muzzle, spaced about 3-4 stitches apart. Embroider a small “Y” shape for the mouth using black thread. For a little extra cuteness, add two small horizontal stitches in pink yarn just below the eyes for rosy cheeks.
Assembly
- Ears: Sew the ears to the top of the head.
- Body: Sew the head securely to the top of the body. Be careful to center the head so the bear doesn’t lean to one side.
- Limbs: Sew the arms to the sides of the body and the legs to the bottom. If you want your bear to sit upright, sew the legs slightly forward.
- Tail: Sew the tail to the back of the body.
Finally, attach your keychain hardware to the top of the head between the ears. Secure the knot tightly or use a tiny drop of fabric glue to ensure it stays in place.
Tips for Success
- Use a Stitch Marker: Because you are working in continuous spirals, it is very easy to lose track of the beginning of the round. Use a scrap piece of yarn or a plastic marker.
- Consistent Tension: Keep your stitches tight! If you see gaps where the stuffing is showing, try using a smaller hook.
- The Magic Ring: If you struggle with the magic ring, you can chain 2 and work your first round of stitches into the first chain.
- Personalize It: Add a tiny crochet scarf or a small bow around the bear’s neck to give it a unique personality!