Adorable Winter Goose Crochet Pattern: Easy Amigurumi Tutorial
Adorable Winter Goose Crochet Pattern: A Cozy Amigurumi Tutorial
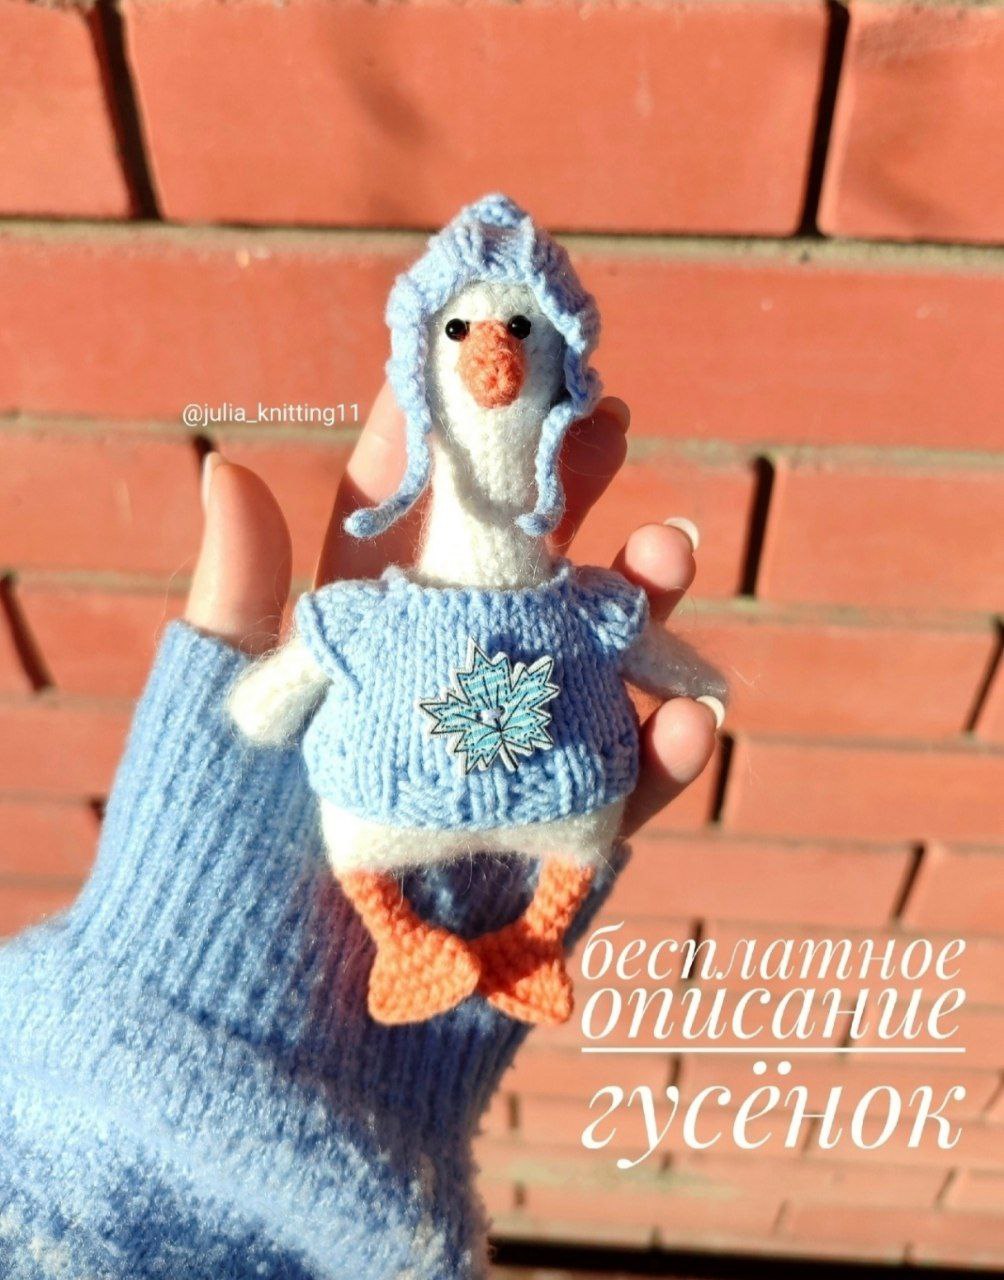
Looking for a charming project to brighten up the colder months? Meet our Winter Goose! This little fellow is the perfect combination of cozy and cute, sporting a tiny knitted sweater and a matching beanie. Whether you are looking for a unique handmade gift or a whimsical addition to your own amigurumi collection, this pattern is a delightful way to practice both your crochet and basic knitting skills.
This project is designed to be beginner-friendly, though it does combine two different crafts. If you’ve never knitted before, this is a fantastic “starter” project to learn how to create simple ribbing and basic shapes. Let’s get started on creating your own little winter companion!
Materials & Abbreviations
To make your Winter Goose, you will need a few basic supplies. We recommend using a sport-weight or DK-weight yarn to keep the stitches tight and the stuffing secure.
Materials Needed
- Yarn:
- White yarn (for the body, wings, and tail)
- Light blue yarn (for the hat and sweater)
- Orange yarn (for the beak and feet)
- Crochet Hook: 2.0mm (or a size that works best with your yarn to prevent stuffing from showing)
- Knitting Needles: A pair of needles suitable for your blue yarn (approximately 2.5mm to 3.0mm)
- Eyes: 3-4mm black beads or safety eyes
- Decoration: One small decorative button for the sweater
- Stuffing: Polyester fiberfill
- Tools: Yarn needle, scissors, and stitch markers
Crochet Abbreviations (US Terms)
- MR: Magic Ring
- ch: Chain
- sc: Single Crochet
- inc: Increase (two single crochets in one stitch)
- dec: Decrease (invisible decrease recommended)
- st(s): Stitch(es)
Knitting Abbreviations
- K: Knit
- P: Purl
- YO: Yarn Over
- Ribbing 2×2: Knit 2, Purl 2
Step-by-Step Instructions
The Body and Head
We will work the head and body as one continuous piece from the top down. Use white yarn.
- Round 1: 6 sc in MR (6)
- Round 2: inc in each st around (12)
- Round 3: (1 sc, inc) * 6 (18)
- Round 4: (2 sc, inc) * 6 (24)
- Rounds 5-8: sc in each st around (24) – 4 rounds total
- Round 9: (6 sc, dec) * 3 (21)
- Round 10: sc in each st around (21)
- Round 11: (5 sc, dec) * 3 (18)
- Round 12: (4 sc, dec) * 3 (15)
- Rounds 13-17: sc in each st around (15) – 5 rounds total
- Round 18: (4 sc, inc) * 3 (18)
- Round 19: sc in each st around (18)
- Round 20: (5 sc, inc) * 3 (21)
- Round 21: (6 sc, inc) * 3 (24)
- Round 22: (7 sc, inc) * 3 (27)
- Round 23: (8 sc, inc) * 3 (30)
- Round 24: (9 sc, inc) * 3 (33)
- Round 25: (10 sc, inc) * 3 (36)
- Round 26: (11 sc, inc) * 3 (39)
- Round 27: (12 sc, inc) * 3 (42)
- Rounds 28-35: sc in each st around (42) – 8 rounds total
- Round 36: (12 sc, dec) * 3 (39)
- Round 37: (11 sc, dec) * 3 (36)
- Round 38: (10 sc, dec) * 3 (33)
Assembly Note: Fold the piece in half and sew along the center. Be sure to leave several unsewn single crochet stitches on the sides; these will serve as the attachment points for the legs.
The Feet
Using orange yarn, repeat for both feet:
- Round 1: Join yarn to the side of the body and work 6 sc.
- Rounds 2-5: sc in each st around (6) – 4 rounds total
- Round 6: (1 sc, inc) * 3 (9)
- Round 7: (2 sc, inc) * 3 (12)
- Round 8: (3 sc, inc) * 3 (15)
Fold the foot in half and sc across 7 stitches to close the end.
The Wings
Using white yarn, repeat for both wings:
- Round 1: 6 sc in MR (6)
- Round 2: (1 sc, inc) * 3 (9)
- Round 3: sc in each st around (9)
- Round 4: (2 sc, inc) * 3 (12)
- Round 5: sc in each st around (12)
- Round 6: (3 sc, inc) * 3 (15)
- Rounds 7-8: sc in each st around (15)
- Round 9: (3 sc, dec) * 3 (12)
Fold the wing in half and sc across 6 stitches to close.
The Beak
Using orange yarn:
- Round 1: 6 sc in MR (6)
- Round 2: sc in each st around (6)
- Round 3: (1 sc, inc) * 3 (9)
- Round 4: sc in each st around (9)
The Tail
Using white yarn:
- Round 1: 6 sc in MR (6)
- Round 2: (1 sc, inc) * 3 (9)
- Round 3: (2 sc, inc) * 3 (12)
- Round 4: sc in each st around (12)
- Round 5: (3 sc, inc) * 3 (15)
- Round 6: sc in each st around (15)
The Winter Hat (Knitted)
Cast on 24 stitches using blue yarn.
- Rows 1-14: Work in 2×2 Ribbing (K2, P2).
Fold the rectangle in half and sew one side to create a cap. For the straps, chain 10 with your crochet hook, attach to the hat, sc around the bottom edge of the hat, and chain 10 on the other side to finish the ties.
The Cozy Sweater (Knitted)
Cast on 30 stitches using blue yarn.
- Row 1: Edge stitch, K4, YO, K1, YO, K4, YO, K1, YO, K8, YO, K1, YO, K4, YO, K1, YO, K4, Edge stitch.
- Row 2: Edge stitch, P3, work YO stitches as twisted purls, Edge stitch.
- Row 3: Edge stitch, K5, YO, K1, YO, K6, YO, K1, YO, K10, YO, K1, YO, K6, YO, K1, YO, K5, Edge stitch.
- Row 4: Edge stitch, P44, Edge stitch.
- Row 5: Edge stitch, K6, YO, K1, YO, K8, YO, K1, YO, K12, YO, K1, YO, K8, YO, K1, YO, K6, Edge stitch.
- Row 6: Edge stitch, P52, Edge stitch.
- Row 7: Edge stitch, K7, bind off 12 sts (first sleeve), K14, bind off 12 sts (second sleeve), K7, Edge stitch.
- Row 8: Edge stitch, P7, increase 4 sts, P14, increase 4 sts, P7, Edge stitch.
- Rows 9-12: Work in stockinette stitch (Knit on right side, Purl on wrong side) for 36 stitches.
- Rows 13-16: Work in 2×2 Ribbing (4 rows total).
Bind off all stitches and sew the sweater closed along the back seam.
Finishing
Now it is time to bring your goose to life! Start by stuffing the body firmly with fiberfill. Use your yarn needle to sew the beak to the center of the face and the tail to the rear of the body. Attach the wings to the sides of the body, just above where the legs meet.
Place your beads or safety eyes just above the beak for a cute, curious expression. Finally, dress your goose in its knitted sweater and hat. Sew the decorative button onto the front of the sweater for an extra touch of detail.
Tips for Success
- Tension Control: Because this is a small toy, keep your crochet tension tight. If you see gaps where stuffing is peeking through, try dropping down a hook size (e.g., from 2.0mm to 1.75mm).
- Invisible Decreases: When working the body, use the invisible decrease method (inserting the hook into the front loops only of the next two stitches) to keep the shape smooth.
- Knitting Help: If the “twisted purls” in the sweater are confusing, simply purl them as usual; the twisted stitch is primarily for a tighter, more decorative look.
- Customization: Feel free to change the colors! A yellow goose in a red sweater or a grey goose in a green hat looks just as adorable.