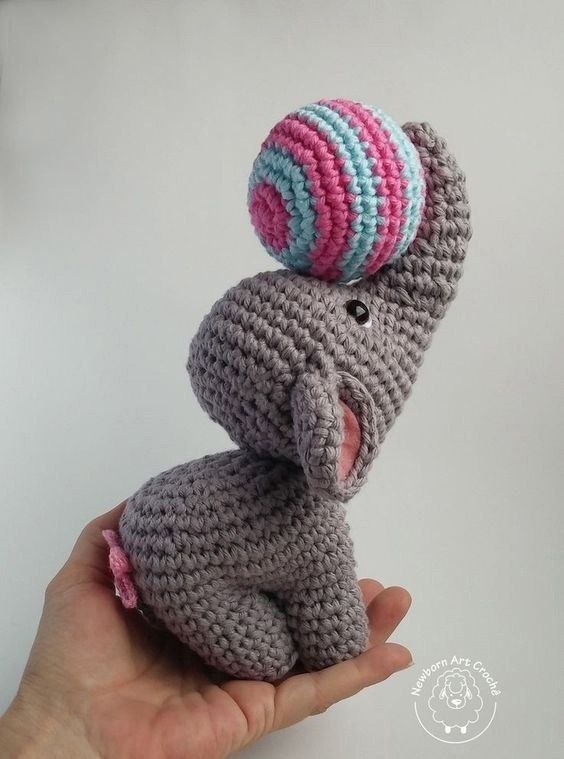
Adorable Mini Crochet Elephant Pattern: A Beginner-Friendly Amigurumi Tutorial
If you are looking for a quick and heartwarming project to add to your crochet collection, this mini amigurumi elephant is the perfect choice. Whether you’re crafting a cute nursery decoration, a unique gift for a baby shower, or just want a tiny companion to sit on your desk, this little elephant is bound to bring a smile to anyone’s face. This pattern is designed with beginners in mind, utilizing basic stitches to create a professional, rounded look.
Amigurumi, the Japanese art of knitting or crocheting small, stuffed yarn creatures, is a wonderful way to practice your tension and learn how to shape 3D objects. In this tutorial, we will guide you through every step—from creating the magic ring to the final assembly—ensuring your little elephant turns out perfectly.
Materials & Abbreviations
Before you begin, gather all your supplies. Using a smaller hook than the yarn suggests is a common amigurumi technique to ensure the stuffing doesn’t peek through the stitches.
Supplies Needed
- Yarn: Medium weight (4) or DK weight yarn in grey (for the body) and a small amount of pink (for the inner ears).
- Crochet Hook: 1.75mm or 2.0mm hook.
- Safety Eyes: Two 4mm black safety eyes.
- Stuffing: Polyester fiberfill or scrap yarn.
- Tools: Yarn needle, scissors, and a stitch marker.
US Crochet Terms & Abbreviations
- MR: Magic Ring (or Magic Circle)
- sc: Single crochet
- inc: Increase (2 single crochet in the same stitch)
- dec: Decrease (single crochet two stitches together – invisible decrease recommended)
- ch: Chain
- sl st: Slip stitch
- BLO: Back loops only
- st(s): Stitch(es)
Step-by-Step Instructions
The Head and Trunk
The head is worked in a continuous spiral. The first few rounds create the trunk, which then expands into the rounded head.
- Round 1: 6 sc in MR (6)
- Round 2: [1 sc, inc] repeat 3 times (9)
- Round 3: 3 dec, 3 inc (9)
- Round 4: 9 sc (9)
- Round 5: [2 sc, inc] repeat 3 times (12)
- Round 6: 1 inc, 4 dec, 3 inc (12)
- Round 7: 12 sc (12)
- Round 8: [3 sc, inc] repeat 3 times (15)
- Round 9: 2 inc, 5 dec, 3 inc (15)
- Round 10: 15 sc (15)
- Round 11: [4 sc, inc] repeat 3 times (18)
- Round 12: 3 inc, 6 dec, 3 inc (18)
- Round 13: 18 sc (18)
- Round 14: 3 inc, 12 sc, 3 inc (24)
- Round 15: [1 sc, inc] repeat 3 times, 12 sc, [1 sc, inc] repeat 3 times (30)
- Round 16: [2 sc, inc] repeat 3 times, 12 sc, [2 sc, inc] repeat 3 times (36)
- Round 17: [3 sc, inc] repeat 3 times, 12 sc, [3 sc, inc] repeat 3 times (42)
- Rounds 18-22: 42 sc (42)
- Round 23: [5 sc, dec] repeat 6 times (36)
- Round 24: [4 sc, dec] repeat 6 times (30)
- Round 25: [3 sc, dec] repeat 6 times (24)
- Round 26: [2 sc, dec] repeat 6 times (18). Stop here to insert safety eyes between rounds 24 and 25 and add stuffing firmly.
- Round 27: [1 sc, dec] repeat 6 times (12). Fasten off and weave in ends.
The Ears
Make two ears. You can use grey yarn for the outer part and a small amount of pink for the inner detail if desired.
- Round 1: 6 sc in MR (6)
- Round 2: 6 inc (12)
- Round 3: [1 sc, inc] repeat 6 times (18)
- Round 4: [2 sc, inc] repeat 6 times (24). Fasten off, leaving a long tail for sewing.
The Mouth (Trunk End)
This part is worked in rows rather than a spiral.
- Row 1: Chain 6.
- Row 2: 1 dec, 2 sc, 1 dec.
- Row 3: 2 dec.
- Row 4: 1 sl st. Fasten off.
The Body and Legs
We begin by creating four separate legs and then joining them together to form the body.
The Legs (Make 4)
- Round 1: 6 sc in MR (6)
- Round 2: 6 inc (12)
- Round 3: 12 sc in BLO (12)
- Rounds 4-7: 12 sc (12)
Important: Do not fasten off the fourth leg. You will use it to join all four legs together.
The Body Join and Torso
- Round 8: Crochet 12 sc around each of the 4 legs (48)
- Rounds 9-13: 48 sc (48)
- Round 14: [4 sc, dec] repeat 8 times (40)
- Round 15: 40 sc (40)
- Round 16: [3 sc, dec] repeat 8 times (32). Sew the small hole between the legs closed.
- Round 17: [2 sc, dec] repeat 8 times (24). Stuff the legs firmly.
- Round 18: [1 sc, dec] repeat 8 times (16). Stuff the body.
- Round 19: [1 sc, dec] repeat 5 times, 1 sc (11).
Fasten off, weave the tail through the remaining stitches to close the hole, and pull tight.
The Tail
- Row 1: Chain 8.
- Row 2: 7 sl st. Fasten off.
Finishing
Now it’s time to bring your elephant to life! Use your yarn needle and the tails left from your pieces to assemble the toy.
- Head: Sew the head securely to the top of the body. Make sure it is centered and balanced.
- Ears: Attach the ears to the sides of the head. For a more realistic look, slightly fold them forward.
- Mouth: Sew the mouth piece to the very end of the trunk.
- Tail: Attach the small tail to the back of the body.
- Final Touches: Trim any remaining yarn tails and use a needle to hide them inside the body.
Tips for Success
Mastering the Invisible Decrease
To avoid bumps in your elephant’s head and body, use the “invisible decrease.” Instead of inserting your hook through the second stitch, insert it through the front loops only of the next two stitches, then complete the single crochet. This keeps the surface smooth.
Maintaining Consistent Tension
Amigurumi requires a tighter tension than a blanket or a scarf. If you notice stuffing leaking through, try switching to a slightly smaller hook or pulling your stitches tighter. Use a stitch marker at the end of every round to ensure you don’t lose your place in the spiral.
Customizing Your Elephant
Once you’ve mastered the basic grey elephant, feel free to get creative! You can use variegated yarn for a colorful “fantasy” elephant, add a small crocheted bow around the neck, or create a tiny ball for the elephant to hold in its trunk.