Adorable Crochet Mini Bunny Pattern: A Step-by-Step Amigurumi Tutorial
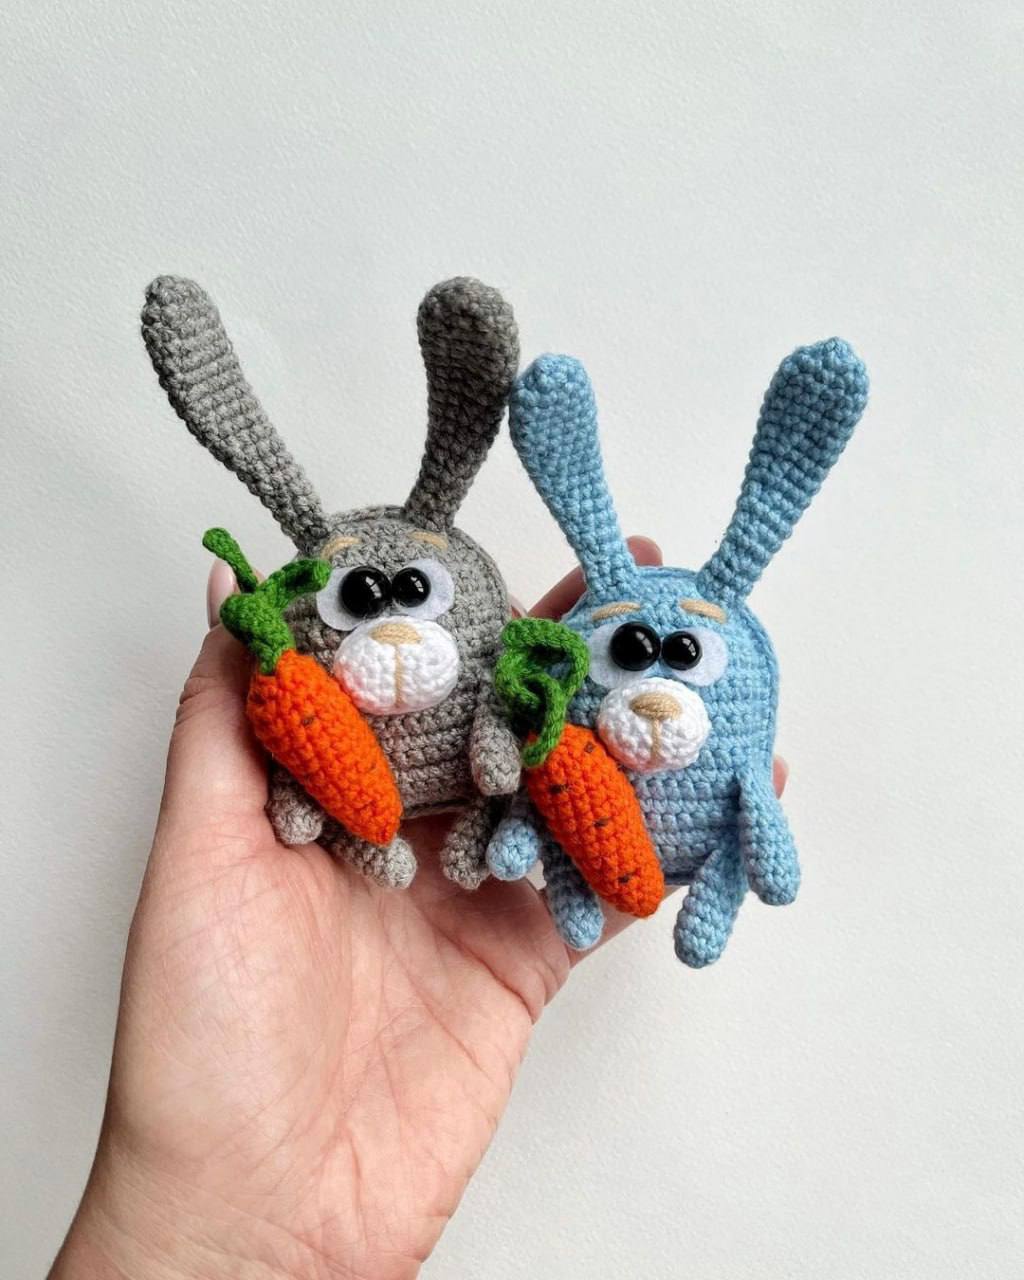
Looking for a quick, cute, and satisfying crochet project? This mini amigurumi bunny is the perfect choice! Whether you want to create a set of adorable fridge magnets, a unique keychain, or a tiny companion for your desk, this little bunny is sure to bring a smile to anyone’s face. Even if you are relatively new to amigurumi, this project is designed to be beginner-friendly with clear instructions and simple shapes.
In this tutorial, we will walk through creating a tiny bunny complete with a little carrot to hold. We will use a combination of traditional rounds and flat-piece construction to give the bunny its signature look. Let’s grab our hooks and get started!
Materials & Abbreviations
To make this mini bunny, you will need a few basic supplies. Since this is a miniature project, I recommend using a smaller hook to ensure your stuffing doesn’t peek through the stitches.
Materials Needed
- Yarn: Small amounts of cotton or acrylic yarn in the following colors:
- Main color (e.g., light blue or grey) for the body, head, ears, and paws.
- White for the muzzle.
- Beige or light brown for the nose and eyebrows.
- Orange for the carrot.
- Green for the carrot top.
- Crochet Hook: 2.0mm or 2.5mm hook.
- Eyes: Two different sized safety eyes (10mm and 8mm).
- Felt: Small pieces of white felt.
- Stuffing: Polyester fiberfill.
- Tools: Tapestry needle, scissors, and a strong adhesive (like super glue) if adding a magnet.
- Optional: A small flat magnet for the back.
Abbreviations (US Terms)
- ch: chain
- sc: single crochet
- inc: increase (2 sc in the same stitch)
- dec: decrease (sc 2 together)
- sl st: slip stitch
- MR: magic ring
- st(s): stitch(es)
Step-by-Step Instructions
The Ears (Make 2)
Use your main color yarn for the ears. These are worked in continuous rounds.
- Round 1: 6 sc in a magic ring (6)
- Round 2: inc in each st around (12)
- Rounds 3-7: sc in each st around (12) — 5 rounds total
- Round 8: dec, 10 sc (11)
- Round 9: sc in each st around (11)
- Round 10: dec, 9 sc (10)
- Round 11: sc in each st around (10)
- Round 12: dec, 8 sc (9)
- Round 13: sc in each st around (9)
- Round 14: dec, 7 sc (8)
- Round 15: sc in each st around (8)
- Round 16: dec, 6 sc (7)
- Round 17: sc in each st around (7)
Closing the Ear: Do not stuff the ears. Flatten the piece and sc 3 stitches across the opening to close it. Fasten off, leaving a long tail (about 12 inches) for sewing.
The Paws
We will create two sets of paws: the upper arms and the lower feet. Both use the main color.
Upper Paws (Make 2)
- Round 1: 8 sc in a magic ring (8)
- Rounds 2-7: sc in each st around (8) — 6 rounds total
Lightly stuff the paw. Flatten the piece and sc 4 stitches across the opening to close. Fasten off, leaving a 12-inch tail.
Lower Paws (Make 2)
- Round 1: 8 sc in a magic ring (8)
- Rounds 2-6: sc in each st around (8) — 5 rounds total
Lightly stuff the paw. Flatten the piece and sc 4 stitches across the opening to close. Fasten off, leaving a 12-inch tail.
The Body and Head
The main body of the bunny is unique because it is made of two flat oval pieces that are joined together. Use your main color.
Body Piece #1 (Back Piece)
- Foundation: ch 18
- Row 1: sc in the second ch from hook and in each following ch (17). Turn.
- Rows 2-15: ch 1, sc in each st across (17). Turn (14 rows total).
- Row 16: ch 1, dec, 13 sc, dec (15). Turn.
- Row 17: ch 1, dec, 11 sc, dec (13). Turn.
- Row 18: ch 1, dec, 9 sc, dec (11). Turn.
- Row 19: ch 1, dec, 7 sc, dec (9). Turn.
- Row 20: ch 1, dec, 5 sc, dec (7). Turn.
Fasten off and set this piece aside.
Body Piece #2 (Front Piece)
- Foundation: ch 18
- Row 1: sc in the second ch from hook and in each following ch (17). Turn.
- Rows 2-14: ch 1, sc in each st across (17). Turn (13 rows total).
- Row 15 (Eye Holes): ch 1, 7 sc, ch 1, skip 1 st, 1 sc, ch 1, skip 1 st, 7 sc (17). Turn.
- Row 16: ch 1, dec, 13 sc, dec (15). Turn.
- Row 17: ch 1, dec, 11 sc, dec (13). Turn.
- Row 18: ch 1, dec, 9 sc, dec (11). Turn.
- Row 19: ch 1, dec, 7 sc, dec (9). Turn.
- Row 20: ch 1, dec, 5 sc, dec (7). Turn.
Crucial: Do not fasten off yet! We will use this yarn to join the pieces.
The Muzzle
Use white yarn for the muzzle.
- Foundation: ch 5
- Row 1: Working in the second ch from hook: inc, 2 sc, 3 sc in the next st, 3 sc (10).
- Row 2: 2 inc, 2 sc, 3 inc, 2 sc, inc (16).
- Row 3: sc in each st around (16).
Fasten off, leaving a 12-inch tail for sewing.
The Carrot
Use orange yarn for the carrot body and green for the leaves.
- Round 1: 6 sc in a magic ring (6)
- Round 2: (1 sc, inc) x 3 (9)
- Round 3: sc in each st around (9)
- Round 4: (2 sc, inc) x 3 (12)
- Round 5: sc in each st around (12)
- Round 6: (3 sc, inc) x 3 (15)
- Rounds 7-12: sc in each st around (15) — 6 rounds total
- Round 13: (3 sc, dec) x 3 (12)
Stuff the carrot firmly with fiberfill.
- Round 14: dec x 6 (6)
Fasten off and weave in the ends.
The Carrot Greens: Attach green yarn to the top of the carrot. ch 13, turn, 12 sc back down the chain, and sl st back into the top of the carrot. Repeat this two more times to create three little leaves. Fasten off and weave in ends.
Finishing & Assembly
Setting the Eyes
Cut two circles from white felt: one 1/2 inch (13mm) and one slightly smaller (10mm). Poke a hole in the center of each. Insert the 10mm safety eye into the larger felt circle and the 8mm safety eye into the smaller one. Place these into the eye holes of Body Piece #2 and secure them with the washers on the inside.
Joining the Body
Place Body Piece #1 (the back) underneath Body Piece #2 (the front). Using the yarn still attached to Piece #2, sc through both layers all the way around the perimeter. As you are closing the final side, stuff the body firmly with fiberfill. Fasten off and weave in the end.
Final Details
- Muzzle: Stuff the white muzzle slightly and sew it directly under the eyes.
- Feet: Sew the lower paws to rows 1-3 of the body, angled slightly toward the center.
- Arms: Sew the upper paws around rows 7-8, also angled toward the center.
- Ears: Sew the ears to the top of the head (around row 20).
- Face: Use beige yarn to embroider a tiny “V” for the nose on the muzzle and two small straight lines for the eyebrows.
- Carrot: Sew the carrot to one of the upper paws so it looks like the bunny is holding it. For added realism, you can use beige yarn to sew tiny horizontal stitches along the carrot.
Tips for a Perfect Mini Bunny
- Tension is Key: Because this is a small project, keep your stitches tight. If they are too loose, the stuffing will show through, and the bunny might lose its shape.
- Stitch Markers: Use a stitch marker or a scrap piece of yarn to mark the start of your rounds, especially for the ears and paws.
- Magnet Placement: If you are making a magnet, use a strong adhesive to attach a flat magnet to the bunny’s back. Make sure the glue is completely dry before placing it on your fridge!
- Customization: Feel free to change the main color! This pattern works great in pink for a little piglet or grey for a classic rabbit.