Quack-tastic Cuteness: How to Crochet Your Own Adorable Plush Baby Duckling
“`html
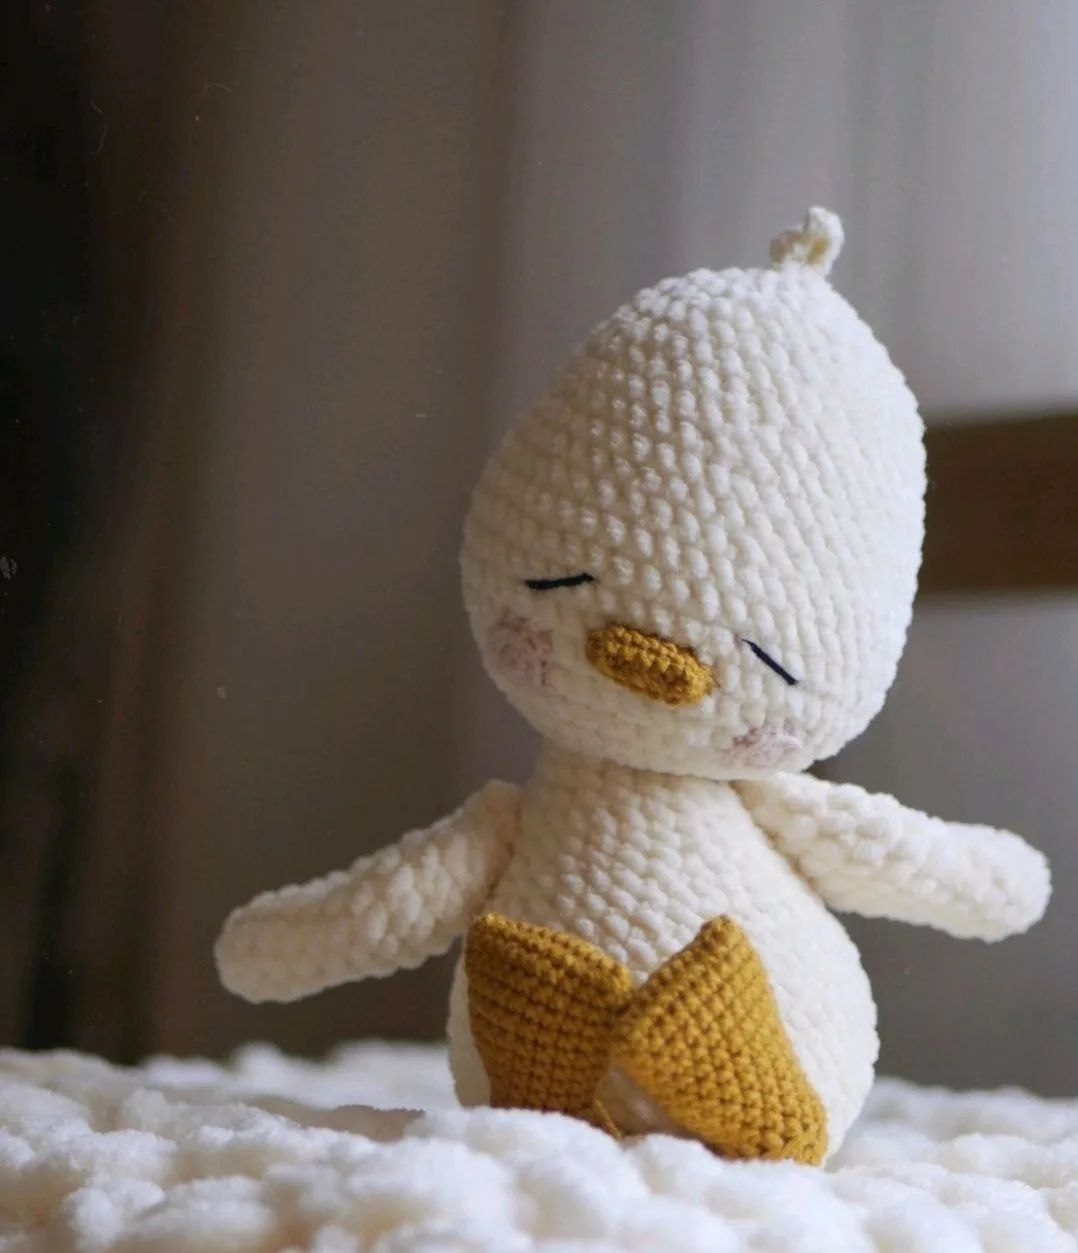
How to Crochet a Cute Baby Duckling: Step-by-Step Amigurumi Pattern
Create your own adorable, cuddly duckling with this detailed amigurumi crochet pattern. This project is perfect for beginners and intermediate crocheters looking to make a soft toy that is as sweet as it is cozy.
Materials Needed
- Main Yarn: Wolans Bunny Sweater or Himalaya Dolphin Fine in Milky/White (Plush yarn).
- Feet and Beak Yarn: YarnArt Jeans in Mustard.
- Cheeks Yarn: Alize Cotton Gold in Light Pink.
- Tuft Yarn: YarnArt Jeans in Milky/White.
- Eyes: Black embroidery thread or thin black yarn.
- Stuffing: High-quality polyester fiberfill (holofiber).
- Crochet Hooks: 2.0mm (for cotton blend yarn) and 2.5mm (for plush yarn). You can adjust the size based on your tension.
- Additional Tools: Stitch markers, scissors, yarn needle, and a wooden stick (for stuffing small parts).
Abbreviations (US Terms)
- MR: Magic Ring
- ch: Chain
- sc: Single Crochet
- inc: Increase (two sc in one stitch)
- dec: Decrease (sc two stitches together)
- sl st: Slip Stitch
- hdc: Half Double Crochet
- FLO: Front Loop Only
- (…) : The number in parentheses indicates the total stitch count for that round.
Step-by-Step Pattern
1. The Feet (Make 2)
Use Mustard yarn and a 2.0mm hook.
- Ch 13. Starting from the 2nd chain from the hook:
- Rounds 2-4: 24 sc (Work 12 sc along one side of the chain and 12 sc along the other side). (3 rounds total)
- Round 5: (dec, 10 sc) x2 (22)
- Round 6: 22 sc
- Round 7: (dec, 9 sc) x2 (20)
- Round 8: 20 sc
- Round 9: (dec, 8 sc) x2 (18)
- Round 10: (dec, 7 sc) x2 (16)
- Round 11: (dec, 6 sc) x2 (14)
- Round 12: 1 sc, 5 sl st, 1 sc, 6 hdc (13). (Leave the last stitch for after the heel).
The Heel:
- Ch 1, turn. Work 5 hdc in the opposite direction.
- Ch 1, turn. Work 4 hdc, then 2 sc (the first sc goes into the space between the hdc rows, the second sc goes into the last stitch of Round 12).
- Round 13: 1 sc, 5 sl st, 2 sc (the second sc goes into the space between the hdc of the previous row), 4 hdc, 2 sc (14)
- Round 14: 1 sc, 5 sc FLO, 8 sc (14)
- Rounds 15-18: 14 sc (4 rounds)
- Round 19: (5 sc, dec) x2 (10). (For the second foot, add an extra 2 sc at the end).
- Stuff the foot lightly.
- Round 20: sc 6 through both loops. Fasten off and weave in the ends.
2. The Body
Use Plush Milky yarn and a 2.5mm hook.
- Round 1: 6 sc in MR
- Round 2: 6 inc (12)
- Round 3: (1 sc, inc) x6 (18)
- Round 4: (2 sc, inc) x6 (24)
- Round 5: (3 sc, inc) x6 (30)
- Round 6: (4 sc, inc) x6 (36)
- Round 7 (Attaching the Feet): In this round, we attach the feet. When making increases for the body, work the increase into one loop of the body, but work each stitch of the increase separately through the foot.
4 sc, [First Foot: 1 sc, inc, 3 sc], [Second Foot: 2 sc, inc, 2 sc], then 3 sc, inc, (5 sc, inc) x3 (42) - Round 8: 20 sc, inc, (6 sc, inc) x3 (46)
- Round 9: 21 sc, inc, (7 sc, inc) x3 (50)
- Rounds 10-11: 50 sc (2 rounds)
- Round 12: 21 sc, dec, (7 sc, dec) x3 (46)
- Round 13: 46 sc
- Round 14: 20 sc, dec, (6 sc, dec) x3 (42)
- Round 15: dec, (1 sc, dec) x7, 19 sc (34)
- Round 16: 33 sc, inc (35)
- Round 17: (5 sc, dec) x5 (30)
- Round 18: (3 sc, dec) x6 (24)
- Rounds 19-20: 24 sc (2 rounds). Begin stuffing the body.
- Round 21: (2 sc, dec) x6 (18)
- Rounds 22-23: 18 sc (2 rounds)
- Round 24: (1 sc, dec) x6 (12). Fasten off, leaving a long tail for sewing the head.
3. The Wings (Make 2)
Use Plush Milky yarn.
- Round 1: 6 sc in MR
- Round 2: 6 inc (12)
- Round 3: 12 sc
- Round 4: (3 sc, inc) x3 (15)
- Round 5: 15 sc
- Round 6: (4 sc, inc) x3 (18)
- Round 7: (2 sc, inc) x6 (24)
- Rounds 8-9: 24 sc (2 rounds)
- Round 10: (10 sc, dec) x2 (22)
- Round 11: (3 sc, dec) x4, 2 sc (18)
- Round 12: (1 sc, dec) x6 (12)
- Round 13: 6 dec. Close the hole and weave in the ends. Do not stuff the wings.
4. The Tail
Use Plush Milky yarn.
- Round 1: 6 sc in MR
- Round 2: (2 inc, 1 sc) x2 (10)
- Round 3: 1 sc, 2 inc, 3 sc, 2 inc, 2 sc (14)
- Round 4: 14 sc
- Round 5: 4 sc, 6 inc, 4 sc (20)
- Round 6: 4 sc, (1 sc, inc) x6, 4 sc (26)
- Fasten off and weave in the end.
5. The Head
Use Plush Milky yarn.
- Round 1: 6 sc in MR
- Round 2: 6 inc (12)
- Round 3: (1 sc, inc) x6 (18)
- Round 4: (2 sc, inc) x6 (24)
- Round 5: (3 sc, inc) x6 (30)
- Round 6: (4 sc, inc) x6 (36)
- Round 7: (2 sc, inc) x3, 9 sc, (2 sc, inc) x3, 9 sc (42)
- Round 8: (3 sc, inc) x3, 9 sc, (3 sc, inc) x3, 9 sc (48)
- Rounds 9-12: 48 sc (4 rounds)
- Round 13: (6 sc, dec) x3, 24 sc (45)
- Rounds 14-15: 45 sc (2 rounds)
- Round 16: (6 sc, dec) x3, 21 sc (42)
- Round 17: 42 sc
- Round 18: (5 sc, dec) x6 (36)
- Round 19: 36 sc
- Round 20: (4 sc, dec) x6 (30)
- Round 21: 30 sc
- Round 22: (3 sc, dec) x6 (24)
- Round 23: (2 sc, dec) x6 (18). Stuff the head firmly.
- Round 24: (1 sc, dec) x6 (12). Continue stuffing until the end.
- Round 25: 6 dec. Close the hole and weave in the ends.
6. Face Details
Beak (Mustard Yarn):
- Ch 6. Starting from the 2nd chain from the hook: inc, 3 sc, 2 inc in one stitch, 3 sc, inc (working along the other side of the chain) (14).
- Round 3: 14 sc. Fasten off, leaving a long tail for sewing.
Cheeks (Pink Yarn – Make 2):
- Round 1: 6 sc in MR
- Round 2: (2 inc, 1 sc) x2 (10). Fasten off, leaving a long tail for sewing.
Tuft (Milky Cotton Yarn):
- Ch 5, anchoring the first loop to the top of the head. Work 4 sc back down into the back loop only.
- Without cutting the yarn, anchor a second chain of 6 to the head and work 5 sc back down. Fasten off and hide the end.
Assembly
The Face
Identify the most convex part of the head to serve as the face. Use pins to position the details before sewing.
- Beak: Sew the beak into the 9th round from the Magic Ring.
- Cheeks: Count 3 sc to the left and right of the beak. Place the cheeks across rounds 7 and 8.
- Eyes: Using black thread, embroider two small closed eyes (each 3 sc wide) as shown in the design.
Head and Body
Sew the head to the body with a slight forward tilt. On the back, leave a 1-row gap from the Magic Ring; on the front, leave a 2-row gap.
Tail and Wings
- Tail: Count 5 rows up from the bottom MR of the body for the bottom edge of the tail. The top should reach the 10th row. Stuff the tail slightly with fiberfill before sewing.
- Wings: Position the wings on the sides so the top edge is 2 rows below the head.
To sew: Insert the needle from the back of the body between the wings, bring it out at the attachment point (4 rows below the head), pass through the wing (2 rows from the top), exit the other side, pass through the wing again, and finish at the back of the body.
Your baby duckling is now complete!
“`