Crochet a Tiny Holiday Friend: Free “Yolochka Igolochka”
Hello, dear maker, and welcome to a project bursting with holiday charm! Are you ready to add a sprinkle of handmade magic to your season? Today, we’re diving into a delightful free pattern for the most precious little Christmas tree you ever did see—the “Yolochka Igolochka” (that’s “Little Needle Tree” for us!).
This adorable plushie is part of the charming “Pucheglaziki” (or “Googly-Eyes”) series, and it’s designed to capture all the whimsy and wonder of the holidays in a tiny, huggable form. With its big, expressive eyes, fluffy “branches,” and sweet smile, this mini tree is sure to steal your heart. It’s the perfect project for using up scraps of plush yarn and creating something truly special.
Imagine this little guy perched on your mantel, tucked into a loved one’s stocking as a surprise gift, or even hanging from your tree as a unique ornament. At just 5-6 cm tall (without its little hat!), it’s a quick, satisfying make that delivers a huge dose of cuteness. This pattern is fantastic for crocheters looking for a fast, fun project that’s great for gifting or keeping your own home extra cozy.
This masterclass is the original work of Agniya Roginskaya of “Vязаные игрушки Milota tois.” It’s shared with so much love for you to enjoy personally. Please remember to respect the designer’s work by not copying, distributing, teaching, or translating it as your own. Feel free, however, to share pictures of the lovely toys you create!
So, grab your softest green yarn, find your comfy spot, and let’s grow a forest of tiny, friendly trees together. This pattern is written with clear, simple steps, perfect for makers who have mastered the basic stitches and are ready to add a little personality to their work. Let’s get started!
Materials & Tools You’ll Need
- Yarn: Plush yarn in green, white, and brown (approximately 100g/120m weight). The designer used Wolans Banny Baby. For a festive “decorated” look, Himalaya Dolphin Festival in color 60 is also recommended!
- Eyes: Adhesive safety eyes, 8 mm or 10 mm.
- Filling: Polyester fiberfill (syntheshaw).
- Crochet Hook: 3 mm to 3.5 mm (a 3.25 mm hook was used here).
- Notions: Scissors, a thick-eyed needle for closing holes, and a long doll-making needle.
- For Assembly: Strong thread for sculpting the face (e.g., polyester/Lavsan), thin black embroidery thread for the smile, and a clear-drying glue (like “Moment Gel”) for securing the eyes and optional eyelashes.
- Optional: A tiny bit of faux fur or yarn for eyelashes, and any mini ornaments you’d like to add!
Crochet Abbreviations & Key
Here’s your guide to the pattern language. Remember, blue text in the original means to use white yarn, and brown text means to use brown yarn.
- сбн (sc) = Single Crochet
- псн (hdc) = Half Double Crochet
- ссн (dc) = Double Crochet
- ПШ = Puff Stitch (4 hdc with one top, all in the same stitch)
- вп (ch) = Chain Stitch
- КА (mr) = Magic Ring
- ЗПП (BLO) = Back Loop Only
- пр (inc) = Increase (2 sc in one stitch)
- уб (dec) = Decrease (sc two stitches together)
- ( )*X = Repeat instructions inside parentheses X times.
A Quick Note: The designer uses a method of single crochet that creates a lovely, dense fabric similar to “half-crosses.” Work at a comfortable tension to keep your stuffing tucked inside!
Finished Size
Using the suggested materials and hook, your finished Christmas tree plushie will be approximately 5-6 cm (2-2.5 inches) tall, not including any adorable hat you might add!
Step-by-Step Crochet Instructions
We’ll start from the tree stump and work our way up to the fluffy top!
Part 1: The Tree Body (Bottom to Top)
We begin with the brown stump.
- 6 sc into a Magic Ring (6).
- BLO: 6 sc (6).
- 6 sc (6).
- Switch to your green yarn now. Cut the brown yarn and secure the end.
Continuing with green:
4. FLO (Front Loops Only): 6 inc (12). (This creates a nice ridge for the base of the tree.)
5. (1 sc, inc) * 6 times (18).
6. (3 sc, inc) * 4 times, 1 sc, inc (23).
7. BLO: 23 sc (23).
8. (2 sc, dec) * 5 times, 3 sc (18).
9. Rounds 9-10: 18 sc (2 rounds).
11. (1 sc, dec) * 2 times, Puff Stitch, dec, Puff Stitch, dec, (1 sc, dec) * 2 times (12). (Those Puff Stitches will become the cute white “patches” for the eyes!)
12. Rounds 12-13: 12 sc (2 rounds).
* Now, gently stuff the body firmly. You can follow the optional face-sculpting (утяжка) diagram on the pattern page if you wish to define the cheeks.
13. 6 dec (6). Fasten off, leaving a tail for closing.
Use your needle to close the remaining hole securely.
Assembly & Finishing: Giving Your Tree Personality
This is the fun part where your tree comes to life!
- Attach the Eyes: Glue the safety eyes securely onto the two white Puff Stitches you made in Round 11.
- Close the Gap: If there’s a small hole between the Puff Stitches (where you decreased), carefully thread a thin yarn tail through the surrounding stitches and pull gently to close it.
- Add a Hat & Lashes (Optional): If you’ve made a tiny hat, sew or glue it on top. You can also glue on small snippets of faux fur or yarn as eyelashes for extra charm.
- Embroider the Smile: Using thin black thread, stitch a sweet, simple smile between and slightly below the eyes.
- Decorate!: Now for the best part—deck your tree! You can glue on tiny beads, sequins, or crochet mini stars and balls. Let your creativity shine!
Tips for a Perfect Mini Tree
- Yarn Choice is Key: Plush yarn is forgiving and gives that wonderfully soft, festive look. If you use the recommended “festival” yarn with speckles, it will look like your tree is already decorated with tiny lights!
- Stuffing Matters: Because this tree is so small, use small pinches of stuffing and a pencil or chopstick to push it firmly into all the nooks, especially the very top. A well-stuffed tree holds its shape beautifully.
- Facing the Front: The side with the two white Puff Stitches is the front of your tree. Make sure all your decorative elements are centered on this side.
- Gift Idea: These make absolutely precious gift toppers, stocking stuffers, or table favor place cards. Make a whole forest in different shades of green!
Congratulations! Your Yolochka Igolochka is ready to spread holiday cheer!
Thank you so much for following along with this pattern. The designer, Agniya Roginskaya, would be absolutely delighted to see your finished creations. If you share your work on social media, you can tag the designer (find them as “Вязаные игрушки Milota tois” or “Агния Рогинская”).
Wishing you a cozy, creative holiday season filled with happy stitches and adorable makes
angel-luchik-1767258501.pdf
PDF 300.67KB
do the same instruction
Crochet a Twinkling Guardian: Free “Angel Luchik” Amigurumi Pattern
Meta Description: Spread holiday cheer with this free Angel Luchik crochet pattern! Create a sweet, plush amigurumi angel with fluffy hair and delicate wings. A perfect quick gift or ornament.
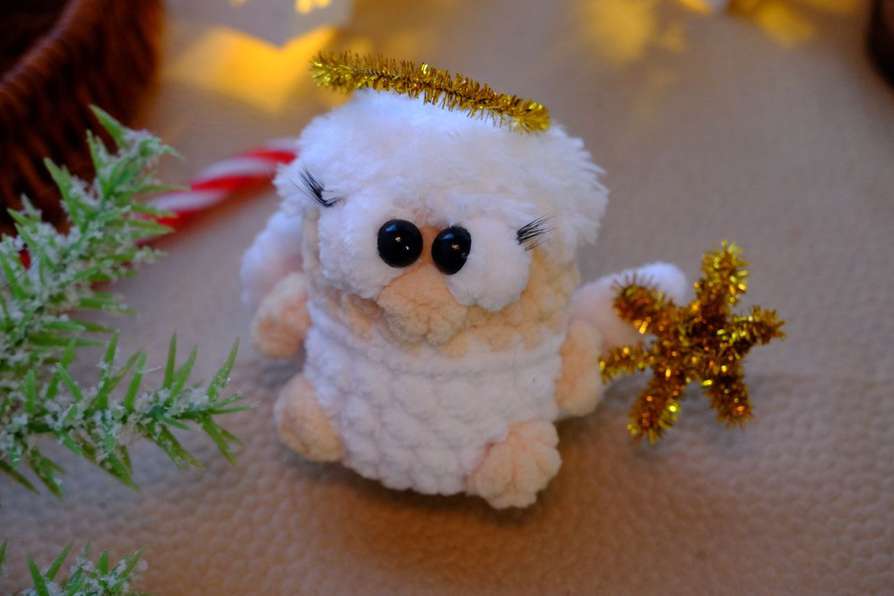
Hello, wonderful maker! Is there anything more heartwarming than adding a little handmade guardian to your holiday décor? Today, we’re diving into a pattern that’s sure to bring a smile—the adorable “Angel Luchik” (or “Ray of Light Angel”).
This charming little angel is the newest member of the beloved “Pucheglaziki” (“Googly-Eyes”) family, bringing a dose of celestial sweetness to the New Year series. With its soft, fluffy white hair, bright eyes, and dainty, textured wings, this tiny guardian is a symbol of comfort and joy, perfect for the season.
Imagine this angel watching over your Christmas tree, peeking out from a gift box as a special surprise, or sitting on a winter windowsill. It’s a small project with a big heart, ideal for using up precious scraps of plush and textured yarn. Whether you’re making a gift for someone who needs a little extra light or creating a keepsake for your own home, this pattern is a quick and rewarding make.
This masterclass is the original, creative work of Agniya Roginskaya of “Vязаные игрушки Milota tois,” shared generously for your personal crafting joy. As you create, please honor the designer’s request by not copying, redistributing, or teaching this pattern as your own. Feel free, however, to share photos of the beautiful angels you bring to life!
So, gather your softest white, peach, and colorful yarns, settle into your favorite cozy corner, and let’s crochet a little beacon of happiness together. This pattern uses basic stitches and clever techniques to create personality, making it a wonderful next step for amigurumi enthusiasts. Ready to make some magic? Let’s begin!
Materials & Tools You’ll Need
- Yarn:
- Plush Yarn: In black, white, and orange (approx. 100g/120m weight). The designer used Wolans Banny Baby. (Note: The pattern mentions this is “for a gnome,” likely indicating these colors are for a different project in the series. For your angel, focus on the colors listed in the abbreviations.)
- Main Colors: Follow the stitch guide: White textured/fur yarn (for the hair), Peach/”flesh” colored yarn (for the face), and White plush yarn (for the body and wings).
- Fur Yarn: A small amount of white fur or “eyelash” yarn for the hairstyle (e.g., “Vyaz’ mekhovaya” or Himalaya Koala).
- Eyes: Adhesive safety eyes, 8 mm or 10 mm.
- Filling: Polyester fiberfill.
- Crochet Hook: 3 mm to 3.5 mm (a 3.25 mm hook was used).
- Notions: Scissors, a thick-eyed or tapestry needle for closing holes.
- For Assembly: Strong glue for eyes (like “Moment Gel”), optional faux eyelashes, and gold chenille (pipe cleaner) wire for making a halo.
- Embroidery Needle: For securing any loose ends.
Crochet Abbreviations & Color Key
Here’s your guide to the pattern language. The colors in the instructions are crucial!
- сбн (sc) = Single Crochet
- псн (hdc) = Half Double Crochet
- ссн (dc) = Double Crochet
- сс2н (tr) = Treble Crochet
- ПШ = Puff Stitch (4 hdc all joined at the top, worked in one stitch)
- вп (ch) = Chain Stitch
- КА (mr) = Magic Ring
- пр (inc) = Increase (2 sc in one stitch)
- уб (dec) = Decrease (sc two stitches together)
- ЗПП (BLO) = Back Loop Only
- Color Guide: Instructions in blue = use white textured/fur yarn. Instructions in yellow = use peach/”flesh” yarn.
Step-by-Step Crochet Instructions
We’ll build our angel from the feet up to the fluffy hair!
Part 1: The Body & Face
We start with what the pattern calls “dark green,” but follow the color key from the abbreviations for peach and white.
- 6 sc into a Magic Ring (6).
- 6 inc (12).
- (1 sc, inc) * 6 times (18).
- 6 sc, Puff Stitch, 5 sc, Puff Stitch, 5 sc (18). (These Puff Stitches will be the eye bases!)
- 18 sc (18).
- Making Arms: 5 sc, Arm: (ch 4, starting from the 2nd chain from hook: 3 dc), 9 sc, Arm: (ch 4, 3 dc as before), 4 sc (18).
- 18 dc (18). Do not cut the white yarn. Switch to your peach/flesh colored yarn.
- BLO: 18 sc (18).
- 9 sc, Puff Stitch, 8 sc (18).
- 8 sc, Puff Stitch (with white yarn), 1 sc, Puff Stitch (with white yarn), 7 sc (18).
- Now, you can cut and secure both the white and peach yarns.
Part 2: The Fluffy Hair
Switch to your white textured or fur yarn.
11. 18 sc (18).
12. (1 sc, dec) * 6 times (12).
* Now, firmly stuff the body.
13. 6 dec. Fasten off, leaving a tail. Use your needle to close the hole securely.
Part 3: The Wings (Make 2, directions differ)
- Right Wing (using white plush yarn):
- Attach yarn between Rounds 3 and 4 on the RIGHT side of the angel (with its back and side facing you). Work from the bottom up.
- In one stitch: (ch, 1 sc, hdc).
- In the next stitch: (2 dc, 1 tr, ch 3. Starting from the 2nd chain from hook: 2 dc, ch 2, sl st into the base of the wing). Fasten off.
- Left Wing (using white plush yarn):
- Attach yarn between Rounds 4 and 5 on the LEFT side of the angel (with its back and side facing you). Work from the top down.
- In one stitch: (ch 6, starting from the 2nd chain from hook: 2 dc, 1 tr, 2 dc).
- In the next stitch: (1 hdc, sc, dc). Fasten off.
Assembly & Finishing: Bring Your Angel to Life
- Attach the Eyes: Glue the safety eyes securely onto the two white Puff Stitches you made in Round 4.
- Close the Gap: If there is a small hole between the Puff Stitches, gently thread a yarn tail through the surrounding stitches and pull to close it neatly.
- Add Lashes (Optional): For extra sweetness, glue tiny faux eyelashes above the eyes.
- Create the Halo: Twist the gold chenille wire into a small circle and attach it to the back of the angel’s head, nestled into the fluffy white hair.
Tips for a Heavenly Make
- Working with Fur Yarn: The textured hair yarn can be tricky to see stitches. Go slowly, feel for the loops with your hook, and don’t worry about perfection—the fluffiness hides a multitude of sins and looks adorable!
- Wing Placement: The different attachment points (between rounds 3&4 vs. 4&5) help give the wings a natural, offset appearance. Use the photo for guidance on positioning.
- Stuffing: Use small pinches of stuffing and a pencil or chopstick to get it firmly into the narrow neck and head area so your angel holds its shape.
- Halo Hack: If you don’t have chenille wire, you can crochet a tiny golden chain and stitch it into a circle, or use a small gold-plated ring from the jewelry aisle.
Congratulations! Your Angel Luchik is complete, ready to watch over your holiday with kindness and light!