Adorable Crochet Sheep Amigurumi Pattern: Free Step-by-Step Tutorial
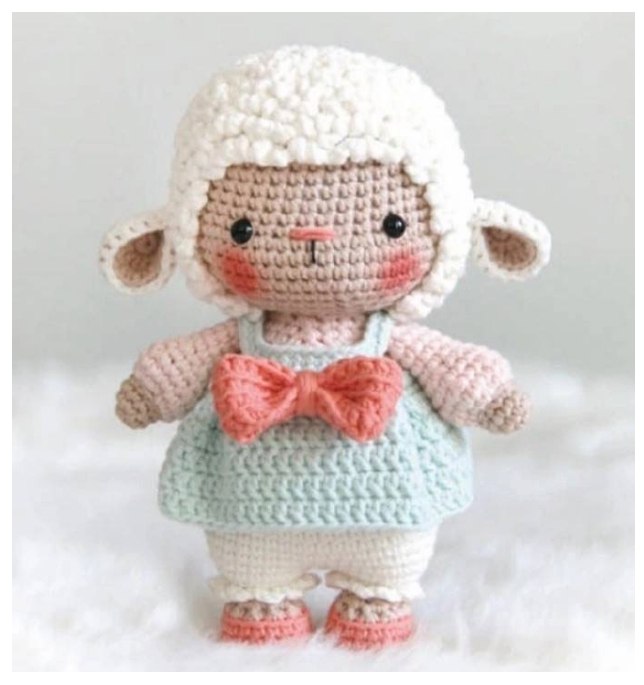
Looking for a sweet and cuddly project to add to your crochet collection? This adorable little sheep is the perfect companion for beginners and experienced makers alike. With its fluffy wool, tiny dress, and charming expression, this amigurumi sheep makes a wonderful gift for a baby shower, a birthday, or a cozy addition to a nursery.
In this tutorial, we will walk you through every stitch needed to create this little lamb. We have designed the instructions to be clear and easy to follow, ensuring that your finished plushie looks professional and polished. Let’s grab our hooks and get started!
Materials & Abbreviations
To make this sheep, you will need the following materials:
- Yarn: Medium weight (4) acrylic or cotton yarn in the following colors:
- White (for the wool, tail, and ear outlines)
- Light Beige (for the face, ears, and arms)
- Coral (for the feet and bow)
- Light Pink (for the body and arm accents)
- Light Blue (for the skirt)
- Crochet Hook: 2.5mm or 3.0mm (depending on your tension)
- Stuffing: Polyester fiberfill
- Eyes: 6mm or 8mm safety eyes
- Other Tools: Yarn needle, scissors, and stitch markers
Abbreviations (US Terms)
- MR: Magic Ring
- sc: Single Crochet
- inc: Increase (two sc in one stitch)
- dec: Decrease (sc two stitches together)
- ch: Chain
- sl st: Slip Stitch
- hdc: Half Double Crochet
- dc: Double Crochet
- BLO: Back Loop Only
- FLO: Front Loop Only
- [ ]: Total stitch count at the end of the round
Step-by-Step Instructions
The Legs and Body
The legs and body are worked as one continuous piece. We start with the first leg and then join it to the second leg to create the torso.
First Leg (Left): Start with Coral yarn.
- Round 1: 6 sc in MR [6]
- Round 2: 6 inc [12]
- Round 3: (1 sc, inc) x 6 [18]
- Round 4: BLO 18 sc [18]
- Rounds 5-6: 18 sc [18]
- Round 7: Change to Light Beige. BLO 5 sc, 4 dec, 5 sc [14]
- Round 8: 5 sc, 2 dec, 5 sc [12]
- Round 9: Change to White. 5 sc, 1 dec, 5 sc [11]
- Round 10: BLO (inc, 1 sc) x 2, 3 inc, (1 sc, inc) x 2 [18]
- Round 11: 4 sc, inc, 8 sc, inc. Leave the remaining 4 stitches unworked for now [16].
Fasten off and weave in the ends. Now, we add a cute lace trim. Using White yarn, attach to the FLO of Round 10. Work (ch 3, sl st into the first chain) and repeat across the round to create a scalloped edge. Fasten off.
Second Leg (Right): Repeat Rounds 1 through 10 as you did for the first leg. For Round 11, work: 4 sc, inc, 8 sc, inc, 4 sc, and then 7 sc to connect toward the first leg [27]. Add the lace trim using White yarn as described above.
The Body: Now we join the legs and work upward to form the body.
- Round 12: Continue working into the 4 remaining stitches of the first leg. Work 33 sc, inc, 6 sc [41].
- Tip: Use a matching color of yarn to sew up any gaps between the legs at the join.
- Stuff the legs firmly.
- Round 13: 6 sc, inc, 34 sc [42]
- Round 14: 36 sc, 2 inc, 4 sc [44]
- Round 15: 4 sc, 2 inc, 38 sc [46]
- Rounds 16-18: 46 sc [46]
- Round 19: 1 dec, 44 sc [45]
- Round 20: 10 sc, dec, 22 sc, dec, 9 sc [43]
- Round 21: 1 dec, 41 sc [42]
- Round 22: 42 sc [42]
- Round 23: 1 dec, 40 sc [41]
- Round 24: 1 dec, 13 sc, dec, 9 sc, dec, 13 sc [38]
- Round 25: 1 dec, 36 sc [37]
- Round 26: Change to Light Pink. BLO 37 sc [37]
- Round 27: 37 sc [37]
- Round 28: 18 sc, dec, 17 sc [36]
- Round 29: (8 sc, dec) x 3, 6 sc [33]
- Round 30: 17 sc, dec, 14 sc [32]
- Round 31: (dec, 6 sc) x 4 [28]
- Round 32: (dec, 5 sc) x 4 [24]
- Round 33: (dec, 2 sc) x 6 [18]
Fasten off and stuff the body firmly.
The Skirt
Using Light Blue yarn:
- Chain 44 and join into a ring with a sl st.
- Round 1: ch 1, 44 sc, sl st to join [44].
- Round 2: ch 1, 4 sc, ch 12, skip 13 sts, 10 sc, ch 12, skip 13 sts, 4 sc, sl st to join [42].
- Round 3: ch 1, 42 sc, sl st to join [42].
- Round 4: ch 1, working in FLO: 1 sc, 2 inc, 12 sc, ch 2, 12 sc, ch 2, 12 sc, 2 inc, 1 sc, sl st to join [50].
- Round 5: ch 3 (counts as 1 dc), 1 dc in next st, (2 dc inc) x 2, 5 dc, 1 dc inc, 6 dc, (3 dc inc) x 2 in the ch-2 space from the previous row, 12 dc, (3 dc inc) x 2 in the ch-2 space, 6 dc, 1 dc inc, 5 dc, (2 dc inc) x 2, 3 dc, sl st to join [64].
- Round 6: ch 3, 4 dc, 1 dc inc, 50 dc, 1 dc inc, 6 dc, sl st to join [66].
- Rounds 7-9: ch 3, 64 dc, sl st to join [66].
Fasten off. Pinch and shape the skirt to create natural folds.
The Bow
Using Coral yarn:
- Chain 27.
- Row 1: ch 2, 1 hdc in second ch from hook, 25 hdc, turn. [27]
- Row 2: BLO ch 2, 1 hdc in second ch from hook, 11 hdc, 1 hdc inc, 13 hdc, turn [28].
- Rows 3-4: BLO ch 2, 1 hdc in second ch from hook, 26 hdc, turn [28].
Fasten off. Pinch the center of the rectangle to create a bow shape and wrap yarn around the center 10 times to secure it. Sew it to the center of the skirt.
The Head
Using Light Beige yarn:
- Round 1: 6 sc in MR [6]
- Round 2: 6 inc [12]
- Round 3: (1 sc, inc) x 6 [18]
- Round 4: (2 sc, inc) x 6 [24]
- Round 5: (3 sc, inc) x 6 [30]
- Round 6: (4 sc, inc) x 6 [36]
- Round 7: (5 sc, inc) x 6 [42]
- Round 8: (13 sc, inc) x 2, 14 sc [44]
- Rounds 9-10: 44 sc [44]
- Round 11: 15 sc, 11 sc, 18 sc [44]
- Round 12: 14 sc, 13 sc, 17 sc [44]
- Rounds 13-15: 14 sc, 14 sc, 16 sc [44]
- Round 16: 14 sc, 1 sc, (inc, 1 sc) x 6, 1 inc, 16 sc [51]
- Round 17: 14 sc, 1 sc, dec, 16 sc, dec, 1 sc, 15 sc [49]
- Round 18: 14 sc, 20 sc, 15 sc [49]
- Round 19: dec, 12 sc, 1 sc, dec, 14 sc, dec, 1 sc, 15 sc [46]
- Round 20: dec, 9 sc, dec, 1 sc, 9 sc, dec, 6 sc, 3 sc, dec, 10 sc [42]
- Round 21: dec, 5 sc, dec, 3 sc, 2 sc, (dec, 5 sc) x 2, (dec, 5 sc) x 2 [36]
- Round 22: dec, 4 sc, dec, 3 sc, 1 sc, dec, 4 sc, dec, 3 sc, 1 sc, (dec, 4 sc) x 2 [30]
- Round 23: 2 dec, 1 sc, 2 dec, 1 sc, (2 dec, 1 sc) x 2, 1 sc, (2 dec, 1 sc) x 2 [18]
Fasten off, leaving a long tail for sewing. Stuff the head firmly.
Adding the Wool
Using White yarn, we will create the fluffy wool using surface crochet. Attach the yarn to the head. Work (ch 4, sl st back into the first chain) to create a loop. Repeat this process around the head, following the rows of the head pattern up to Round 23. Ensure you connect each row of loops to the next to create a seamless, fluffy texture.
Ears, Arms, and Tail
Ears (Make 2): Create one inner ear in Light Beige and one outer ear in White.
- Inner Ear (Beige): Round 1: 6 sc in MR. Round 2: inc, (2 hdc inc) x 1, (2 hdc inc) x 2, (2 hdc inc) x 1, inc [12]. Round 3: 1 sc, inc, 1 hdc, 1 2-hdc inc, (1 hdc, 1 2-hdc inc) x 2, 1 hdc, 1 2-hdc inc, 1 sc, inc [18].
- Outer Ear (White): Repeat as above.
- Finishing the Ears: Place the beige ear on top of the white ear. Join them by working (ch 1, sc) through both layers. For the beige part, work in BLO; for the white part, work through both loops. Work 18 sl st around the edge [18].
Arms (Make 2): Using Light Beige yarn.
- Round 1: 5 sc in MR [5]
- Round 2: 5 inc [10]
- Rounds 3-4: 10 sc [10]
- Round 5: Change to Light Pink. BLO 10 inc [20]
- Round 6: 20 sc [20]
- Round 7: (dec, 2 sc) x 5 [15]
- Round 8: 15 sc [15]
- Round 9: (dec, 1 sc) x 5 [10]
- Rounds 10-13: 10 sc [10]
- Round 14: (dec, 3 sc) x 2 [8]
Fasten off, stuff lightly, and flatten the end before sewing to the body.
Tail: Using White yarn.
- Round 1: 5 sc in MR [5]
- Round 2: 5 inc [10]
- Round 3: (3 sc, dec) x 2 [8]
- Round 4: (2 sc, dec) x 2 [6]
Finishing
Now it’s time to assemble your little sheep!
- Dress the Lamb: Slide the light blue skirt onto the body.
- Head and Body: Sew the head securely to the body.
- Facial Features: Insert safety eyes and embroider a small pink nose and mouth. You can add a bit of pink blush to the cheeks for extra cuteness.
- Attachments: Sew the ears to the top of the head and the arms to the sides of the body. Attach the tail to the center back of the torso.
- Final Touch: Ensure all seams are tight and the stuffing is evenly distributed.
Tips for Success
- Tension is Key: Since this is amigurumi, keep your stitches tight so the stuffing doesn’t peek through. If you see gaps, try a smaller hook size.
- Stitch Markers: Use a stitch marker at the beginning of every round. It is very easy to lose your place when working in continuous spirals.
- Stuffing: Stuff the body and head firmly, but not so tight that the shape becomes distorted. Use a chopstick or a crochet hook to push stuffing into the narrow parts of the legs.
- Perfecting the Wool: When doing the surface crochet loops, don’t pull the yarn too tight, or the head will pucker. Keep the loops loose and bouncy for that “cloud” look!