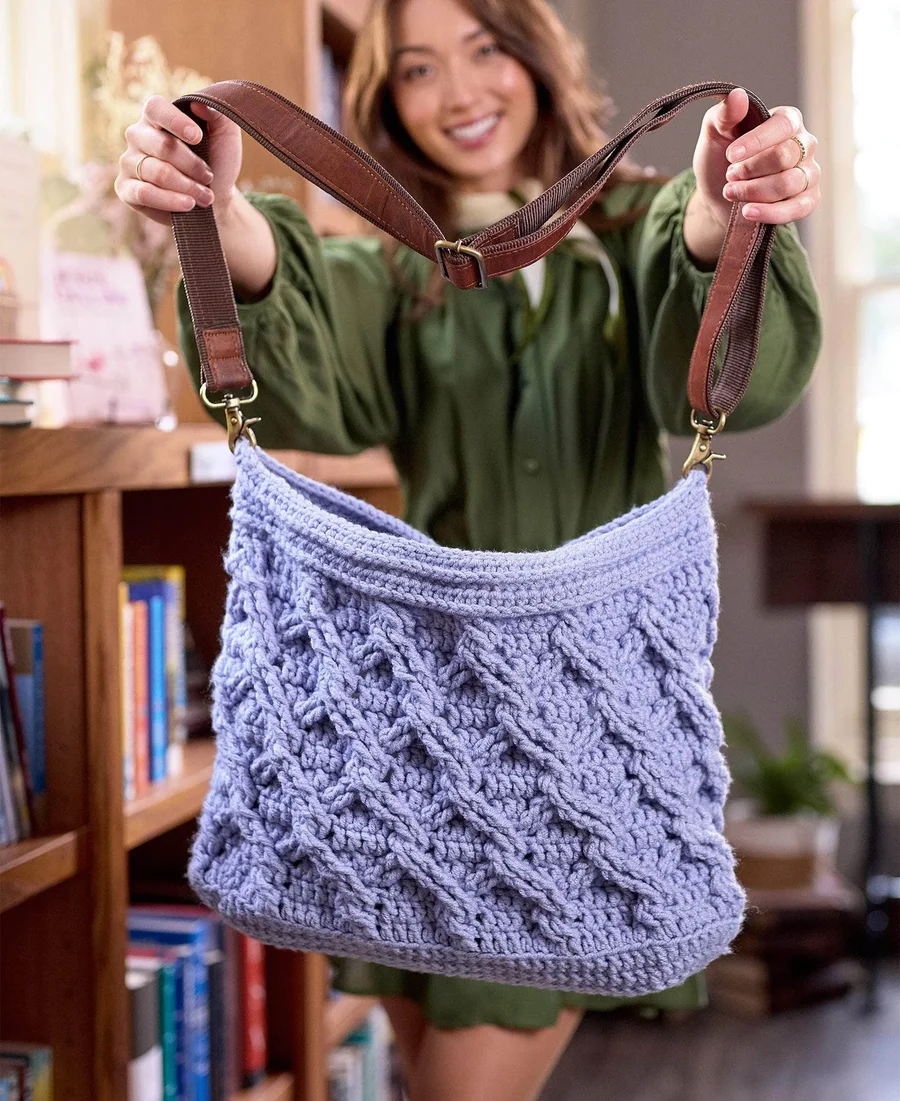
Crochet Twisted Diamonds Tote Bag Pattern: A Detailed Tutorial
If you are looking for a project that combines elegance with everyday functionality, this Twisted Diamonds Tote is the perfect choice. This bag features a stunning, textured cable design that gives it a high-end, boutique look, while the chunky yarn ensures it is sturdy enough to carry your essentials—whether that is a stack of library books, your favorite tablet, or your daily errands gear.
While the “twisted diamond” effect looks complex, it is actually a series of repeated post stitches that create a beautiful architectural lattice. This tutorial is designed to walk you through the process step-by-step, making the sophisticated cable work accessible to any crocheter ready to level up their skills. Because we are working in joined rounds from the bottom up, you get a seamless, professional finish.
Materials & Abbreviations
To get started, gather your materials. Using a chunky weight yarn is key here; it allows the cable texture to pop and ensures the bag holds its shape without needing a liner.
Materials Needed
- Yarn: Approximately 4 balls of chunky acrylic yarn (approx. 117 yards per 100g ball). A soft blue or neutral tone works beautifully for this design.
- Crochet Hook: US Size K-10.5 (6.5 mm) or the size needed to obtain your gauge.
- Notions: Tapestry needle for weaving in ends, one locking stitch marker, and an adjustable 60-inch leather shoulder strap with clasps.
Gauge
12 stitches x 6 rounds = 4 inches in the cable pattern. Checking your gauge is highly recommended to ensure your tote ends up the correct size.
Abbreviations (US Terms)
- beg: begin(ning)
- blo: back loop only
- ch: chain(s)
- dc: double crochet
- fptr: front post treble crochet
- hdc: half double crochet
- patt: pattern
- pm: place marker
- rem: remain(ing)
- rep: repeat(ing)
- rnd: round(s)
- RS: right side
- sk: skip
- sl st: slip stitch(es)
- st: stitch(es)
- tr: treble crochet
- WS: wrong side
Step-by-Step Instructions
This tote is worked from the base upward in joined rounds. Unless otherwise noted, join every round with a slip stitch to the first stitch of the round.
Part 1: The Base
The base creates a sturdy oval foundation for your bag.
Chain 29.
Round 1: Working in the back bumps of the foundation chain, work 2 sc in the second chain from the hook, sc in each of the next 28 chains, and work 4 sc in the last chain. Rotate your work to begin working on the opposite side of the foundation chain. Sc in each of the next 28 chains, 2 sc in the last chain. Join to the beginning sc with a sl st. (64 sc)
Round 2: Ch 3 (counts as dc), dc in the same sc, 2 dc in the next sc, dc in the next 28 sc, 2 dc in each of the next 4 sc, dc in the next 28 sc, 2 dc in each of the last 2 sc. Join to the beginning dc. (72 dc)
Round 3: Ch 3, [2 dc in next dc, dc in next dc] twice, dc in next 27 dc, [2 dc in next dc, dc in next dc] 4 times, dc in next 28 dc, [dc in next dc, 2 dc in next dc] twice. Join to the beginning dc. (80 dc)
Round 4: Ch 3, dc in next dc, [2 dc in next dc, dc in next 2 dc] twice, dc in next 27 dc, [2 dc in next dc, dc in next 2 dc] 4 times, dc in next 27 dc, [dc in next 2 dc, 2 dc in next dc] twice. Join to the beginning dc. (88 dc)
Round 5: Ch 3, dc in 2 dc, [2 dc in next dc, dc in next 3 dc] twice, dc in next 26 dc, [2 dc in next dc, dc in next 3 dc] 4 times, dc in next 27 dc, [dc in next 3 dc, 2 dc in next dc] twice. Join to the beginning dc. (96 dc)
Round 6: Ch 3, working in back loops only, dc in each dc around. Join to the beginning dc. (96 blo dc)
Part 2: The Twisted Diamonds Cable Pattern
This is the main body of the bag. The pattern is a multiple of 8 stitches. Before starting the body, familiarize yourself with the 9-round stitch guide below.
The Cable Stitch Guide
- Rnd 1 (RS): Ch 3, dc in each dc around. Join to beg dc.
- Rnds 2-3: Ch 3, *sk 2 sts, fptr in next 2 sts, working in front of sts just worked, fptr in 2 skipped sts, dc in next 4 sts; rep from * around, omitting last dc on last rep. Join to beg dc.
- Rnd 4: Ch 3, dc in each st around. Join to beg dc. (Place marker in the sl st join to mark the start of the round).
- Rnd 5: *Sl st in next 4 sts on working round, fptr in next 2 post sts 2 rounds below (skipping 2 dc on working round), sk 4 dc from 2 rounds below, and fptr in next 2 post sts (skipping 2 more dc on working round); rep from * around. Join to marked st with a sl st, replace marker.
- Rnd 6: Sl st in next st, ch 3, dc in next 3 sl sts, *sk next 2 post sts, fptr in next 2 post sts, working in front of sts just worked, fptr in next 2 skipped post sts, dc in next 4 sts; rep from * around. Join to beg dc, replace marker.
- Rnd 7: Ch 3, dc in next 3 dc, *sk next 2 post sts, fptr in next 2 post sts, working in front of sts just worked, fptr in next 2 skipped post sts, dc in next 4 dc; rep from * around. Join to beg dc, replace marker.
- Rnd 8: Ch 3, dc in each st around. Join to beg dc, replace marker.
- Rnd 9: Fptr in next 2 post sts from 2 rounds below and 2 sts to the right, skipping first 2 sts on working round, *sk 4 dc from 2 rounds below and fptr in next 2 post sts, skipping next 2 sts on working round, sl st in next 4 sts, fptr in next 2 post sts from 2 rounds below, skipping next 2 sts on working round; rep from * around. Join with sl st in marked st. Remove marker.
Assembling the Body
Now, apply the stitch guide to your bag:
- Work Rounds 1-9 of the Twisted Diamonds Cable Pattern.
- Repeat Rounds 2-9 once more.
- Repeat Rounds 2-3 one final time.
Part 3: The Top Border
The border provides a clean finish and creates the anchor points for your strap.
Round 1 (RS): Ch 2 (does not count as a stitch), hdc in each st around. Join to beg hdc, turn. (96 hdc)
Round 2 (WS): Ch 2, hdc in the third loop of each hdc around. Join to beg hdc, turn.
Round 3 (RS): Ch 2, blo hdc in next 46 hdc, ch 2, sk 2 hdc, blo hdc in next 46 hdc, ch 2, sk last 2 hdc. Join to beg hdc, turn.
Round 4 (WS): Ch 2, hdc in same st, 2 hdc in next ch-2 sp, hdc in third loop of each hdc to next ch-2 sp, 2 hdc in next ch-2 sp, hdc in third loop of each remaining hdc around. Join to beg hdc. Fasten off.
Finishing
To complete your tote, start by weaving in all loose ends using your tapestry needle, ensuring the knots are secure so the bag doesn’t lose its shape over time.
Finally, attach your adjustable leather shoulder strap. Attach the clasps or sew the strap ends into the ch-2 spaces created during Round 3 of the Top Border. Once attached, your Twilight Lattice Tote is ready for use!
Tips for Success
Mastering the Post Stitches
The “twisted” look comes from Front Post Treble Crochet (fptr). If you are new to post stitches, remember that instead of inserting your hook into the top “V” of the stitch, you are inserting it around the vertical post of the stitch from the row below. When the pattern asks you to work “2 rounds below,” simply skip the most recent row and insert your hook into the post of the row beneath that.
Managing Tension
Cable work can pull the fabric inward, making the bag tighter than a standard dc project. Keep your tension relaxed, especially during the fptr rounds. If you find the bag is becoming too stiff, try using a hook a half-size larger.
Using a Stitch Marker
Because this bag is worked in the round and uses complex cable repetitions, it is very easy to lose your place. Always use a locking stitch marker at the beginning of your rounds. This ensures your diamonds align perfectly as you move upward.