Adorable Seasonal Crochet Sheep Pattern: A Complete Step-by-Step Tutorial
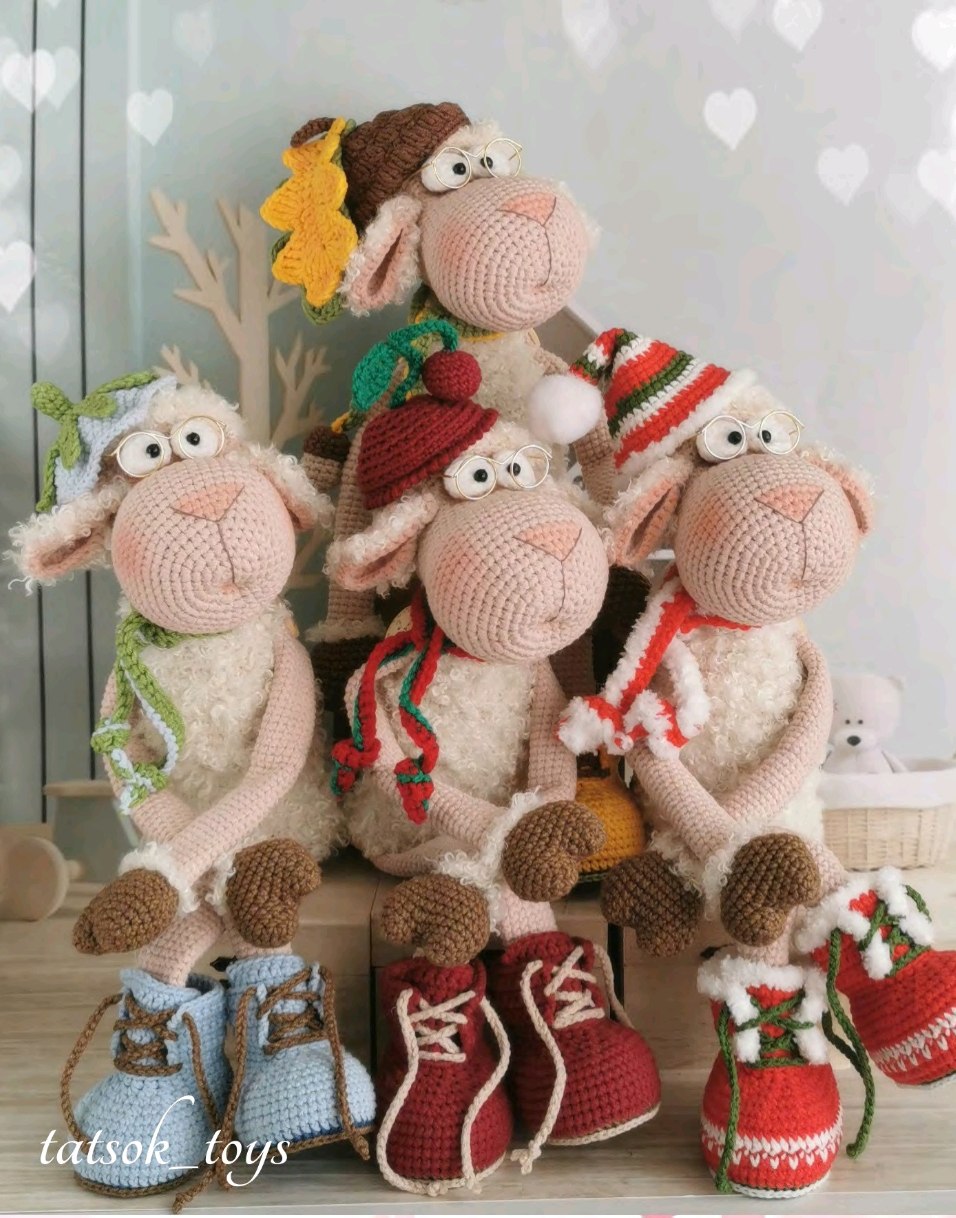
Looking for a cozy and versatile project? This adorable crochet sheep is the perfect companion for any season! With a whimsical design and a unique technique to create a fluffy, woolly texture without using excessive amounts of expensive specialty yarn, this amigurumi project is a delight for crafters of all skill levels. The best part? We will show you how to create four different outfits so your sheep can celebrate Spring, Summer, Autumn, and Winter!
Materials & Abbreviations
Materials Needed
- Main Body Yarn: Fingering weight cotton yarn (e.g., Alize Cotton Gold or Yarn Art Jeans) in a light beige or cream color.
- Fuzzy Yarn: Bouclé or faux fur yarn in white or cream for the woolly parts.
- Accessory Yarn: Various colors of fingering weight cotton for the boots and hats (Blue, Red, Green, Brown, White).
- Crochet Hook: 1.9mm (or a size that gives you a tight fabric).
- Eyes: 3-4mm black plastic beads or safety eyes, and a small amount of white yarn for the eye whites.
- Stuffing: High-quality polyester fiberfill.
- Head Joint: 1 T-shaped cotter pin, two 25mm plastic disks, and two metal washers.
- Additional Tools: 15mm buttons (2 pieces), thick cardboard or plastic for boot soles, embroidery thread for the nose, dry pastel or blush for detailing, strong clear glue, and a yarn needle.
Abbreviations (US Terms)
- MR: Magic Ring
- ch: chain
- sc: single crochet
- inc: increase (2 sc in one stitch)
- dec: decrease (2 sc together)
- sl st: slip stitch
- hdc: half double crochet
- dc: double crochet
- tr: treble crochet
- Bobble: 3 unfinished double crochets in one stitch, joined at the top.
- BLO: Back loop only
- FLO: Front loop only
- st(s): stitch(es)
Step-by-Step Instructions
The Body
The body is worked in a spiral. To achieve the fluffy look while keeping the shape, we use a special technique: the fuzzy yarn is only worked into even-numbered rows. On odd rows, use the main cotton yarn only.
R1: Ch 21. Starting from the 2nd ch from hook: inc, 18 sc, 4 sc in the last ch. Working along the other side of the chain: 18 sc, inc (44).
R2: inc, 20 sc, 2 inc, 20 sc, inc (48).
R3: 48 sc (48).
R4-20: 48 sc (48). Remember: hold the fuzzy yarn along with your cotton yarn on even rows (4, 6, 8, etc.) and use cotton only on odd rows.
R21: (4 sc, dec)*8 (40).
R22-24: 40 sc (40).
R25: (3 sc, dec)*8 (32).
R26-28: 32 sc (32).
R29: (2 sc, dec)*8 (24).
R30-32: 24 sc (24).
R33: 12 dec (12).
R34: 6 dec (6). Fasten off and weave in ends.
The Head
R1: 6 sc in MR (6).
R2: 6 inc (12).
R3: (1 sc, inc)*6 (18).
R4: 1 sc, inc, (2 sc, inc)*5, 1 sc (24).
R5: (3 sc, inc)*6 (30).
R6: 2 sc, inc, (4 sc, inc)*5, 2 sc (36).
R7: (5 sc, inc)*6 (42).
R8: 3 sc, inc, (6 sc, inc)*5, 3 sc (48).
R9: (7 sc, inc)*6 (54).
R10-16: 54 sc (54).
R17: (7 sc, dec)*6 (48).
R18: 48 sc (48).
R19: 3 sc, dec, (6 sc, dec)*5, 3 sc (42).
R20-22: 42 sc (42).
R23: inc, 10 sc, 20 sl st, 10 sc, inc (44). Mark the second increase for the head joint.
R24: 12 sc, 20 sl st, 12 sc (44).
R25-26: 13 sc, 19 sl st, 12 sc (44).
R27-28: 14 sc, 19 sl st, 11 sc (44).
R29-34: 44 sc (44).
R35: (9 sc, dec)*4 (40).
R36: 4 sc, dec, (8 sc, dec)*3, 4 sc (36).
R37: (7 sc, dec)*4 (32).
R38: 3 sc, dec, (6 sc, dec)*3, 3 sc (28).
R39: (5 sc, dec)*4 (24).
R40: 1 sc, dec, (2 sc, dec)*5, 1 sc (18).
R41: (1 sc, dec)*6 (12).
R42: (1 sc, dec)*4 (8). Fasten off, stuff firmly, and close.
Arms (Make 2)
Fingers: Start with 6 sc in MR, (1 sc, inc)*3 (9), (2 sc, inc)*3 (12). Make two of these. Join them by attaching yarn to the first finger and working: 5 sc, inc, 6 sc (Finger 1), 5 sc, inc, 6 sc (Finger 2).
Hand: R5: 6 sc, inc, 12 sc, inc, 6 sc (28). R6: 28 sc (28). R7: 6 sc, dec, 12 sc, dec, 6 sc (26). R8: 5 sc, dec, 11 sc, dec, 6 sc (24). R9: 2 sc, dec, (4 sc, dec)*3, 2 sc (20). R10: (3 sc, dec)*4 (16).
Arm: Work one row of 16 sc with fuzzy yarn. Then transition to main cotton yarn: (6 sc, dec)*2 (14). R13-32: 14 sc. R33 (FLO): 14 sc for the elbow. R34-55: 14 sc. Flatten the end and sc 6 across to close.
Legs & Boots (Make 2)
Sole: Ch 9. Start from 2nd ch: 7 sc, 5 sc in last ch, 6 sc along other side, inc (20). R2: inc, 6 sc, 5 inc, 6 sc, 2 inc (28). R3: 1 sc, inc, 6 sc, (1 sc, inc)*5, 6 sc, (1 sc, inc)*2 (36). R4: 2 sc, inc, 6 sc, (2 sc, inc)*5, 6 sc, (2 sc, inc)*2 (44). R5: 3 sc, inc, 6 sc, (3 sc, inc)*5, 6 sc, (3 sc, inc)*2 (52).
Boot Body: Insert a cardboard insole. BLO 52 sc. R7: 52 sc. R12: 11 sc, (3 sc, dec)*5, 16 sc (47). R13: 11 sc, (2 sc, dec)*5, 16 sc (42). R14: 11 sc, (1 sc, dec)*5, 16 sc (37). R15: 11 sc, 5 dec, 16 sc (32). R16: BLO 12 sc, 2 dec, 16 sc (30). R17: 15 dec (15).
Leg: R18-39: 15 sc. R40 (FLO): 15 sc. R41-62: 15 sc. Flatten and sc 7 to close.
Face and Details
- Eyes: 6 sc in MR, 6 inc (12), BLO 12 sc, 12 sc, 6 dec. Glue these to R22 of the head. Sew small black beads onto the white centers.
- Mouth: Use a needle and cotton yarn to pull a thread from the back of the head to the front, creating a small indentation for the mouth.
- Nose: Embroider a small triangle on the snout using brown thread.
Finishing
Assembly
- Head to Body: Insert the cotter pin assembly (disk, pin, washer) through the neck of the body and into the head. Secure the pin.
- Legs: Sew the legs to R2 of the body.
- Arms: Use a button-joint method. Sew a button to the body, then hook the arm through it and sew it secure. Position the arms about 4 rows above the knee.
- Face: Use dry pastel or blush to add a soft pink glow to the cheeks, nose, and ears.
Seasonal Accessories (Optional)
- Spring: Create a light blue bell-shaped hat using a combination of increases, decreases, and Bobble stitches. Add a green leaf and a matching striped scarf.
- Summer: Crochet a bright red cherry-shaped hat. Add two small red berries and green leaves.
- Autumn: Crochet a brown acorn cap using Bobble stitches for texture. Add yellow and orange autumn leaves.
- Winter: Create a red, white, and green striped hat with a white fuzzy brim and a pom-pom. Pair with white fur-trimmed boots.
Tips for Success
- Managing Fuzzy Yarn: If you find the bouclé yarn difficult to see, use a stitch marker at the start of every row. The “every other row” technique is key to preventing the toy from becoming a shapeless fuzzball.
- Tension: Keep your tension tight, especially on the head and boots, to ensure the stuffing doesn’t show through.
- Customization: Feel free to change the boot colors or create your own hats! This sheep is a great canvas for your creativity.
- Boot Soles: Don’t skip the cardboard insole; it helps the sheep sit properly and keeps the boots from flattening.