Cute Amigurumi Baby Chick Crochet Pattern: Step-by-Step Tutorial
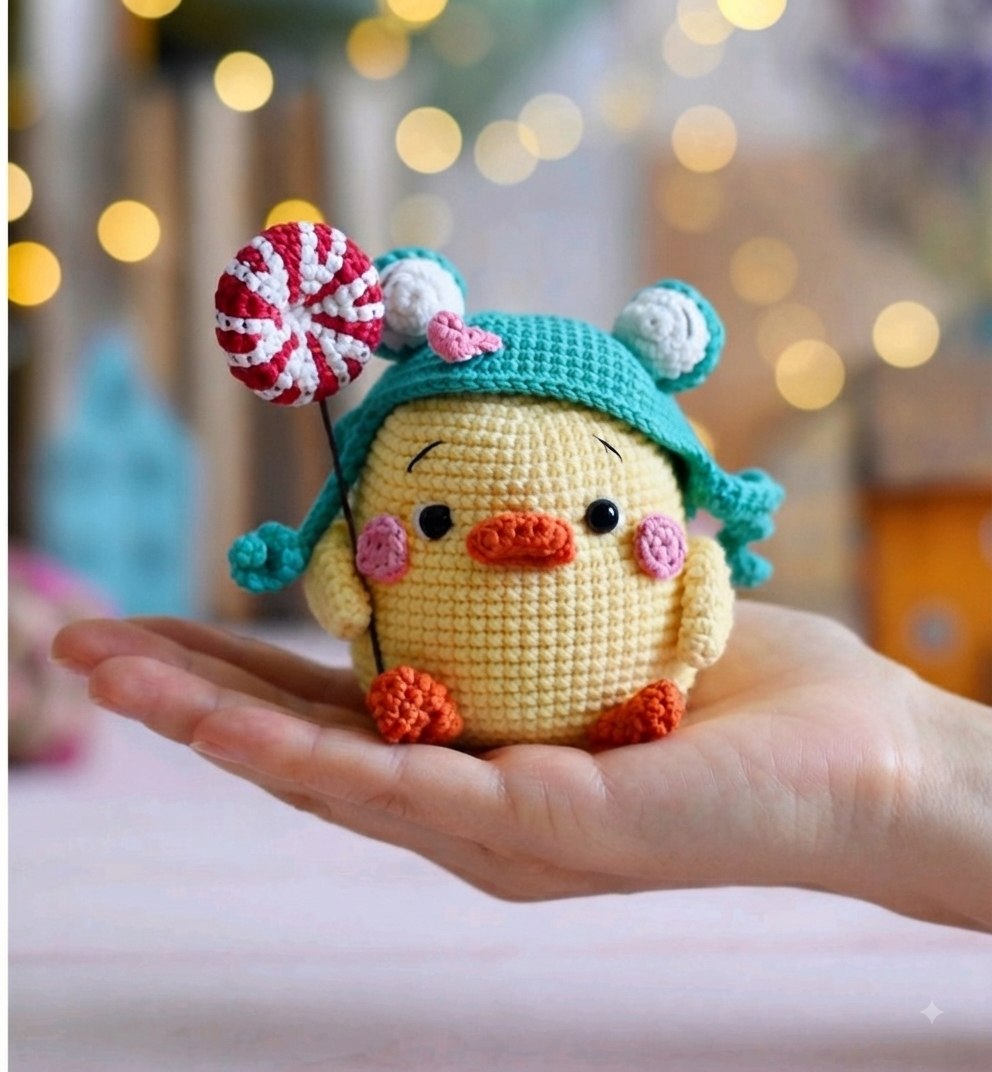
Looking for a project that is absolutely adorable and perfect for beginners? This little amigurumi baby chick is the ultimate “cute factor” project! With its round body, tiny wings, and a cozy little hat, this chick is bound to become a favorite in your crochet collection or a heartwarming gift for a loved one.
In this tutorial, we will walk you through every stitch needed to create this sweet little bird, including his tiny accessories like a colorful lollipop and a matching hat. Grab your yellow yarn and let’s get started!
Materials & Abbreviations
Materials Needed
- Yarn: Medium weight yarn in Yellow, Blue, Orange, Pink, White, and Red.
- Crochet Hook: A size appropriate for your yarn (typically a 2.5mm to 3.5mm hook for amigurumi to keep stitches tight).
- Safety Eyes: 6mm black safety eyes.
- Wire: 1.6mm armature wire (for the lollipop stick and body stability).
- Stuffing: Polyester fiberfill.
- Tools: Yarn needle, scissors, and stitch markers.
Abbreviations (US Terms)
- MR: Magic Ring
- sc: Single crochet
- inc: Increase (2 sc in one stitch)
- dec: Decrease (sc 2 stitches together)
- ch: Chain
- hdc: Half double crochet
- sl st: Slip stitch
- BLO: Back loop only
- FLO: Front loop only
- st(s): Stitch(es)
Step-by-Step Instructions
Head and Body (Yellow Yarn)
The head and body are worked as one continuous piece from the top down. Start with yellow yarn.
- Round 1: 6 sc in MR (6)
- Round 2: 6 inc (12)
- Round 3: (1 sc, inc) * 6 (18)
- Round 4: (2 sc, inc) * 6 (24)
- Round 5: (3 sc, inc) * 6 (30)
- Round 6: (4 sc, inc) * 6 (36)
- Round 7: (5 sc, inc) * 6 (42)
- Round 8: (6 sc, inc) * 6 (48)
- Round 9: (7 sc, inc) * 6 (54)
- Round 10-12: 54 sc (54)
- Round 13: (8 sc, inc) * 6 (60)
- Round 14-15: 60 sc (60)
Placement Note: Insert the 6mm safety eyes between rounds 15 and 16, leaving 12 stitches between the eyes.
- Round 16: (19 sc, inc) * 3 (63)
- Round 17-18: 63 sc (63)
- Round 19: (20 sc, inc) * 3 (66)
- Round 20-23: 66 sc (66)
- Round 24: (21 sc, inc) * 3 (69)
- Round 25-26: 69 sc (69)
- Round 27: (22 sc, inc) * 3 (72)
- Round 28-30: 72 sc (72)
- Round 31: (7 sc, dec) * 8 (64)
- Round 32: (6 sc, dec) * 8 (56)
- Round 33: (5 sc, dec) * 8 (48)
- Round 34: (4 sc, dec) * 8 (40)
- Round 35: (3 sc, dec) * 8 (32)
- Round 36: (2 sc, dec) * 8 (24)
- Round 37: (2 sc, dec) * 6 (18)
- Round 38: (1 sc, dec) * 6 (12)
- Round 39: 6 dec (6)
Fasten off and weave in the end. Stuff the body firmly with fiberfill.
The Wings (Yellow Yarn – Make 2)
- Round 1: 6 sc in MR (6)
- Round 2: (1 sc, inc) * 3 (9)
- Round 3: 9 sc (9)
- Round 4: (2 sc, inc) * 3 (12)
- Round 5: (3 sc, inc) * 3 (15)
- Round 6: 15 sc (15)
- Round 7: (3 sc, dec) * 3 (12)
- Round 8: (2 sc, dec) * 3 (9)
- Round 9: (1 sc, dec) * 3 (6)
Leave a long tail for sewing to the body.
The Beak and Feet (Orange Yarn)
Beak
- Round 1: Ch 4. Starting from the 2nd chain: 2 sc, 3 sc in the last chain. Working along the other side of the chain: 1 sc, inc (8)
- Round 2: (inc, 1 sc) * 4 (12)
- Round 3: 1 sc, 4 hdc, 7 sc (12)
Leave a tail for sewing.
Feet (Make 2)
- Round 1: Ch 4. Starting from the 2nd chain: 2 sc, 3 sc in the last chain, 1 sc, inc (8)
- Round 2: (inc, 1 sc) * 4 (12)
- Round 3: 12 sc (12)
- Round 4: (2 sc, dec) * 3 (9)
- Round 5: (1 sc, dec) * 3 (6)
Flatten the piece and sc 3 stitches across both sides to close. Leave a tail for sewing.
The Accessories
Cheeks (Pink Yarn – Make 2)
- Round 1: 6 sc in MR (6). Fasten off, leaving a tail for sewing.
Tongue (Pink Yarn)
- Row 1: Ch 7. Starting from the 2nd chain: 3 sc in the first stitch (inc), 3 hdc, 2 sc. Leave a tail for sewing.
The Hat (Blue Yarn)
- Round 1: 6 sc in MR (6)
- Round 2: 6 inc (12)
- Round 3: (1 sc, inc) * 6 (18)
- Round 4: (2 sc, inc) * 6 (24)
- Round 5: (3 sc, inc) * 6 (30)
- Round 6: (4 sc, inc) * 6 (36)
- Round 7: (5 sc, inc) * 6 (42)
- Round 8: (6 sc, inc) * 6 (48)
- Round 9: (7 sc, inc) * 6 (54)
- Round 10: (8 sc, inc) * 6 (60)
- Round 11: (9 sc, inc) * 6 (66)
- Round 12-14: 66 sc (66)
- Round 15: (10 sc, inc) * 6 (72)
- Round 16 (The Ties): 11 sc, ch 24. Starting from the 2nd chain: 20 sc, 3 hdc, 3 sl st, 26 sc. Ch 24. Starting from the 2nd chain: 20 sc, 3 hdc, 3 sl st, 29 sc. Fasten off.
Hat Eyes (White and Blue Yarn – Make 2)
- Round 1: 6 sc in MR (6)
- Round 2: 6 inc (12)
- Round 3: (3 sc, inc) * 3 (15)
- Round 4: 15 sc (15)
- Round 5: Change to Blue, 15 sc (15)
- Round 6: BLO, 15 sc (15)
- Round 7: (3 sc, dec) * 3 (12)
- Round 8: (2 sc, dec) * 3 (9)
- Round 9: (1 sc, dec) * 3 (6)
Close the hole. Then, attach blue yarn to the front loops (FLO) of Round 6 and work 12 sc around the edge to create a border.
The Lollipop (White and Red Yarn)
Use white for the base and red for the stripes.
- Round 1: 6 sc in MR (6)
- Round 2: (1 sc, inc) * 6 (12)
- Round 3: (2 sc, inc) * 6 (18)
- Round 4: (inc, 2 sc) * 6 (24)
- Round 5: (3 sc, inc) * 6 (30)
- Round 6-8: 30 sc (30)
- Round 9: (1 sc, dec, 2 sc) * 6 (24)
- Round 10: (2 sc, dec) * 6 (18)
- Round 11: (dec, 1 sc) * 6 (12)
- Round 12: 6 dec (6)
Insert a piece of wire for the stick before closing. You can wrap the wire in red or white yarn for a cleaner look.
Finishing
Now it’s time to put our little chick together!
- Wings: Sew the wings to the sides of the body between rounds 19 and 20.
- Beak: Sew the beak centered between rounds 16 and 18.
- Feet: Sew the feet to the bottom of the body between rounds 29 and 30.
- Cheeks & Tongue: Sew the pink cheeks just below the eyes and the tiny tongue just under the beak.
- Hat: Slip the hat onto the head and secure it with a few hidden stitches if necessary. Sew the Hat Eyes onto the top of the hat.
- Lollipop: Position the lollipop stick against the chick’s side and secure it by sewing the top of the candy to the wing or body.
Tips
- Tight Stitches: When making amigurumi, use a smaller hook than the yarn recommends. This prevents the stuffing from peaking through.
- The Magic Ring: If you struggle with the magic ring, you can chain 2 and work your first round of stitches into the first chain.
- Wire Safety: If you use wire for the body or lollipop, ensure the ends are bent or capped so they don’t poke through the fabric.
- Stuffing: Stuff the body in small increments, especially when decreasing, to ensure the chick keeps its round, plump shape.