Free Crochet Dream Keeper Amigurumi Pattern: Create Your Own Sweet Guardian
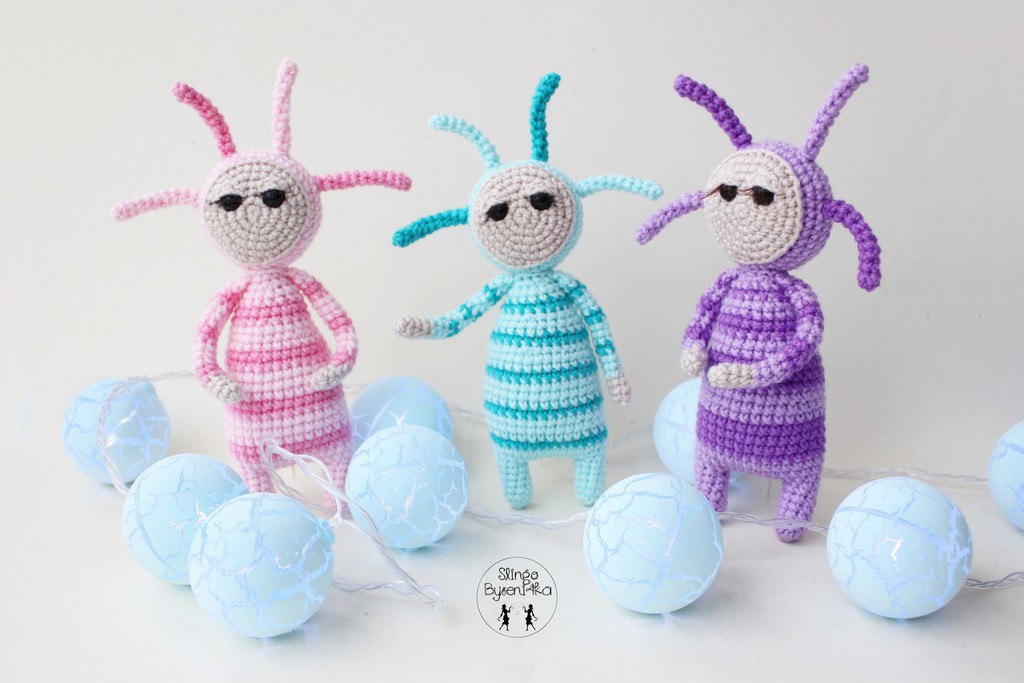
Looking for a whimsical and adorable project to add to your crochet collection? Meet the Dream Keeper! These charming, alien-like guardians are the perfect blend of spooky and sweet, making them ideal gifts for children, collectors, or anyone who loves unique amigurumi. With their oversized heads, tiny limbs, and quirky antennae, these little creatures are sure to bring a smile to anyone’s face.
This tutorial is designed to be beginner-friendly. If you know how to work in the round and handle basic stitches, you are ready to start. Whether you want to make a colorful trio like the ones in the photos or a single guardian in your favorite hue, this detailed guide will walk you through every stitch.
Materials & Abbreviations
Before we dive into the stitches, gather your supplies. To achieve the look of the Dream Keepers, you will need a mix of skin-toned yarn for the face and hands, and vibrant colors for the body and head.
Supplies Needed
- Yarn: Medium weight (Size 4) yarn in a skin-tone color and one or more bright colors of your choice for the costume.
- Crochet Hook: A size that matches your yarn (typically 3.25mm to 3.5mm for amigurumi to ensure a tight fabric).
- Safety Eyes: Small plastic safety eyes.
- Stuffing: High-quality polyester fiberfill.
- Needle: A yarn needle for sewing the pieces together.
- Extra Details: Doll eyelashes (optional, for a more expressive look).
- Stitch Marker: Essential for keeping track of your rounds.
US Crochet Terms & Abbreviations
- ch: Chain
- sc: Single crochet
- inc: Increase (two single crochets in one stitch)
- dec: Decrease (single crochet two stitches together)
- sl st: Slip stitch
- MR: Magic Ring
- st(s): Stitch(es)
Step-by-Step Instructions
The Legs (Make 2)
We start with the feet. These are small and simple, forming the base of our guardian.
- Round 1: 6 sc in MR (6)
- Round 2: (1 inc, 2 sc) repeat twice (8)
- Rounds 3-7: sc in each st around (8)
Fasten off the first leg. For the second leg, do not cut the yarn; we will use it to connect to the body.
The Body
The body connects the two legs and forms the torso. This part uses a combination of the legs and a chain to create the “crotch” area.
- Connection: From the second leg, chain 8.
- Round 1: Sl st into the leg, sc in the next 7 sts of the leg. Sc in the next 8 sts along the chain. Sl st into the first leg, sc in the next 7 sts of that leg. Finally, sc in the 8 sts along the other side of the chain. (32)
- Round 2: sc in each st around (32)
- Round 3: sc in each st around (Wait: depending on your tension, you may naturally have 28 or 32; ensure you maintain a consistent count. We will work with 28 for the next section) (28)
Tip: Place your stitch marker now to mark the beginning of your rounds.
- Rounds 4-14: sc in each st around (32)
- Round 15: (6 sc, dec) repeat 4 times (28)
- Round 16: sc in each st around (28)
- Round 17: (5 sc, dec) repeat 4 times (24)
- Round 18: sc in each st around (24)
- Round 19: (4 sc, dec) repeat 4 times (20)
Note: Start stuffing the body firmly with fiberfill from this point forward.
- Round 20: sc in each st around (20)
- Round 21: (3 sc, dec) repeat 4 times (16)
- Round 22: sc in each st around (16)
- Round 23: (2 sc, dec) repeat 4 times (12)
Fasten off, leaving a long tail for sewing the head to the body.
The Arms (Make 2)
Start with the skin-colored yarn for the hands.
- Round 1: 6 sc in MR (6)
- Rounds 2-4: sc in each st around (6)
Switch to your costume color yarn.
- Rounds 5-18: sc in each st around (6)
- Round 19: ch 1, fold the piece in half, and sc 3 through both layers to close the arm.
Fasten off and leave a long tail for sewing.
The Horns/Antennae (Make 4)
Using the costume color yarn, create the four signature horns.
- Round 1: 4 sc in MR (4)
- Rounds 2-10: sc in each st around (4)
Fasten off and leave a long tail for sewing.
The Face
Using the skin-colored yarn, we create the flat circle that will be the face.
- Round 1: 6 sc in MR (6)
- Round 2: 6 inc (12)
- Round 3: (1 sc, inc) repeat 6 times (18)
- Round 4: (2 sc, inc) repeat 6 times (24)
- Round 5: (3 sc, inc) repeat 6 times (30)
- Round 6: (4 sc, inc) repeat 6 times (36)
Fasten off and leave a long tail for sewing.
The Head
Using the costume color yarn, we create the hood/head that will encase the face.
- Round 1: 6 sc in MR (6)
- Round 2: 6 inc (12)
- Round 3: (1 sc, inc) repeat 6 times (18)
- Round 4: (2 sc, inc) repeat 6 times (24)
- Round 5: (3 sc, inc) repeat 6 times (30)
- Round 6: (4 sc, inc) repeat 6 times (36)
- Round 7: sc in each st around (36)
- Round 8: (5 sc, inc) repeat 6 times (42)
- Rounds 9-11: sc in each st around (42)
Pause and Assemble the Face: Place the skin-colored face circle against the opening of the head. Insert the safety eyes through both the face and the head layers, then secure them. Now, continue crocheting around the edge of the face to close the head.
- Round 12: (5 sc, dec) repeat 6 times (36)
- Round 13: (4 sc, dec) repeat 6 times (30)
- Round 14: (3 sc, dec) repeat 6 times (24)
Begin stuffing the head firmly.
- Round 15: (2 sc, dec) repeat 6 times (18)
- Round 16: (1 sc, dec) repeat 6 times (12)
- Round 17: 6 dec (6)
Close the hole and weave in the end.
The Eyelids (Make 2)
Using skin-colored yarn, these add a sleepy, cute expression.
- Step 1: ch 4.
- Step 2: Starting in the 2nd ch from hook: 1 sl st, 1 inc, 1 sl st (4)
Fasten off and leave a long tail for sewing.
Finishing
Now it is time to bring your Dream Keeper to life! Using your yarn needle and the tails you left behind, follow these assembly steps:
- Attach the Face: Sew the skin-colored face securely to the front of the head.
- Add Expression: Sew the eyelids just above the safety eyes to give them that half-closed, dreamy look. If you have doll eyelashes, carefully glue them to the outer corners of the eyes.
- Connect the Head: Sew the head onto the top of the body.
- Attach Limbs: Sew the arms to the sides of the body and the four horns to the top of the head. Space the horns evenly—two in front and two in back.
- Final Touches: Trim any loose threads and give your Dream Keeper a little squeeze to make sure the stuffing is even.
Tips for Success
- Tension is Key: When working with amigurumi, keep your stitches tight. If you see stuffing poking through, try using a smaller crochet hook.
- Magic Ring Mastery: If the magic ring is tricky, you can ch 2 and work your first round of 6 sc into the second chain from the hook.
- Symmetry: When sewing the arms and horns, use pins to mark the placement first. This ensures your guardian isn’t lopsided.
- Customization: Feel free to change the colors! Striped yarn works beautifully for the body to give the guardian a “sweater” look.