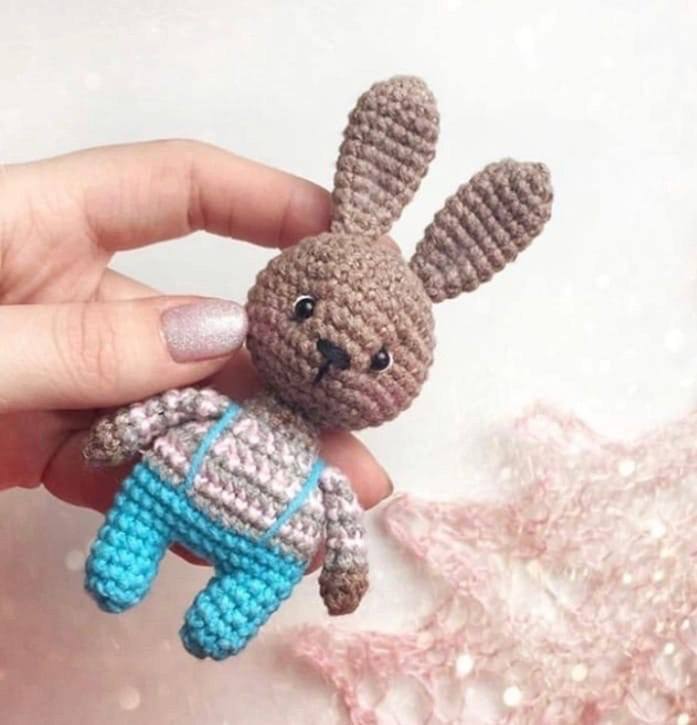
Adorable Amigurumi Bunny Crochet Pattern: A Step-by-Step Guide
There is nothing quite as charming as a handmade amigurumi companion. Whether you are looking to create a thoughtful gift for a loved one or simply want a cozy new project to tackle over the weekend, this little bunny is the perfect choice. With its cute overalls and floppy ears, this project is designed to be beginner-friendly while producing a professional, high-quality result.
In this tutorial, we will walk you through every stitch needed to bring this sweet rabbit to life. We will be using standard US crochet terms and imperial measurements to ensure a smooth crafting experience. Grab your favorite yarn and let’s get started!
Materials & Abbreviations
Before we dive into the stitches, let’s make sure you have everything you need on your crochet hook. To achieve the look seen in the photos, you will want a yarn that holds its shape well, such as a cotton blend or a high-quality acrylic.
Supplies Needed:
- Yarn: Medium weight (Worsted) yarn in Brown, Light Blue, Grey, and a small amount of Pink.
- Crochet Hook: 3.25mm or 3.5mm (adjust size to ensure your stitches are tight so the stuffing doesn’t show through).
- Stuffing: Polyester fiberfill or similar craft stuffing.
- Eyes: 6mm or 8mm safety eyes.
- Extras: Yarn needle, scissors, and stitch markers.
Abbreviations (US Terms):
- MR: Magic Ring
- sc: Single Crochet
- inc: Increase (2 sc in one stitch)
- dec: Decrease (sc 2 stitches together)
- ch: Chain
- st: Stitch
Step-by-Step Instructions
The Arms (Make 2)
We will start with the arms. These are small and simple, but they feature a cute color-blocked detail that adds a lot of personality to the bunny.
Using Brown yarn:
- Round 1: 6 sc in MR (6)
- Round 2: inc, 5 sc (7)
Now, we will switch colors. To create the striped effect, alternate between Grey and Pink yarn every single row until the arm is finished.
- Rounds 3-8: 7 sc (7)
Finishing the arms: Do not stuff the arms. Flatten the piece and sc across the opening for 3 stitches to close the end. Fasten off, leaving a long tail for sewing the arms to the body later.
The Head
The head is a classic sphere shape. Be sure to use a stitch marker to keep track of your rounds, as it is easy to lose your place in a circle.
Using Brown yarn:
- Round 1: 6 sc in MR (6)
- Round 2: 6 inc (12)
- Round 3: (1 sc, inc) * 6 (18)
- Round 4: (2 sc, inc) * 6 (24)
- Round 5: (3 sc, inc) * 6 (30)
- Round 6: (4 sc, inc) * 6 (36)
- Rounds 7-11: 36 sc (36)
- Round 12: (4 sc, dec) * 6 (30)
- Round 13: (3 sc, dec) * 6 (24)
- Round 14: (2 sc, dec) * 6 (18)
- Round 15: (1 sc, dec) * 6 (12)
Pro Tip: Stuff the head firmly as you work, but leave a little bit of room at the neck for assembly.
The Legs and Body
This is the most technical part of the pattern. We start by making two separate legs and then joining them together to create the body in one continuous piece.
Using Light Blue yarn:
Leg 1:
- Round 1: 6 sc in MR (6)
- Round 2: (inc, 1 sc) * 3 (9)
- Rounds 3-5: 9 sc (9)
Fasten off the first leg completely.
Leg 2:
- Repeat Rounds 1-5. Do not fasten off. We will use this leg to start the body.
Joining the Legs and Starting the Body:
- Round 6: ch 4, work 9 sc around the first leg, 4 sc across the chain, 9 sc around the second leg, and 4 sc across the remaining chain (30)
- Round 7: inc, 7 sc, inc, 4 sc, inc, 7 sc, inc, 4 sc (34)
Now we transition to the shirt. At Round 9, change the yarn to Grey. To keep the transition clean, use an “invisible join” or change the color on the last pull-through of the previous stitch.
- Rounds 8-12: 30 sc (30)
- Round 13: (dec, 3 sc) * 6 (24)
- Round 14: (dec, 2 sc) * 6 (18)
- Round 15: 18 sc (18)
- Round 16: (dec, 1 sc) * 6 (12)
At Round 17, change back to Brown yarn to create the neck.
- Round 17: 12 sc (12)
- Round 18: 6 dec (6)
Fasten off and weave in your ends.
The Ears (Make 2)
The ears give the bunny its iconic look. These are worked as flat-ish tubes and then sewn shut.
Using Brown yarn:
- Round 1: 6 sc in MR (6)
- Round 2: 6 inc (12)
- Rounds 3-9: 12 sc (12)
- Round 10: (dec, 4 sc) * 2 (10)
- Round 11: 10 sc (10)
Fold the top edge in half and sew it closed with a yarn needle to create a rounded tip.
Finishing & Assembly
Assembly is where the bunny truly comes to life! Use a yarn needle and matching colors for all your sewing.
Putting it Together:
- Arms: Sew the arms to the sides of the body at Round 15.
- Head: Sew the head securely to the neck.
- Ears: Position the ears on top of the head, sewing them between Rounds 2, 3, and 4.
Adding the Face:
- Eyes: To give the bunny a cute, pinched face, use a long piece of brown yarn to pull a stitch between Rounds 9 and 10 of the head toward the back. This creates a dip for the eyes. Secure your safety eyes in this area.
- Nose: Embroider a small nose between Rounds 10 and 11.
- Mouth: Stitch a small vertical line downward from the center of the nose for about 3 rows.
Tips for Success
If this is your first time making an amigurumi, here are a few tricks to ensure your bunny looks professional:
- Tension is Key: Amigurumi requires a tighter tension than a blanket or a scarf. If you see gaps where the stuffing is peeking through, try going down a hook size (e.g., from 3.5mm to 3.0mm).
- Invisible Decreases: To avoid bumps in your work, use the “invisible decrease” method. Instead of a standard dec, insert your hook into the front loop of the first stitch, then the front loop of the second stitch, and complete the sc.
- Stitch Markers: Because you are working in continuous spirals, it is very easy to forget where your round ends. Always place a marker in the first stitch of every round.
- Stuffing: Use a chopstick or a knitting needle to push stuffing into the tight corners of the legs and head to ensure a smooth, round shape.