Easy Amigurumi Pig Crochet Pattern: A Step-by-Step Tutorial
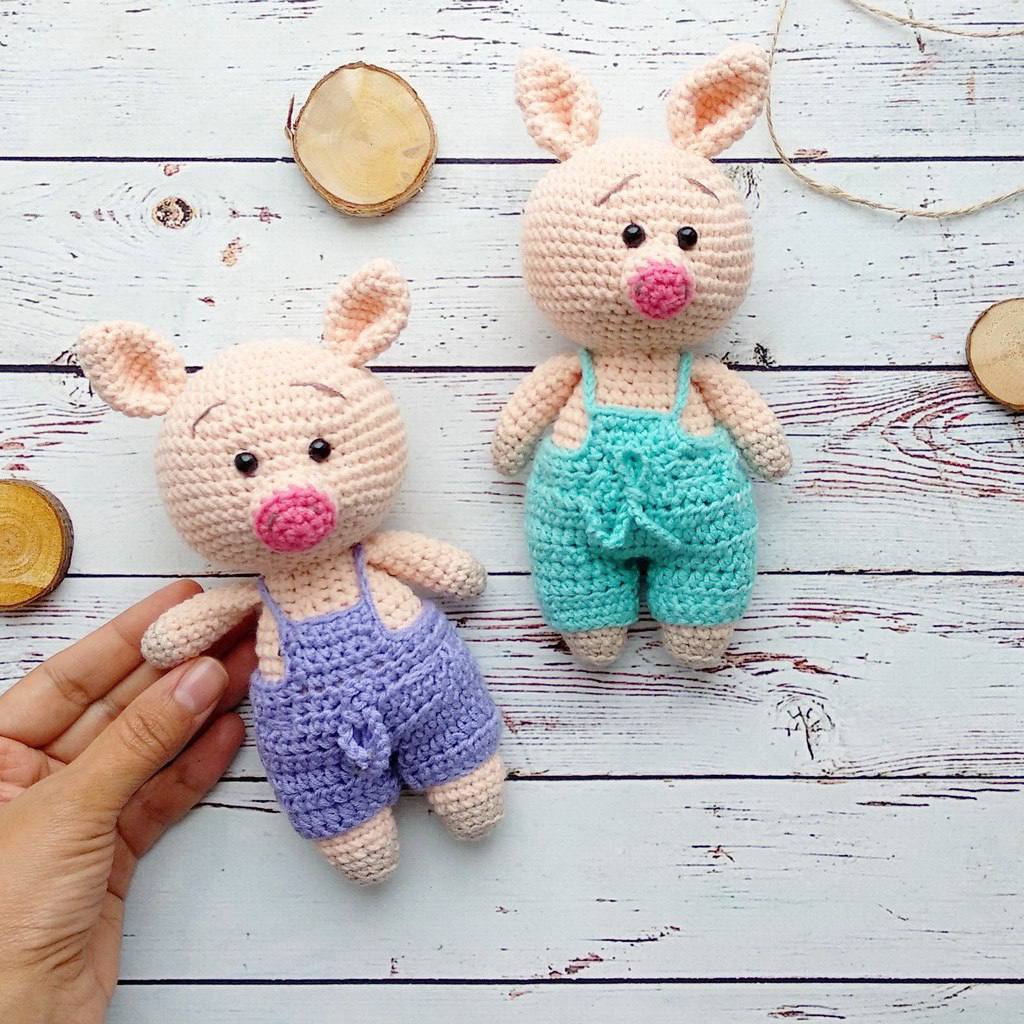
Are you looking for a charming and adorable project to add to your crochet collection? This amigurumi piglet is the perfect solution! Whether you are looking to create a cute nursery decoration, a unique gift for a little one, or just want to practice your crochet skills, this little piggy is sure to bring a smile to your face. This pattern is designed to be beginner-friendly, guiding you through the process of creating a sweet character with tiny overalls and a cute snout.
Crocheting amigurumi is a wonderful way to relax and create something tangible and huggable. This project uses standard techniques, making it an excellent way to master shaping, color changes, and assembling multiple parts into a single character. Grab your hook and some soft yarn, and let’s get started on this delightful piglet!
Materials & Abbreviations
Before we dive into the stitches, let’s make sure you have everything you need on your crochet table. Using the right materials will ensure your piglet looks professional and feels extra soft.
Materials Needed
- Main Yarn: Approximately half a skein of medium-weight cotton yarn (DK or Sport weight works best). A soft pink or peach color is ideal.
- Overalls Yarn: A small amount of contrasting color yarn (such as light blue, teal, or purple). Cotton blends like Yarn Art Jeans or similar are great for definition.
- Snout Yarn: A small amount of bright pink yarn.
- Hoof/Hand Yarn: A small amount of beige or cream yarn.
- Crochet Hook: A 2.25mm (US size B-1) or 2.0mm hook. Using a slightly smaller hook than the yarn suggests helps keep the stitches tight so stuffing doesn’t show through.
- Safety Eyes: Small safety eyes (usually 6mm to 8mm).
- Stuffing: High-quality polyester fiberfill (poly-fill).
- Extras: A tapestry needle for sewing, scissors, and a stitch marker.
Abbreviations (US Terms)
- ch: chain
- sc: single crochet
- hdc: half double crochet
- sl st: slip stitch
- inc: increase (2 sc in one stitch)
- dec: decrease (sc 2 together)
- BLO: back loops only
- Rnd: round
- St(s): stitch(es)
Step-by-Step Instructions
The Head
We will begin by creating the head. Remember to stuff the head as you work to maintain its shape.
- Rnd 1: Ch 2, work 6 sc into the second chain from the hook (6)
- Rnd 2: 6 inc (12)
- Rnd 3: (1 sc, inc) * 6 (18)
- Rnd 4: (2 sc, inc) * 6 (24)
- Rnd 5: (3 sc, inc) * 6 (30)
- Rnd 6: (4 sc, inc) * 6 (36)
- Rnd 7: (5 sc, inc) * 6 (42)
- Rnd 8: (6 sc, inc) * 6 (48)
- Rnd 9: (7 sc, inc) * 6 (54)
- Rnds 10-16: 54 sc (54)
- Place safety eyes between Rnds 11 and 12, approximately 4 stitches apart.
- Rnd 17: (7 sc, dec) * 6 (48)
- Rnd 18: (6 sc, dec) * 6 (42)
- Rnd 19: (5 sc, dec) * 6 (36)
- Rnd 20: (4 sc, dec) * 6 (30)
- Rnd 21: (3 sc, dec) * 6 (24)
- Rnd 22: (2 sc, dec) * 6 (18)
Fasten off, leaving a long tail for sewing the head to the body.
The Ears
Make two ears. Fold them in half once finished.
- Rnd 1: Ch 2, 4 sc in the second chain from the hook (4)
- Rnd 2: 4 inc (8)
- Rnd 3: (3 sc, inc) * 2 (10)
- Rnd 4: (4 sc, inc) * 2 (12)
- Rnd 5: (3 sc, inc) * 3 (15)
- Rnd 6: (4 sc, inc) * 3 (18)
- Rnd 7: (5 sc, inc) * 3 (21)
- Rnd 8: 21 sc (21)
- Rnd 9: (5 sc, dec) * 3 (18)
Fasten off. Fold the piece in half and sew the bottom edge closed.
The Snout
Start with the bright pink yarn.
- Rnd 1: Ch 2, 6 sc in the second chain from the hook (6)
- Rnd 2: 6 inc (12)
- Change to the main pink/peach yarn.
- Rnd 3: 12 sc in BLO (back loops only)
- Rnd 4: 12 sc (12)
Fasten off, leaving a tail for sewing.
The Arms
Make two arms. Use the beige yarn initially.
- Rnd 1: Ch 2, 6 sc in the second chain from the hook (6)
- Rnd 2: (1 sc, inc) * 3 (9)
- Rnd 3: 9 sc (9)
- Change to the main color.
- Rnds 4-11: 9 sc (9)
Fold the arm and sew the opening shut with 4 sc. Stuff lightly if desired.
The Legs and Body
This part is unique as we will work the legs and the body as one continuous piece. Make two leg parts. Start with beige yarn.
Legs (Make 2)
- Rnd 1: Ch 2, 6 sc in the second chain from the hook (6)
- Rnd 2: 6 inc (12)
- Rnd 3: 12 sc in BLO (12)
- Rnd 4: 12 sc (12)
- Change to main color.
- Rnd 5: (3 sc, inc) * 3 (15)
- Rnds 6-11: 15 sc (15)
Connecting the Body
Do not fasten off the second leg. We will now join the two legs to form the body.
- Rnd 12: On the second leg, work 4 sc. Ch 3 (this creates a bridge). Work 15 sc into the first leg. Work 3 sc into the ch-3 bridge. Work 15 sc into the second leg. Work 3 sc into the ch-3 bridge. (Total: 36)
- Rnd 13: 14 sc, 5 inc, 17 sc (41)
- Rnds 14-15: 41 sc (41)
- Rnd 16: 39 sc, 1 dec (40)
- Rnd 17 (Tail): 38 sc. Ch 6. In each chain, work an inc, then skip 1 stitch and work 1 sc into the body. (40)
- Rnd 18: (6 sc, dec) * 5 (35)
- Rnd 19: 35 sc (35)
- Rnd 20: (5 sc, dec) * 5 (30)
- Rnds 21-22: 30 sc (30)
- Rnd 23: (3 sc, dec) * 6 (24)
- Rnd 24: 24 sc (24)
- Rnd 25: (2 sc, dec) * 6 (18)
- Rnd 26: 18 sc (18). Note: This is where you will sew the arms to the sides of the body.
- Rnd 27: 18 sc (18)
Fasten off.
The Overalls
Make two leg pieces. You can work these in rounds or in rows (turning your work after each row to create a textured look). We will work in rows here.
- Foundation: Ch 20, sl st into the first chain to form a circle.
- Rnd 1: Ch 1, 19 sc, sl st (19)
- Rnd 2: Ch 1, 19 sc, sl st (19)
- Rnd 3: Ch 2, 19 hdc, sl st (19)
- Rnd 4: Ch 2, 19 hdc, sl st (19)
Make a second piece identical to the first.
To join the legs: On the second piece, do not fasten off. Ch 4 and sl st into the first leg piece. Work the remaining rounds to connect them. Work 5 hdc for 4-5 rows upwards to create the “front” of the overalls. Finally, join yarn to the perimeter and work a round of sc around the entire piece. For straps, ch 19 and attach to the top of the overalls, crossing them at the back.
Finishing
Now comes the best part—bringing your piglet to life!
- Assembly: Sew the head onto the body. A good rule of thumb is to position it about 4-5 rows down from the top of the body piece.
- Ears: Sew the ears onto the top of the head.
- Snout: Sew the snout centered between the eyes.
- Arms: Sew the arms to the sides of the body at Round 26.
- Details: For an extra touch of cuteness, use a colored pencil to lightly shade the cheeks and ears. You can also use black thread or yarn to embroider simple eyebrows and the nostrils on the snout.
Tips for Success
- Tension Control: Amigurumi requires tight stitches to ensure the stuffing doesn’t peek through. If your stitches feel loose, try using a smaller hook.
- Stitch Markers: Since you are working in continuous rounds, always use a stitch marker to keep track of your starting point.
- Stuffing: Don’t be afraid to stuff firmly! A well-stuffed amigurumi holds its shape much better over time.
- Safety First: If you are making this for a baby, consider embroidering the eyes with black yarn instead of using plastic safety eyes to prevent choking hazards.