Adorable Amigurumi Donkey Crochet Pattern: A Step-by-Step Tutorial
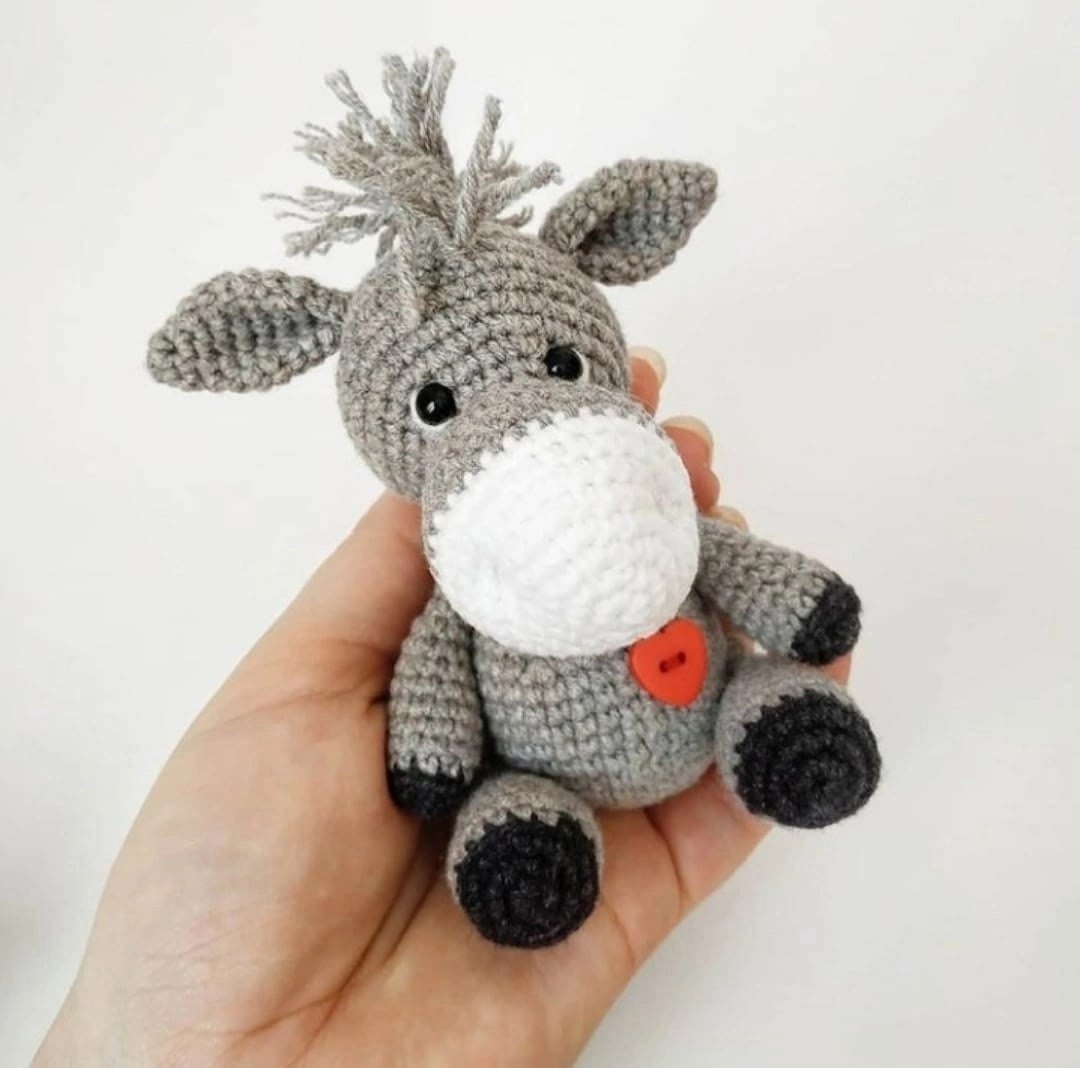
Are you looking for your next adorable crochet project? This little “In Love” Donkey is the perfect addition to your amigurumi collection. With its expressive eyes, fuzzy mane, and a sweet little heart on its chest, this donkey makes a wonderful gift for children, a charming nursery decoration, or even a thoughtful handmade gift for a friend. This pattern is designed to be beginner-friendly, focusing on basic stitches while resulting in a professional-looking, high-quality plush toy.
In this tutorial, we will walk you through every step of the process, from creating the tiny snout to crafting that signature fuzzy mane. Whether you are a seasoned crocheter or just starting your amigurumi journey, this guide will help you create a lovable little companion that you’ll be proud to show off.
Materials and Abbreviations
Before we pick up our hooks, let’s make sure you have everything you need. Using the right materials is key to achieving that tight, clean amigurumi look.
Materials Needed
- Yarn: Medium weight cotton or cotton-blend yarn in White, Gray, and Black.
- Crochet Hook: A small hook is recommended to ensure tight stitches so stuffing doesn’t show through. Use a size between 1.75mm and 2.25mm (a 2.25mm hook works beautifully).
- Safety Eyes: 6mm screw-on safety eyes.
- Stuffing: High-quality polyester fiberfill (polyfill).
- Notions: A tapestry needle for sewing, sharp scissors, and a small heart-shaped button (or you can crochet a small heart to attach).
Abbreviations (US Terms)
All measurements are in inches unless otherwise stated. Please ensure you are familiar with these standard US crochet terms:
- MR: Magic Ring
- sc: Single crochet
- inc: Increase (2 sc in the same stitch)
- dec: Decrease (invisible decrease is recommended for amigurumi)
- BLO: Back loops only
- st(s): Stitch(es)
Step-by-Step Instructions
The Head
We begin the head using your white yarn to create the snout, then transition to gray for the rest of the face.
Starting with White:
- R1: 6 sc in a MR (6)
- R2: 6 inc (12)
- R3: (1 sc, inc) repeat 6 times (18)
- R4: (2 sc, inc) repeat 6 times (24)
- R5: (3 sc, inc) repeat 6 times (30)
- R6-8: 30 sc (30)
Change to Gray yarn:
- R9-11: 30 sc (30)
- R12: (3 sc, dec) repeat 6 times (24)
- R13: (2 sc, dec) repeat 6 times (18)
- R14: 18 sc (18)
- R15: (2 sc, inc) repeat 6 times (24)
- R16: (3 sc, inc) repeat 6 times (30)
- R17: (4 sc, inc) repeat 6 times (36)
- R18: (5 sc, inc) repeat 6 times (42)
- R19-23: 42 sc (42)
- R24: (5 sc, dec) repeat 6 times (36)
- R25: (4 sc, dec) repeat 6 times (30)
- R26: (3 sc, dec) repeat 6 times (24)
- R27: (2 sc, dec) repeat 6 times (18)
- R28: (1 sc, dec) repeat 6 times (12)
- R29: 6 dec (6)
Eye Placement & Nostril Detail:
Insert the 6mm safety eyes between Rows 15 and 16, ensuring they are spaced 6 sc apart. To create the nostrils, take your yarn and insert the needle at the bottom of the head between Rows 15 and 16. Bring the yarn up through the top of the head between Rows 5 and 6. Re-insert the needle through the next 2 sc, and then pull it out through the single stitch immediately next to those. Tie a knot and repeat this process for the second nostril. Do this twice for each side to give the snout a realistic shape.
The Body
Using Gray yarn:
- R1: 6 sc in a MR (6)
- R2: 6 inc (12)
- R3: (1 sc, inc) repeat 6 times (18)
- R4: (2 sc, inc) repeat 6 times (24)
- R5: (3 sc, inc) repeat 6 times (30)
- R6: (4 sc, inc) repeat 6 times (36)
- R7-12: 36 sc (36)
- R13: (7 sc, dec) repeat 4 times (32)
- R14: (6 sc, dec) repeat 4 times (28)
- R15: (5 sc, dec) repeat 4 times (24)
- R16: (4 sc, dec) repeat 4 times (20)
- R17-18: 20 sc (20)
- R19: (3 sc, dec) repeat 4 times (16)
- R20: 16 sc (16)
Fasten off, leaving a long tail of approximately 12–16 inches for sewing the body to the head later.
The Ears
Using Gray yarn:
- R1: 6 sc in a MR (6)
- R2: 6 sc (6)
- R3: (1 sc, inc) repeat 3 times (9)
- R4: (2 sc, inc) repeat 3 times (12)
- R5: (3 sc, inc) repeat 3 times (15)
- R6-8: 15 sc (15)
- R9: (1 sc, dec) repeat 5 times (10)
Fold the ears in half so the open edges meet. Using your gray yarn, crochet 5 sc through both layers to close the ear. Leave a tail for sewing. Note: Do not stuff the ears.
The Arms
Starting with Black yarn:
- R1: 6 sc in a MR (6)
- R2: 6 inc (12)
Change to Gray yarn:
- R3: 12 sc in BLO (12)
- R4-8: 12 sc (12)
- R9: 1 dec, 10 sc (11)
- R10: 11 sc (11)
- R11: 6 sc, 1 dec, 3 sc (10)
- R12: 10 sc (10)
- R13: 1 dec, 8 sc (9)
- R14: 9 sc (9)
Stuff the bottom half of the arm with polyfill. Fold the arm in half and crochet 4 sc through both sides to close it. Leave a tail for sewing.
The Legs
Starting with Black yarn:
- R1: 6 sc in a MR (6)
- R2: 6 inc (12)
- R3: (1 sc, inc) repeat 6 times (18)
Change to Gray yarn:
- R4: 18 sc in BLO (18)
- R5-6: 18 sc (18)
- R7: (4 sc, dec) repeat 3 times (15)
- R8-9: 15 sc (15)
- R10: (3 sc, dec) repeat 3 times (12)
- R11-12: 12 sc (12)
- R13: (2 sc, dec) repeat 3 times (9)
- R14-16: 9 sc (9)
Stuff the bottom half of the leg with polyfill. Fold in half and crochet 4 sc through both sides to close. Leave a tail for sewing.
The Tail
To create the donkey’s unique tail, we will use a “brushing” technique. At Rows 6 or 7 on the back of the body, pull up a loop with your hook. Using the four strands resulting from that loop, chain 4. Pull all ends through the very last chain and tighten. Trim the ends to your desired length and then use a fine-tooth comb or your fingers to brush out/fluff the yarn strands until they look soft and fuzzy.
The Mane
To give your donkey its adorable fuzzy mane, prepare several pieces of gray yarn, each about 2–3 inches long. Fold each piece in half. Pull the folded loop through a stitch on the top of the head, then pull the two ends through the loop and tighten. Repeat this all over the top of the head. Once finished, trim the hair to an even length and brush it out to create a soft, fluffy texture.
Assembly Guide
Now comes the fun part—bringing your donkey to life!
- Head to Body: Use a tapestry needle and the tail left from the body to sew the body to the head between Rows 15 and 20.
- Ears: Fold the ears in half and sew them to the head between Rows 22 and 24.
- Arms: Sew the arms to the body at Rows 17 and 18. Angle them slightly forward so it looks like the donkey is reaching out.
- Legs: Sew the legs between Rows 4 and 9 of the body so the donkey is in a sitting position. For extra stability, take a few extra stitches through the body at Row 12 to secure the legs so they don’t flop outward.
- Final Touch: Sew your heart-shaped button (or crocheted heart) onto the center of the chest.
Tips for Success
- Tension is Key: When working with amigurumi, try to keep your stitches tight. This prevents the white stuffing from peeking through the gray or black stitches.
- Invisible Decreases: For a much smoother look, use the invisible decrease method (inserting the hook into the front loops only of the next two stitches) instead of a standard decrease.
- Safety First: If you are making this for a very small child, consider embroidering the eyes with black yarn instead of using plastic safety eyes to prevent any choking hazards.
- Fluffing the Mane: Don’t be afraid to be aggressive when brushing out the mane and tail! The more you brush, the more “eyelash yarn” texture you will achieve.