
How to Crochet a Cute Amigurumi Owl with Heart Balloons: A Beginner-Friendly Pattern
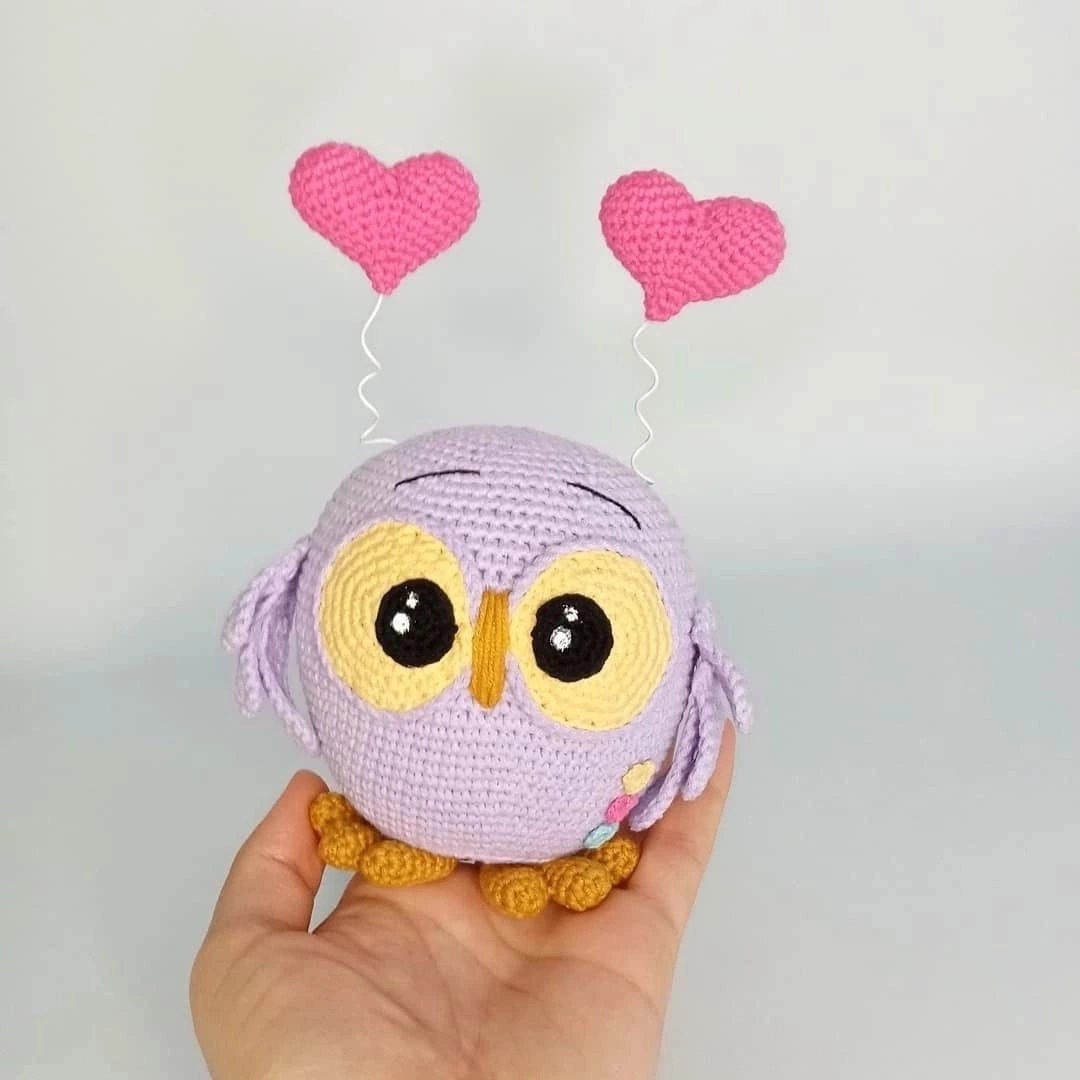
Are you looking for a quick, adorable, and heartfelt crochet project? This little amigurumi owl, complete with floating heart balloons, is the perfect solution! Whether you are making a gift for a loved one, a Valentine’s Day decoration, or just want a cute new friend for your desk, this owl pattern is sure to bring a smile to anyone’s face. Because of its round, simple shape, this project is excellent for intermediate beginners or anyone looking to practice their amigurumi shaping techniques.
In this tutorial, I will walk you through every single step, from crocheting the body to assembling those tiny, whimsical hearts. Grab your favorite yarn and your crochet hook, and let’s get started on this lovely little bird!
Materials & Abbreviations
Before we dive into the stitches, let’s make sure you have everything you need. To achieve the look in the photos, I recommend using a medium-weight (worsted) cotton or acrylic yarn. Cotton works particularly well for amigurumi because it has great stitch definition and doesn’t “pill” as easily.
What You Will Need:
- Yarn (Medium/Worsted Weight): Purple (Main color), Yellow (Eyes), Black (Pupils), Mustard or Gold (Feet), Pink (Hearts), and a tiny bit of White or Silver (optional for wire accents).
- Crochet Hooks: A 2.0mm (B) hook for most parts, and a 2.5mm (E) hook for the eye detailing.
- Stuffing: High-quality polyester fiberfill.
- Wire: Thin craft wire for the heart stems.
- Base Material: A small plastic disc (you can cut one from a recycled plastic container) to help the owl sit upright.
- Safety Eyes or Black Yarn: To create the pupils.
- Acrylic Paint: A tiny bit of white paint to add “glimmer” highlights to the eyes.
- Extras: Yarn needle, scissors, stitch markers, and a thin embroidery thread (like Iris thread) for the eyebrows.
Abbreviations (US Terms):
- MR: Magic Ring
- sc: Single crochet
- inc: Increase (2 sc in one stitch)
- dec: Decrease (sc 2 together)
- ch: Chain
- sl st: Slip stitch
- st(s): Stitch(es)
- BLO: Back loop only
- BLO & Both loops: Working in both loops
- Rnd: Round
- Row: Worked in rows (turning)
Step-by-Step Instructions
The Body and Head
We will work the body and head as one continuous piece. This gives our owl that classic, plump amigurumi look. Use your main purple yarn and a 2.0mm hook.
Rnd 1: 6 sc in a Magic Ring (6)
Rnd 2: 6 inc (12)
Rnd 3: (1 sc, inc) x 6 (18)
Rnd 4: (2 sc, inc) x 6 (24)
Rnd 5: (3 sc, inc) x 6 (30)
Rnd 6: (4 sc, inc) x 6 (36)
Rnd 7: (5 sc, inc) x 6 (42)
Rnd 8: (6 sc, inc) x 6 (48)
Note: This is the perfect time to cut a small plastic disc to fit the bottom of this piece. This will act as a stable base for your owl.
Rnd 9: Working in BLO, 48 sc (48)
Rnd 10: (7 sc, inc) x 6 (54). Work this round through both loops to begin shaping the sides.
Rnd 11: (8 sc, inc) x 6 (60)
Rnd 12-13: 60 sc (60)
Rnd 14: (9 sc, inc) x 6 (66)
Rnd 15: 66 sc (66)
Rnd 16: (10 sc, inc) x 6 (72)
Rnd 17: 72 sc (72)
Rnd 18: (11 sc, inc) x 6 (78)
Rnd 19-34: 78 sc for 16 rounds (78)
Now we begin to close the bottom of the body. Start stuffing the piece firmly with fiberfill.
Rnd 35: (11 sc, dec) x 6 (72)
Rnd 36: (10 sc, dec) x 6 (66)
Important Step: Inserting the Heart Wire
Between rounds 38 and 39, insert your wire stems. To keep them secure, make small loops at the ends of the wire and wrap them with a little tape or yarn, then embed them deeply into the body. Once the wire is in, continue stuffing the owl very tightly; this pressure is what keeps the wires from moving!
Rnd 37: (9 sc, dec) x 6 (60)
Rnd 38: (8 sc, dec) x 6 (54)
Rnd 39: (7 sc, dec) x 6 (48)
Rnd 40: (6 sc, dec) x 6 (42)
Rnd 41: (5 sc, dec) x 6 (36)
Rnd 42: (4 sc, dec) x 6 (30)
Rnd 43: (3 sc, dec) x 6 (24)
Rnd 44: (2 sc, dec) x 6 (18)
Rnd 45: (1 sc, dec) x 6 (12)
Fasten off, leaving a long tail for sewing the hole closed.
The Eyes
The eyes are what give the owl its personality. We will make two yellow outer circles and two black pupils.
Yellow Eyes
Using yellow yarn and a 2.0mm hook:
Rnd 1: 6 sc in a Magic Ring (6)
Rnd 2: 6 inc (12)
Rnd 3: (1 sc, inc) x 6 (18)
Rnd 4: (2 sc, inc) x 6 (24)
Rnd 5: (3 sc, inc) x 6 (30)
Rnd 6: (4 sc, inc) x 6, then sl st to close (36)
Fasten off, leaving a long tail for sewing. Repeat for the second eye.
Black Pupils
Using black yarn and a 2.0mm (or 1.5mm) hook:
Rnd 1: 6 sc in a Magic Ring (6)
Rnd 2: 6 inc (12)
Rnd 3: (1 sc, inc) x 6, then sl st to close (18)
Fasten off, leaving a tail for sewing.
The Feet
Use mustard/gold yarn and a 2.0mm hook. You will make three small components that are joined together.
Part 1 & Part 2 (Make two)
Rnd 1: 6 sc in a Magic Ring (6)
Rnd 2: (1 sc, inc) x 3 (9)
Rnd 3-5: 9 sc (9). Sl st to close and fasten off.
Part 3 (The connector)
Rnd 1: 6 sc in a Magic Ring (6)
Rnd 2: (1 sc, inc) x 3 (9)
Rnd 3-5: 9 sc (9). Do NOT fasten off.
Joining the foot: Attach Part 2 to Part 3 using a slip stitch. Work 5 sc into Part 2, then sl st to Part 1. Work 23 sc around the joined pieces (30 total).
Rnd 7: (3 sc, dec) x 6 (24)
Rnd 8: 24 sc (24)
Rnd 9: (2 sc, dec) x 6 (18)
Rnd 10: (1 sc, dec) x 6 (12)
Rnd 11-13: 12 sc (12)
Rnd 14: (1 sc, dec) x 4 (8)
Rnd 15: 2 dec (6). Fasten off and sew closed.
The Wings
Wings are worked in rows rather than rounds. Use the main purple yarn and a 2.0mm hook.
Wing Component 1
Row 1: Ch 6.
Row 2: 4 sc, 3 sc in the very last stitch, 4 sc, ch 1, turn (11)
Row 3: 4 sc, inc, 1 sc, inc, 4 sc (13). Fasten off.
Wing Component 2
Row 1: Ch 7.
Row 2: 5 sc, 3 sc in the last stitch, 5 sc, ch 1, turn (13)
Row 3: 5 sc, inc, 1 sc, inc, 5 sc (15). Fasten off.
Wing Component 3 (The Base)
Row 1: Ch 9.
Row 2: 7 sc, 3 sc in the last stitch, 7 sc, ch 1, turn (17)
Row 3: 7 sc, inc, 1 sc, inc, 7 sc (19). Do not fasten off.
To assemble the wing, you will crochet the other components into the edges of Component 3. Once the wing is shaped, you will make a second wing using the exact same method (mirroring the stitches) to ensure they are symmetrical.
The Heart Balloons
Use pink yarn and a 2.0mm hook. You can follow a standard small heart pattern found online. Once your hearts are finished, stuff them lightly. Slide the heart over the end of your prepared wire stems. You can wrap the wire in a spiral pattern to give it a more whimsical, “bouncy” look!
Finishing
This is where your owl truly comes to life! Assembly is key to a professional-looking amigurumi.
Assembly Steps:
- Eyes: First, sew the black pupils onto the center of the yellow circles. Then, sew the yellow eyes onto the body between rounds 21 and 33. Leave about 1.5 to 2 stitches of space between the eyes.
- Eye Detail: For a “eyelash” look, crochet a small chain of 37 stitches using a 2.5mm hook and glue/sew it around the outer edge of the yellow eye.
- Eyebrows: Use your embroidery thread to stitch two simple lines above the eyes.
- Beak: Use your mustard/gold yarn to stitch a small triangle shape between the eyes.
- Wings: Sew the wings onto the sides of the body between rounds 29 and 30. Only sew the very top corner of the wing to allow it to hang naturally.
- Feet: Sew the feet to the bottom of the body near the plastic base.
- The Sparkle: Use a tiny bit of white acrylic paint to add a small dot or line on the black pupils. This makes the eyes look “alive.”
- Decorations: You can glue tiny colorful hearts or beads to the sides of the owl for extra cuteness!
Tips for Success
- Tension is Everything: When working amigurumi, keep your tension tight. This prevents the white stuffing from peeking through your stitches.
- Use Stitch Markers: Since amigurumi is worked in continuous rounds, it is very easy to lose your place. Always use a marker to identify the first stitch of every round.
- Wire Safety: If you are making this for a small child, ensure the wire stems are completely encased in stuffing and the ends are tucked very deeply into the body so they cannot be reached.
- Symmetry: When sewing eyes and wings, take your time. Use a mirror if you need to, to ensure both sides look even.