Adorable Pink Crochet Crab Pattern: A Step-by-Step Amigurumi Tutorial
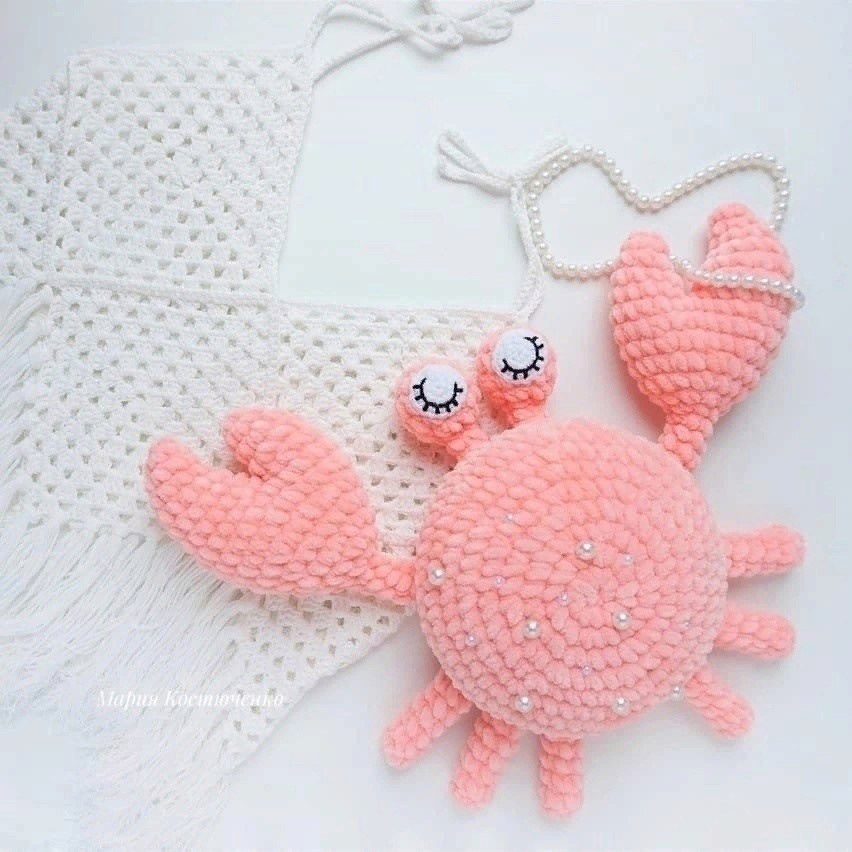
Are you looking for a new, squishy project to add to your collection of ocean-themed amigurumi? Look no further! This adorable pink crochet crab is the perfect project for both intermediate crocheters and ambitious beginners. With its bright color, oversized claws, and expressive eyes, this little crustacean is sure to bring a splash of summer joy to any nursery, shelf, or desk.
Crocheting amigurumi is a wonderful way to practice working in the round and mastering consistent tension. This pattern results in a charming little creature that measures approximately 13 inches diagonally and has a sturdy body width of about 6 inches. Whether you are making a gift for a little one or a cute companion for yourself, this crab is a delightful “sea miracle” that anyone would be proud to display.
Materials and Abbreviations
Before we dive into the stitches, let’s make sure you have everything you need on your crochet hook. Because amigurumi relies on a tight, dense fabric to keep the stuffing from peeking through, using the right weight of yarn and a smaller hook is essential.
Required Materials
- Main Yarn: Approximately 80 grams of medium-weight cotton or acrylic yarn in a bright pink shade.
- Accent Yarn: Approximately 10 grams of white yarn (for the eyes).
- Embroidery Floss: Black embroidery floss or thin black yarn for the pupils.
- Crochet Hooks: A 2.0mm (B) hook for the eyes and a 3.5mm (E) hook for the body and limbs.
- Stuffing: High-quality polyester fiberfill.
- Notions: A tapestry needle for sewing, sharp scissors, and stitch markers.
Common Abbreviations
This pattern uses standard US crochet terminology. Please ensure you are using US terms to avoid confusion with stitch heights.
- MR: Magic Ring (Amigurumi ring)
- ch: Chain
- sl st: Slip stitch
- sc: Single crochet
- inc: Increase (2 sc in one stitch)
- dec: Decrease (invisible decrease is preferred for amigurumi)
- st(s): Stitch(es)
Step-by-Step Crochet Instructions
As you work, remember to use stitch markers to keep track of your rounds. Amigurumi is worked in continuous spirals, so it is very easy to lose your place without a marker!
The Crab Body
The body is worked in a continuous spiral to create a rounded, spherical shape.
- Round 1: Make a Magic Ring and work 8 sc into the ring. (8)
- Round 2: 8 inc. (16)
- Round 3: (1 sc, inc) repeat 8 times. (24)
- Round 4: (2 sc, inc) repeat 8 times. (32)
- Round 5: (3 sc, inc) repeat 8 times. (40)
- Round 6: (4 sc, inc) repeat 8 times. (48)
- Round 7: (5 sc, inc) repeat 8 times. (56)
- Round 8: (6 sc, inc) repeat 8 times. (64)
- Rounds 9–12: sc in each stitch around. (64)
- Round 13: (6 sc, dec) repeat 8 times. (56)
- Round 14: (5 sc, dec) repeat 8 times. (48)
- Round 15: (4 sc, dec) repeat 8 times. (40)
- Round 16: (3 sc, dec) repeat 8 times. (32)
- Round 17: (2 sc, dec) repeat 8 times. (24)
- Round 18: (1 sc, dec) repeat 8 times. (16)
- Round 19: 8 dec. (8)
Fasten off, leaving a long tail for sewing. Stuff the body firmly with fiberfill before closing the hole completely.
The Claws
The claws are unique because they are constructed in two separate parts that are eventually joined to create the pincers. You will need to make two of these.
Part 1 (The Base of the Claw)
- Round 1: Ch 4, then work 4 sc in the 2nd ch from the hook. (4)
- Round 2: (inc, 1 sc) repeat twice. (6)
- Round 3: 2 inc, then 4 sc. (8)
- Round 4: 2 inc, then 6 sc. (10)
- Round 5: 2 inc, then 8 sc. (12)
Part 2 (The Pincer Extension)
- Round 1: Ch 4, then work 4 sc in the 2nd ch from the hook. (4)
- Round 2: (inc, 1 sc) repeat twice. (6)
- Round 3: 2 inc, then 4 sc. (8)
- Round 4: 2 inc, then 6 sc. (10)
- Round 5: 2 inc, then 8 sc. (12)
- Round 6: 2 inc, then 10 sc. (14)
- Round 7: 2 inc, then 12 sc. (16)
Joining the Claws
To form the claw, place Part 1 and Part 2 together. Join them using a single crochet (sc) in the side of the pieces, then continue working in a circle around both parts combined.
- Rounds 8–9: sc in each stitch around. (28)
- Round 10: (5 sc, dec) repeat 4 times. (24)
- Round 11: (4 sc, dec) repeat 4 times. (20)
- Round 12: (3 sc, dec) repeat 4 times. (16)
- Round 13: (2 sc, dec) repeat 4 times. (12)
- Round 14: (1 sc, dec) repeat 4 times. (8)
- Round 15: (dec, 2 sc) repeat twice. (6)
- Rounds 16–19: sc in each stitch around. (6)
Fasten off, leaving a tail for sewing. Stuff lightly.
The Back Legs
Make four identical legs.
- Round 1: Ch 4, work 6 sc in the 2nd ch from the hook. (6)
- Rounds 2–7: sc in each stitch around. (6)
Fasten off, leaving a tail for sewing.
The Eyes and Pupils
The eyes are composed of a white base and a smaller dark pupil to give the crab its character.
The White Eye Base
- Round 1: Ch 4, work 6 sc in the 2nd ch from the hook. (6)
- Round 2: 6 inc. (12)
- Rounds 3–4: sc in each stitch around. (12)
- Round 5: 6 dec. (6)
- Round 6: 1 dec, then 4 sc. (5)
- Rounds 7–9: sc in each stitch around. (5)
The Dark Pupils
Using your black embroidery floss or dark yarn and a 2.0mm hook:
- Round 1: Make a Magic Ring and work 8 sc into the ring. (8)
- Round 2: 8 inc. (16)
- Round 3: (1 sc, inc) repeat 8 times. (24)
Finishing
Now that all your pieces are ready, it is time to bring your crab to life! Assembly is the most important part of making amigurumi look professional.
Assembly Steps
- Eyes: Use your tapestry needle to sew the white eye bases onto the body. Once they are in place, sew the dark pupils into the center of the white circles. For a “cute” look, place them slightly further apart.
- Claws: Sew the two large claws to the front of the body. A good placement is around rows 12 and 13.
- Legs: Sew the four small legs to the bottom/sides of the body. Again, aiming for the row 12–13 level will give the crab a stable, balanced appearance.
- Final Check: Ensure all parts are securely attached and that the body is stuffed evenly so there are no lumps.
Tips
To ensure your crochet crab looks just like the pictures, keep these professional tips in mind:
- Tension is Key: When working amigurumi, try to keep your tension tight. If your stitches are too loose, the white stuffing will show through the pink yarn, which can look messy.
- Use the Invisible Decrease: Instead of a standard decrease, try the “invisible decrease” (inserting the hook into the front loops only of the next two stitches). This makes the decreases much smoother and harder to see.
- Stuffing Strategy: When stuffing the body, push the fiberfill into the corners and curves. If you leave air pockets, the crab might look lumpy rather than round.
- Symmetry: Before sewing, pin your eyes and claws in place with sewing pins. This allows you to step back and check if they are symmetrical before you commit to the permanent stitches.