Crochet Plush Cat Pattern: A Cute and Easy Amigurumi Tutorial
Introduction
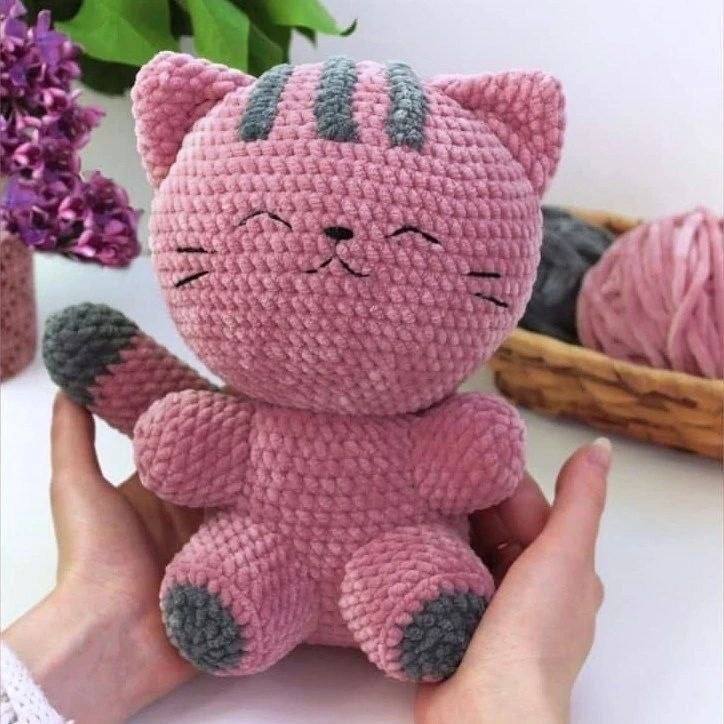
If you are looking for your next adorable crochet project, you have come to the right place! There is nothing quite as heartwarming as a handmade plushie, and this soft, chunky kitty is the perfect addition to any nursery, a sweet gift for a friend, or even a cute companion for your own desk.
This pattern is specifically designed to be worked with plush (chenille-style) yarn, which makes the finished result incredibly soft to the touch and gives it that “kawaii” aesthetic we all love. Because we are using thicker yarn, the project works up relatively quickly, making it a satisfying project even for those who are just beginning their amigurumi journey. In this tutorial, I will walk you through every single step, from creating the tiny paws to assembling that sweet, smiling face.
Materials and Abbreviations
Before we pick up our hooks, let’s make sure you have everything you need. Working with plush yarn can be a little different than standard cotton or acrylic, so having the right supplies is key to a successful project.
Materials Needed
- Crochet Hook: 3mm crochet hook (a smaller hook often helps keep the stitches tight so the stuffing doesn’t show through).
- Yarn: Plush/Chenille yarn. You will need:
- Main Color: Dusty Rose (approximately 1.5 skeins).
- Secondary Color: Gray (a small amount for stripes and details).
- Stuffing: High-quality polyester fiberfill.
- Tools: A yarn needle for sewing, scissors, and stitch markers (highly recommended for plush yarn).
Glossary of Terms
To keep things simple, we will use standard US crochet terminology. Please ensure you are following US terms to avoid confusion!
- MR: Magic Ring (also known as magic circle).
- Ch: Chain.
- Sc: Single Crochet.
- Inc: Increase (2 single crochets in the same stitch).
- 3-sc inc: 3 single crochets in the same stitch.
- Dec: Decrease (sc2tog – single crochet two together).
- BLO: Back Loop Only.
- Rep: Repeat.
Step-by-Step Instructions
The Body
The body is worked in an oval shape to create a sturdy, plump base for our kitty.
Start with a foundation chain of 12 ch.
- Round 1: (Inc, 9 sc, inc) rep 2 times. (26)
- Round 2: (2 inc, 4 sc, inc, 4 sc, 2 inc) rep 2 times. (36)
- Round 3: (sc, inc, 3 sc, inc, 6 sc, inc, 3 sc, inc, sc) rep 2 times. (44)
- Round 4: 44 sc in BLO (Back Loops Only).
- Rounds 5–17: 44 sc. (13 rounds total)
- Round 18: (2 sc, dec, 3 sc, dec, 6 sc, dec, 3 sc, dec) rep 2 times. (36)
- Round 19: sc, 2 dec, (sc, dec) rep 2 times, 2 sc, (dec, sc) rep 2 times, 2 dec, (sc, dec) rep 2 times, 2 sc, dec, sc, dec. (24)
Fasten off the yarn, leaving a long tail for sewing.
The Head
The head is a large, round sphere. We will start with a small chain and build outward.
Start with a foundation chain of 7 ch.
- Round 1: 5 sc, 3-sc inc, 4 sc, inc. (14)
- Round 2: inc, 4 sc, 3 inc, 4 sc, 2 inc. (20)
- Round 3: inc, 6 sc, 4 inc, 6 sc, 3 inc. (28)
- Round 4: (inc, 8 sc, inc, sc, 2 inc, sc) rep 2 times. (36)
- Round 5: (inc, 10 sc, inc, sc, inc, 2 sc, inc, sc) rep 2 times. (44)
- Round 6: 44 sc.
- Round 7: inc, 12 sc, (inc, 2 sc) rep 3 times, inc, 12 sc, (inc, 2 sc) rep 3 times. (52)
- Round 8: 52 sc.
- Round 9: 2 sc, inc, 10 sc, (inc, 2 sc) rep 5 times, inc, 10 sc, (inc, 2 sc) rep 4 times, inc. (64)
- Round 10: 64 sc.
- Round 11: 2 sc, inc, 15 sc, (inc, 3 sc) rep 4 times, inc, 15 sc, inc, (3 sc, inc) rep 3 times, sc. (74)
- Rounds 12–18: 74 sc. (7 rounds total)
- Round 19: sc, dec, 15 sc, (dec, 3 sc) rep 4 times, dec, 15 sc, dec, (3 sc, dec) rep 3 times, 2 sc. (64)
- Round 20: 64 sc.
- Round 21: (dec, 2 sc) rep 4 times, dec, 10 sc, (dec, 2 sc) rep 5 times, dec, 10 sc, dec, 2 sc. (52)
- Round 22: 52 sc.
- Round 23: (2 sc, dec) rep 3 times, 12 sc, (dec, 2 sc) rep 3 times, dec, 12 sc, dec. (44)
- Round 24: 44 sc.
- Round 25: sc, dec, 2 sc, dec, sc, dec, 10 sc, dec, sc, dec, 2 sc, dec, sc, dec, 10 sc, dec. (36)
- Round 26: 36 sc.
- Round 27: sc, 2 dec, (sc, dec) rep 2 times, 2 sc, (dec, sc) rep 2 times, 2 dec, (sc, dec) rep 2 times, 2 sc, dec, sc, dec. (24)
- Round 28: 24 sc.
Fasten off and leave a long tail for sewing.
The Legs (Make 2)
The legs include a little gray tip to give them character.
- Round 1: 6 sc in MR. (6)
- Round 2: 6 inc. (12)
- Round 3: (sc, inc) rep 6 times. (Change to Main Color here). (18)
- Round 4: (2 sc, inc) rep 6 times. (24)
- Round 5: 24 sc in BLO.
- Rounds 6–10: 24 sc. (24)
Fasten off and leave a tail for sewing.
The Ears (Make 2)
These small, triangular ears add so much cuteness!
- Round 1: 5 sc in MR. (5)
- Round 2: 5 inc. (10)
- Round 3: 10 sc.
- Round 4: (sc, inc) rep 5 times. (15)
- Round 5: (2 sc, inc) rep 5 times. (20)
- Round 6: 20 sc.
- Round 7: (3 sc, inc) rep 5 times. (25)
Fasten off and leave a tail for sewing.
The Arms (Make 2)
- Round 1: 6 sc in MR. (6)
- Round 2: 6 inc. (12)
- Round 3: (sc, inc) rep 6 times. (18)
- Rounds 4–8: 18 sc. (18)
Fasten off and leave a tail for sewing.
The Tail
The tail features a fun striped pattern using both your main and secondary colors.
- Round 1: 5 sc in MR using Secondary Color. (5)
- Round 2: 5 inc. (10)
- Round 3: (sc, inc) rep 5 times. (15)
- Rounds 4–6: 15 sc in Secondary Color. (15)
- Rounds 7–13: 15 sc in Main Color. (15)
- Rounds 14–18: 15 sc in Secondary Color. (15)
- Rounds 19–25: 15 sc in Main Color. (15)
- Rounds 26–30: 15 sc in Secondary Color. (15)
- Rounds 31–34: 15 sc in Main Color. (15)
Fasten off and leave a long tail for sewing.
The Stripes (Make 3)
These little gray strips will be sewn onto the head to complete the kitty look.
Using the Secondary Color (Gray):
- Start with a foundation chain of 15 ch.
- In the 2nd chain from the hook, make an increase.
- Continue with 12 sc.
- In the very last chain, work 3 sc.
Fasten off, leaving a long tail for sewing.
Finishing
Now for the most exciting part: assembly! This is where your individual pieces transform into a cute little cat.
Step 1: Stuffing
Before sewing the pieces together, make sure to stuff the body, head, legs, arms, and tail firmly with polyester fiberfill. For the head, ensure the stuffing is even so it remains perfectly round.
Step 2: Sewing the Limbs
- Legs: Sew the legs to the bottom of the body between Rounds 4 and 10.
- Arms: Sew the arms to the sides of the body between Rounds 11 and 17.
- Tail: Sew the tail to the back of the body.
Step 3: The Face and Details
- Ears: Sew the ears to the top of the head.
- Stripes: Sew the three gray stripes onto the top of the head.
- Face: Using a black embroidery thread or thin yarn, embroider a cute little face in the center of the head. A simple “w” shape for the mouth and two curved lines for closed, happy eyes work beautifully!
Tips
Working with plush yarn is a wonderful experience, but it does come with a few unique challenges. Here are some professional tips to help you achieve a perfect result:
- Mind Your Tension: Plush yarn can be slippery and bulky. Try to maintain a consistent tension, but don’t pull so hard that you distort the stitches.
- Use Stitch Markers: It can be very difficult to see where a round begins and ends when working with thick chenille yarn. Always use a stitch marker to stay on track.
- Hide Your Ends: When fastening off, use your yarn needle to weave the ends deep into the stuffing or the body of the plushie. This prevents the ends from popping out later.
- Avoid “Show-Through”: If you can see the stuffing through your stitches, your tension might be too loose, or you may need to use a slightly smaller hook. Tightening your stitches will give the plushie a professional, polished look.
Happy crocheting! I can’t wait to see your adorable plush cats!